- Fehlersuche und -behebung - WeDo 2.0 on Windows 7
WeDo 2.0 on Windows 7
Q: How do I install WeDo 2.0 on Windows 7?
A: To install WeDo 2.0 on Windows 7 please follow these steps:
Step 1
Plug the USB BLE Dongle into the available USB Port. It’s recommended to perform this step before running the WeDo 2.0 Installer.
Step 2
The Dongle will be recognized by Windows 7 in most cases as a Generic BLE Device. This is perfectly normal.
Step 3
Run the installer. Follow the steps until a screen is presented requesting a restart. If the user is asked to approve the installation of third-party drivers during the installation, it’s required to accept. Otherwise the Dongle will not work.
Step 4
The driver is installed through:
- PnPutil
- Microsoft PnP Utility embedded in Windows.
- DPinst
- Driver Package Installer, part of Windows Driver Kit.
- Distributed along with the installer as allowed and advised by Microsoft's license.
To guarantee correct installation on most systems, it's absolutely essential that the computer be restarted before attempting to run WeDo 2.0
Step 5
Run WeDo 2.0 After restart, WeDo 2.0 can be accessed.
Q: What if my Windows 7 device does not have Bluetooth Low energy?
A: It’s important to know that running WeDo 2.0 requires Bluetooth Low Energy (BLE) support. Windows 7 hardware typically doesn't come with BLE support. BLE should be viewed as a separate capability from the more widely known Bluetooth. For Windows 7, the only supported BLE Hardware is the recommended Bluegiga Bluetooth Low Energy Dongle Model BLED112. No other type of BLE hardware is supported for WeDo 2.0 on Windows 7.
Q: The dongle fails to connect to the WeDo 2.0 hub. The hub cannot be seen inside the WeDo Connection Center. What do I do?
A: We recommend you attempt the following steps. Before attempting any of the following steps, ensure that the WeDo 2.0 application is shut down and not running.
Step 1
Verify the Dongle is installed correctly: Open Device Manager on the Windows 7 device. The Dongle has to be listed under ”Ports (COM & LPT)” as ”Bluegiga Bluetooth Low Energy”.
Step 2
The cause may also be related to the specific USB port. Try unplugging the dongle and reconnecting it to another USB port. Observe that Windows recognize the device and it is listed correctly in Device Manager. It’s recommended to restart the machine after attempting this action before running WeDo 2.0 again.
Step 3
Verify there are no COM-port Conflicts. Observe this example image of Device Manager.
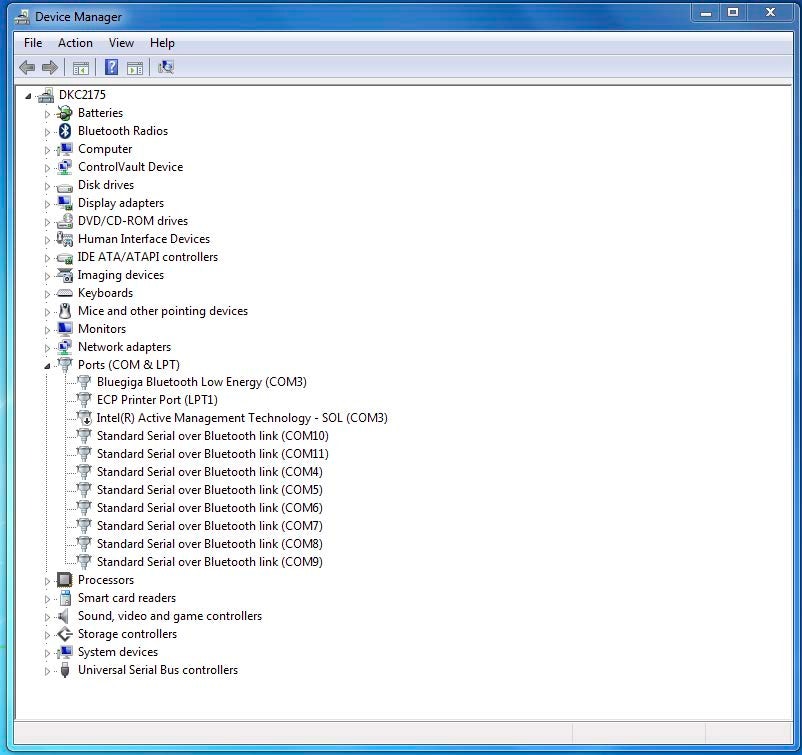
Notice how ”Bluegige Bluetooth Low Energy” incorrectly has been assigned by Windows on COM 3 while ”Intel® Active Management Technology – SOL” also has been assigned to COM 3. This may happen in rare cases on specific system configurations.
To change this, select the Bluegiga Bluetooth Low Energy device, right click and select properties.
Then select the ”Port Settings” Fan.
In the Port Settings, select ”Advanced”
Under “Advanced” select a new Com port under ”COM Port Number”.
The used Com Ports will be listed in the drop down as ”In Use”.
Select a new COM port that is not in Use.
Click ok and return to the Device manager.
Verify that the Bluegiga Bluetooth Low Energy no longer shares COM port with any other device.
After this, restart the computer. After having restarted, run WeDo 2.0 Again.
