Automatic Headlights
Design car features that will improve nighttime driving safety.

Connect
(5 minutes)

Ignite a classroom discussion around the following questions:
- What are the dangers of driving at night?
- How can we define the concept of ambient light?
- How can drivers be assisted in their nighttime driving?
Tell the students that during this lesson they will be exploring how changes in ambient light can trigger reactions in programs, and that control of a program through a decision is an example of Boolean logic.
Allow the students to select the tool(s) they find most appropriate for capturing and sharing their ideas. Encourage them to document their thoughts using text, videos, images, sketchnotes, or another creative medium.
Construct
(15 to 30 minutes)
Build
Students will construct the Robot Educator base model, and then they will add the Color Sensor pointing forward.
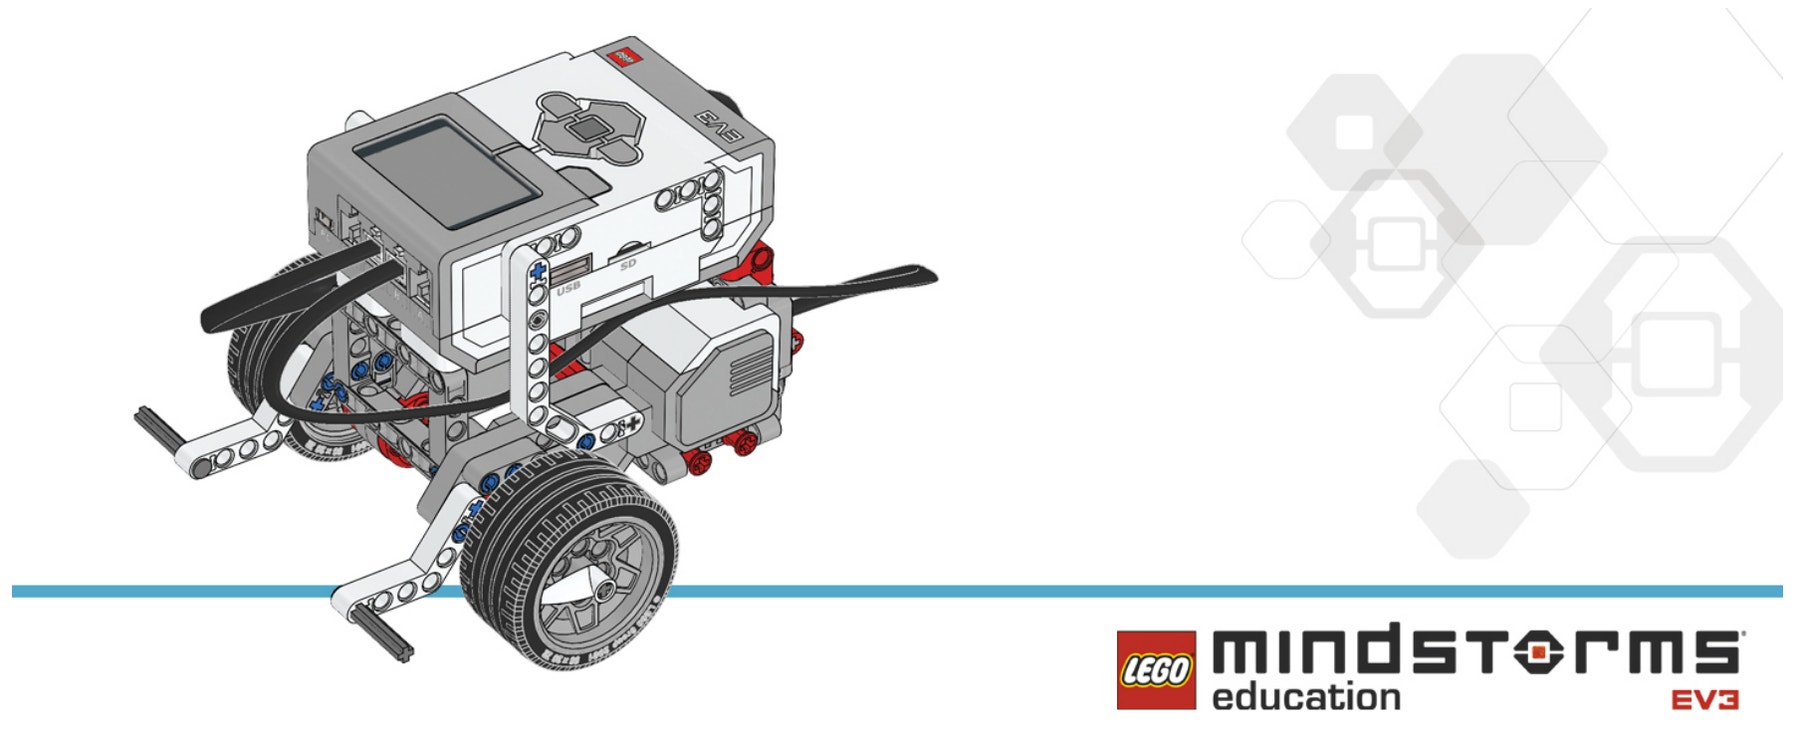
Have the students perform the following building check before they program their robots:
- Are the wires correctly connected from the motors to ports B and C?
- Are the wheels correctly installed?
- Are the wheels rotating freely?
- Are the wires correctly connected from the Color Sensor to 3?
Program
Have the students begin a new project in the EV3 programming environment.
Introduce the Color Sensor and demonstrate to the students that it has three modes:
– Color, which detects LEGO® system colors
– Ambient Light Intensity, which detects light levels
– Reflected Light Intensity, which measures the light from the Color Sensor that is reflected off of a nearby surface back to the sensor
Have the students write a program using the Color Sensor in Compare Ambient Light Intensity mode to simulate automatic headlights.
Students can use various methods to simulate the headlights, such as:
- Displaying an image of a light bulb on the EV3 Brick Display
- Using colors of the on the EV3 Brick
Allow the students to select the tool(s) they find most appropriate for capturing and sharing their pseudocode. Encourage them to use text, videos, images, sketchnotes, or another creative medium.
POSSIBLE SOLUTION: AUTONOMOUS AMBIENT LIGHT DETECTION

- Start the program.
- Wait for the level of ambient light intensity to drop below 15.
- Show a light bulb on the EV3 Brick Display.
- Wait for 5 seconds.
Note
Refer students to the Robot Educator Tutorials for further assistance.
In the EV3 Software :
Robot Educator > Basics > Loop
Robot Educator > Hardware > Color Sensor - Light
Robot Educator > Beyond Basics > Multitasking
Robot Educator > Hardware > Brick Display
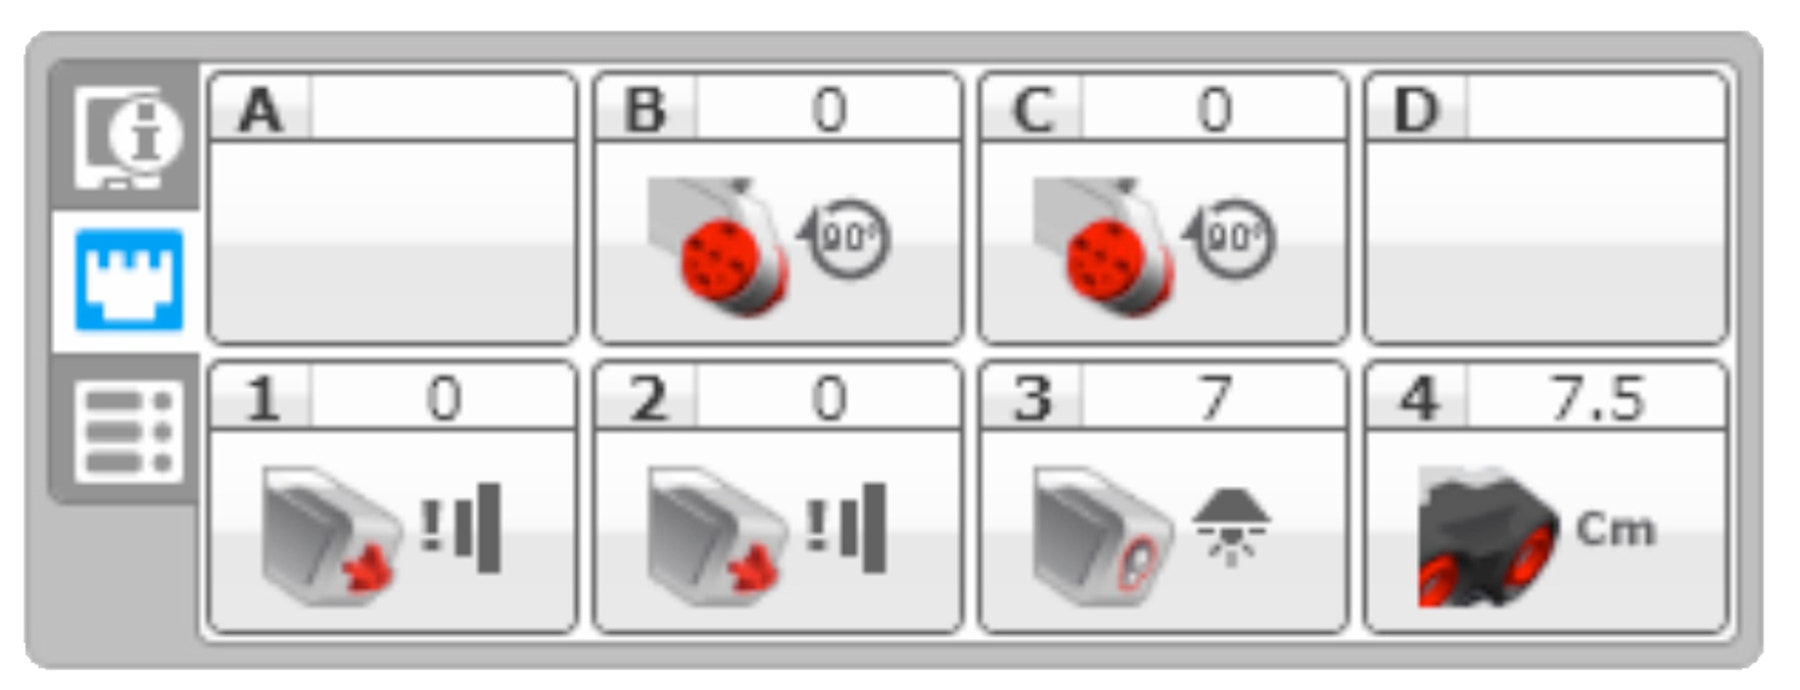
Show the students how to use the Port View in the EV3 Software to take readings of ambient light (e.g., Port View showing ambient light intensity, port 3).
Explain that they will be exploring how loops work and how to incorporate these into their programs.
Explain the concept of a loop and how it can be used to make programs run indefinitely, until manually stopped.
Setup
Have students point a flashlight at the Color Sensor to create a change in ambient light luminosity.
Contemplate
(35 minutes)
Students will create a program that reacts to changes in ambient light intensity, and which simulates automatic headlights more closely. The program will need to turn the lights on when it becomes dark and turn the lights off when it becomes light again.
Highlight that the ambient light intensity settings in their programs will need to be constantly monitored and debugged to ensure that the program is operating correctly.
POSSIBLE SOLUTION: REACT TO AMBIENT LIGHT DETECTION

- Start the program.
- Wait for the level of ambient light intensity to drop below 15.
- Show a light bulb on the EV3 Brick Display.
- Wait for the level of ambient light intensity to rise above 15.
- Reset the EV3 Brick Display.
- Repeat steps 2 to 5 forever.
Differentiation option
- Students will use multitasking/parallel programming to simulate automatic and manual light switches.They can use a Touch Sensor or the Brick Button to simulate the manual switch.Using the Touch Sensor or the Brick Button as a manual override introduces students to the use of Boolean logic.
- Demonstrate to the students how to drag a “wire” from the Start Block in order to create a parallel program (i.e., multitasking).
- Show the students the Loop Interrupt Block and explain that we can use this block to stop whatever is happening within the loop in the parallel program.
POSSIBLE SOLUTION: MANUAL CONTROL OVER AUTONOMOUS AMBIANT LIGHT DETECTION
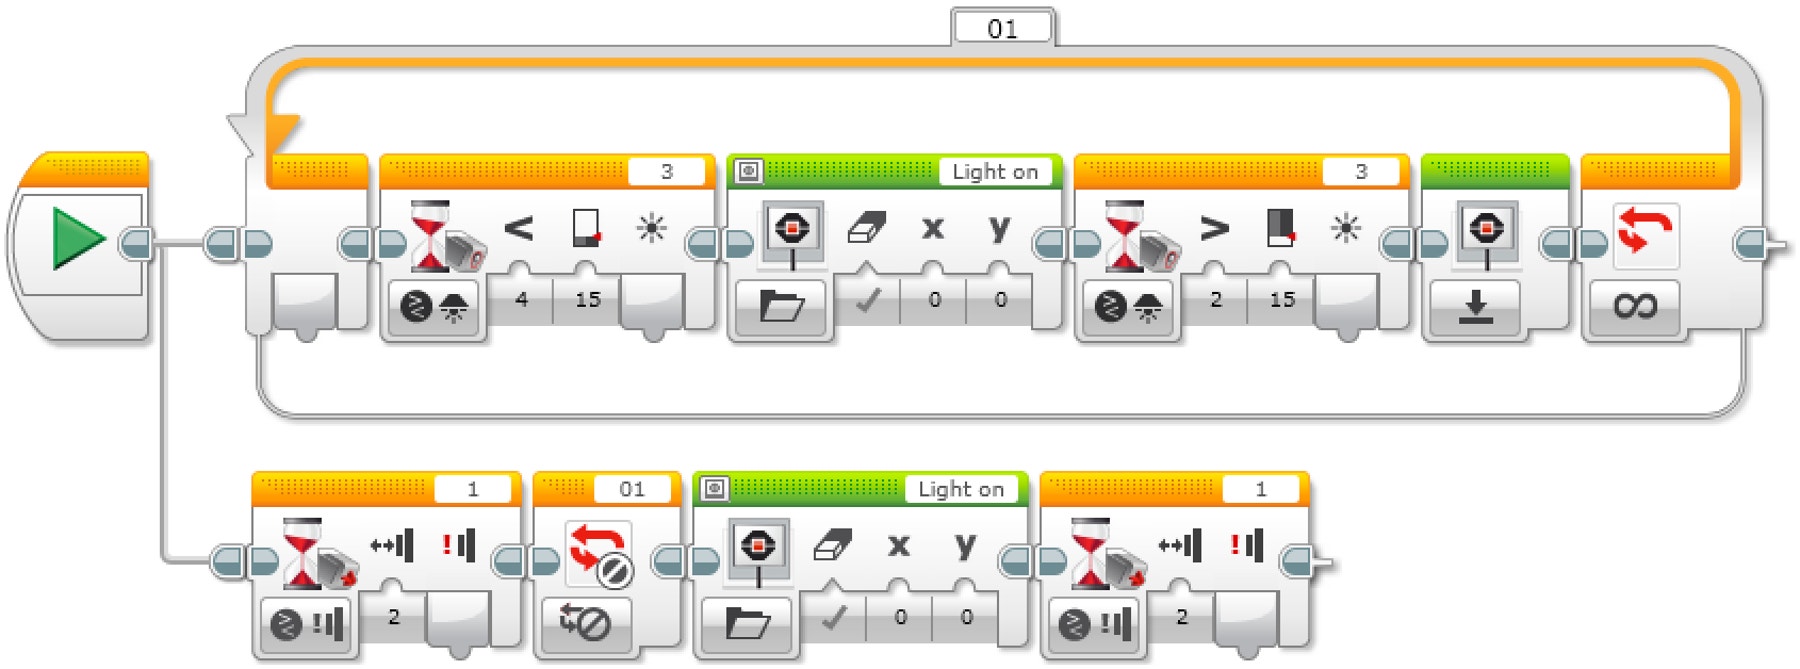
- Start the program.
TASK 1
2. Wait for the level of ambient light intensity to drop below 15.
3. Show a light bulb on the EV3 Brick Display.
4. Wait for the level of ambient light intensity to rise above 15.
5. Reset the EV3 Brick Display.
6. Repeat steps 2 to 5 of Task 1 forever.
TASK 2
7. Wait for the Touch Sensor (simulating the manual light switch) to be “bumped”.
8. Interrupt the Loop named “01” (override the automatic program).
9. Show a light bulb on the EV3 Brick Display.
10. Wait for the Touch Sensor to be “bumped” again (the light will go off because the program ends).
Share
- Allow the students to select the tool(s) they find most appropriate for capturing and sharing their creations, unique thinking, and learning process. Encourage them to use text, videos, images, sketchnotes, or another creative medium.
- Ask one or two groups to demonstrate their programs.
- Ask your students to share what they expected to happen vs. what actually happened with their programs.
- Ask them whether anything about the results of their programs surprised them.
Assessment Opportunity
Specific rubrics for assessing computational thinking skills can be found under 'Assessment'.
Continue
(45 minutes)
Using Text-Based Programming
Have the students explore text-based programming solutions so they can compare different programming languages.
Swift Playground: POSSIBLE SOLUTION
/*
NOTE: Display file used in this example is not the same has RobotC exemple
*/

ev3.WaitForLightAmbient(on: .three, lessThanOrEqualTo: 15)
ev3.displayImage(named: .awake)
ev3.WaitFor(seconds : 5)
ROBOT C: POSSIBLE SOLUTION
#pragma config(Sensor, S1, touchSensor, sensorEV3_Touch)
#pragma config(Sensor, S4, sonarSensor, sensorEV3_Ultrasonic)
#pragma config(Motor, motorB, rightMotor,tmotorEV3_Large, PIDControl, driveRight, encoder)
#pragma config(Motor, motorC, leftMotor, tmotorEV3_Large, PIDControl, driveLeft, encoder)
/*
Create a program that turns on the lights automatically using the Color Sensor when the ambient light level drops below a certain level.
*/
task main()
{
//Wait for the level of ambient light intensity to drop below 15. while(getColorAmbient(colorSensor) >= 15)
{ //Do nothing while we’re waiting.
sleep(1);
}
//Display Image “Light on” on the LCD Screen.
drawBmpfile(0, 127, “Light on”);
//Stay on for 5 seconds.
sleep(5000);
}
경고! 위험할 수 있습니다!
LEGO Education has no ownership of the ROBOTC platform and does not provide any support or guarantee of the quality of the user experience and technology used. All required set up information is provided by ROBOTC at robotc.net. We recommend always to reinstall the official LEGO MINDSTORMS EV3 Brick firmware when you finish using other programming languages.
Other Program Solutions
Swift Playground: POSSIBLE SOLUTION
/*
Display file used in this example are not the same has RobotC exemple
*/

While true
{
ev3.WaitForLightAmbient(on: .three, lessThanOrEqualTo: 15)
ev3.displayImage(named: .awake)
ev3.WaitForLightAmbient(on: .three, greaterThanOrEdualTo: 15)
ev3.display(text: “.”)
}
ROBOT C: POSSIBLE SOLUTION
Swift Playground: POSSIBLE SOLUTION
ev3.move (left Port: .b, rightPort: .c, leftPower: 20, rightPower: 20)
ev3.WaitForLightColor (on: .three, color: .red)
ev3.stopMove(leftPort: .b, rightPort: .c)
ROBOT C: POSSIBLE SOLUTION
교사 지원
Students will:
Explore the concept of Inputs and the way to control them.
Explore the concept of a Wait for function.
LEGO® MINDSTORMS Education EV3 Core Set
EV3 Software or Programming App
ROBOTC software (optional)
Direct light source (e.g., flashlight)
NGSS
MS-ETS1-1. / MS-ETS1-2. / MS-ETS1-3. /MS-ETS1-4.
CSTA
2-A-2-1 / 2-A-7-2 / 2-A-7-3 / 2-A-7-4 / 2-A-5-5 / 2-A-5-6 / 2-A-3-9 / 2-A-6-10 / 2-C-7-11 / 2-C-4-12 / 2-D-5-16 / 2-I-1-20


