Bobsleigh
The crowd cheers as bobsleighs zoom down the ice track! What sets the winner apart?
Grab your crash helmet and get ready to ride a bobsleigh to find out!
Prepare
- Review the online pupil material. Use a projector to share this material with your pupils during the lesson.
- Make sure that you have covered how to make predictions in an earlier lesson.
- Consider the abilities and backgrounds of all your pupils. Differentiate the lesson to make it accessible to everyone. See the Differentiation section below for suggestions.
Engage
(Whole Class, 5 Minutes)
- Watch the pupil video here or access it via the online pupil material.
- Facilitate a quick discussion about which forces the pupils have seen in action when they have been sledging or watching sledging or bobsleighing.
- Ask questions like these:
- Which force makes the bobsleigh move? (Push)
- What else makes the bobsleigh move? (Gravity is the force that pulls the mass down. The more mass an object has, the faster it will move. This is called ‘momentum’. Momentum will make an object in motion stay in motion longer or give it more force. So, if you add mass, you get more momentum. And that makes the bobsleigh slide farther.)
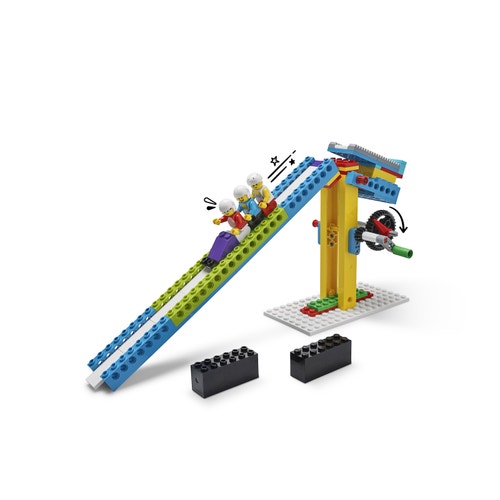
- Tell the pupils that they are going to build a bobsleigh and ice track, and explore how they can make the bobsleigh go farther by increasing its mass.
Explore
(Small Groups, 30 Minutes)
- Have the pupils work in pairs to build the Bobsleigh model. Tell them to take turns, one partner searching for the bricks while the other builds, switching roles after each step has been done.
- You can find building help in the Tips section below.
- Have the groups stop building after 20 minutes or when all the groups have built at least the bobsleigh and weights, and have completed the ice track up to step 23 on page 51 in the building instructions book.
- Have the pupils test the ice track with the Minifigures and bobsleigh. Tell them to hold the bobsleigh at the purple marker at the top of the ice track and let it go. The groups that were able to complete the ice track and launcher can turn the handle to launch the bobsleigh.
- Ask them to use a measuring tape to measure the distance that the bobsleigh travelled from the base of the ice track. Tell them to record the distance on their Student Worksheets (Teacher Support – Additional Resources) or a chart in their notebooks.
- To ensure fair testing, have the pupils repeat the test 3 times and use the middle value as the final measured distance. Tell them to place a brick next to the measuring tape to mark the distance that was travelled in each run.
- If the pupils have not already built the launcher, and if time permits, ask them to build it now.
Explain
(Whole Class, 10 Minutes)
- Gather your pupils together and facilitate a group discussion about what they have observed.
- Ask questions like these:
- Which force made the bobsleigh slide down the ice track? (Gravity)
- What other variable*(s)* can help a bobsleigh go faster and farther down the ice track? (A good push at the start will help, and a heavier bobsleigh has the advantage. A smooth bottom to the bobsleigh and a smooth ice track will reduce friction.)
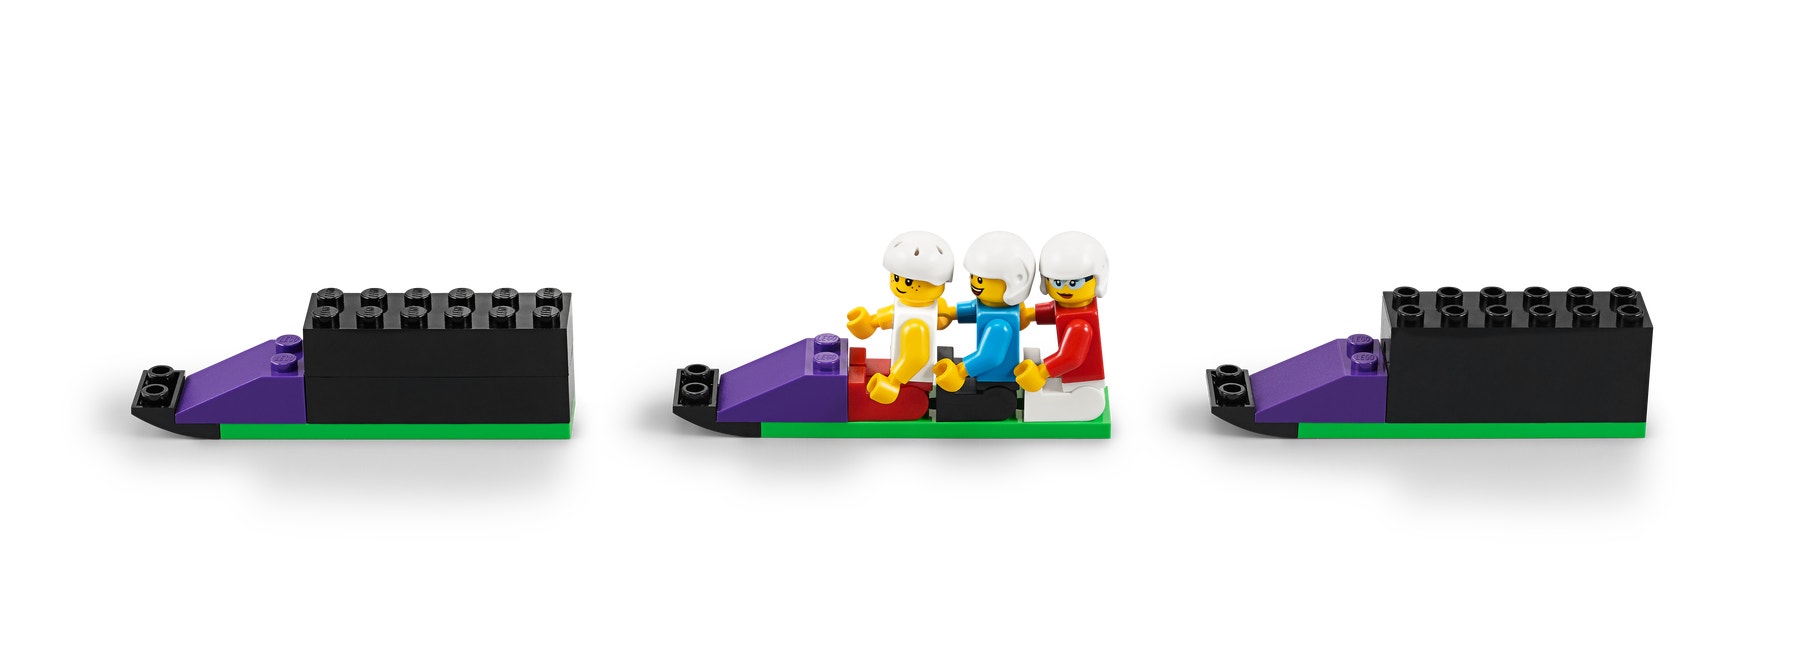
- Tell the pupils to hold the Minifigures in one hand and the 2 connected black bricks in the other.
- Ask them which is heavier (i.e. has more mass) and which will slide farther.
- Have the pupils use a brick to mark their predictions and then test to see if they were right.
- Ask them to use a measuring tape to measure the distance travelled and then fill in their charts.
- Tell them to take the weighted brick and compare it to the black bricks they have just tested.
- Have the pupils use another brick to mark their predictions and test again to see if they were right.
- Ask:
- How is it different? (weight/mass)
- How is it the same? (volume, colour)
- Will it go farther? (It should. However, if the surface is not smooth, it will create more friction and travel a shorter distance.)
Elaborate
(Whole Class, 5 Minutes)
- Gather the pupils together to review and discuss their experiments.
- Ask questions like these:
- Did you recognise any patterns in the motion of the bobsleigh as you changed its mass? (The heaviest mass slid the farthest.)
- Were you able to predict what would happen next?
- Allow time for the pupils to disassemble their models, sort the bricks back into the trays and tidy up their workstations.
Evaluate
(Ongoing Throughout the Lesson)
- Encourage them to explore the model's movement as they build it. Ask questions like these:
- Can you find the hand crank?
- What does it do when you turn it?
- How many turns does it take to tip the top of the ice track?
- Ask guiding questions to encourage them to ‘think aloud’ and explain their thought processes and reasoning in the problem-solving decisions they have made when building their models.
Observation Checklist
- Measure your pupils’ proficiency in describing the pattern in the motion of an object and how this pattern can be used to predict its future motion.
- Establish a scale that suits your needs. For example:
- Requires additional support
- Can work independently
- Can teach others
Self-Assessment
- Have each pupil choose the brick that they feel best represents their performance.
- Green: I think I can recognise a pattern in the motion of the bobsleigh.
- Blue: I know I can recognise a pattern in the motion of the bobsleigh.
- Purple: I can recognise a pattern in the motion of the bobsleigh and use this pattern to predict future motion. I can also help a friend to understand.
Peer Feedback
- In their teams, have the pupils discuss their experiences working together.
- Encourage them to use statements like these:
- I liked it when you…
- I'd like to hear more about how you…
Teacher Tips
Model Tips
- To test their models, the pupils will require a smooth flat surface that is at least one meter long. Ideally, everyone should test on the same surface because the results will vary on wood, tile, paper, carpet, etc. due to the differences in the coefficient of friction.
- The pupils should use a strip of tape to mark a spot or identify a mark on the table or floor that they can use to align the ice track to ensure that it stays in the same position each time that they test.
Differentiation
Simplify this lesson by:
- Having your pupils work with just the bobsleigh and weighted brick (i.e. do not build past step 23 on page 51)
Increase the difficulty by:
- Asking your pupils to free-build something that will make the bobsleigh go farther (e.g. a heavier bobsleigh, something to reduce friction [e.g. wheels], a taller ice track, something to give a push at the top)
- Challenging the pupils to design and build something to start their bobsleighs with a running push at the top of the ice track
- In bobsleigh competitions, the winners optimise their mass and start with the strongest, fastest push at the top of the track. After learning about mass, your pupils can try to make something that gives a strong push to make their bobsleighs travel even farther.
Extensions
(Note: This will require additional time.)
To incorporate the development of maths skills, have your pupils weigh the different bobsleigh configurations. Have them create a chart in which the vertical axis is the weight of the different bobsleighs, and the horizontal axis is the distance travelled by the bobsleighs. Ask them to repeat each test 5 times and to plot the results on their charts using a dot. Facilitate a discussion about how much variation they observed, and the relationship between weight and the distance travelled.
National Curriculum Maths: Ma3/3.1 Measurement
National Curriculum Maths: Ma3/4.1 Measurement
Teacher Support
The pupils will:
- Explore how gravity affects the motion of bobsleighs based on mass
- Observe a pattern and make predictions
- Understand the difference between mass and volume
- LEGO® Education BricQ Motion Essential Sets (one for every two pupils)
- Masking tape
- Measuring Tape (one per group)
ACSSU076
Forces can be exerted by one object on another through direct contact or from a distance
ACSIS069
Reflect on investigations, including whether a test was fair or not
ACMMG084
Use scaled instruments to measure and compare lengths, masses, capacities and temperatures


