Cruise Control
Design a cruise control program to assist drivers by making their driving experience less stressful.

Connect
(5 minutes)
During this lesson, you will introduce the students to variables. The students will use this information to create a cruise control feature for their wheeled robots. Pressing the Touch Sensor will increase the speed of the robot.
Ignite a classroom discussion around the following questions:
- What factors can make drivers feel stressed while driving?
- How can we help improve drivers’ safety during long drives?
Ask the students what they think the plus and minus buttons mean on a steering wheel. Discuss how these can adjust the speed of the car.
Allow the students to select the tool(s) they find most appropriate for capturing and sharing their ideas. Encourage them to document their thoughts using text, videos, images, sketchnotes, or another creative medium.
Construct
(15 to 30 Minutes)
Build
Students will construct the Robot Educator base model, and then they will add two Touch Sensors.
Tell the students that today’s task will utilize two Touch Sensors to control and maintain the speed of their robot.
Have the students perform the following building check before they program their robots:
- Are the wires correctly connected from the motors to ports B and C?
- Are the wheels correctly installed?
- Are the wheels rotating freely?
Program
Have the students begin a new project in the EV3 programming environment.
Expand on the students’ understanding of the Variable Block. Explain that it is a programming block that can store data (text, logic, a numeric, or arrays), which can be overwritten at any time while the program is running.
Explain that this block has to be read and then written to, using the Math, Text, or Array Operations Blocks.
The students will need to program their robot so that, once moving, it can be sped up by pressing the Touch Sensor. Code blocks for controlling the Touch Sensor (wait) should be placed inside a loop.
Allow the students to select the tool(s) they find appropriate for capturing and sharing their pseudocode. Encourage them to use text, videos, images, sketchnotes, or another creative medium.
POSSIBLE SOLUTION
FILENAME: CODING-07.EV3 (TAB: 1)

INCREASE SPEED WITH VARIABLE
- Start the program.
- Create a Variable Block called “Speed” and enter a value of 0.
- If the Touch Sensor is pressed:
a. Read the variable called “Speed”
b. Add 10 to the read value
c. Write the result in the variable called “Speed”
d. Read the variable called “Speed”
e. Start motors B and C at a speed set to the value stored in the variable called “Speed”
ELSE
(Do nothing) - Repeat steps 3a to 3e forever.
Note
Refer students to the Robot Educator Tutorials for further assistance. In the EV3 Software:
Robot Educator > Beyond Basics > Variables
Robot Educator > Tools > My Blocks
Robot Educator > Basics > Straight Move
Robot Educator > Beyond Basics > Multitasking
Robot Educator > Beyond Basics > Loop
Robot Educator > Beyond Basics > Data Wires
Robot Educator > Beyond Basics > Math – Basic
Explain that the students will be using the Variable Block today.
You might wish to explain to the students the difference between a constant and a variable.
- A constant is used to provide values in a program over and over again. These fixed values can only be edited by the user when the program is not running.
- A variable is a way of storing values in a program that can be used in that program. The difference here is that the value can be overwritten time and time again as the program is running.
You may want to show the Constant Block in action with the Move Steering Block and Display Block.
Show students how to use the Variable Block, and get them to create a program that contains a variable.
Contemplate
(35 minutes)
With the first program written and the robot accelerating when the Touch Sensor is pressed, ask the students to think about how they would extend the program to slow the robot down.
One solution could be to have a second unlimited loop similar to the loop used in the first programming exercise. This loop would use a different Touch Sensor port (another sensor added).
The Math Block would be changed to subtract rather than add.
Remind the students about multitasking and tell them that they will need to use their knowledge of this type of programming in this lesson.
POSSIBLE SOLUTION
FILENAME: CODING-07.EV3 (Tab: 2)
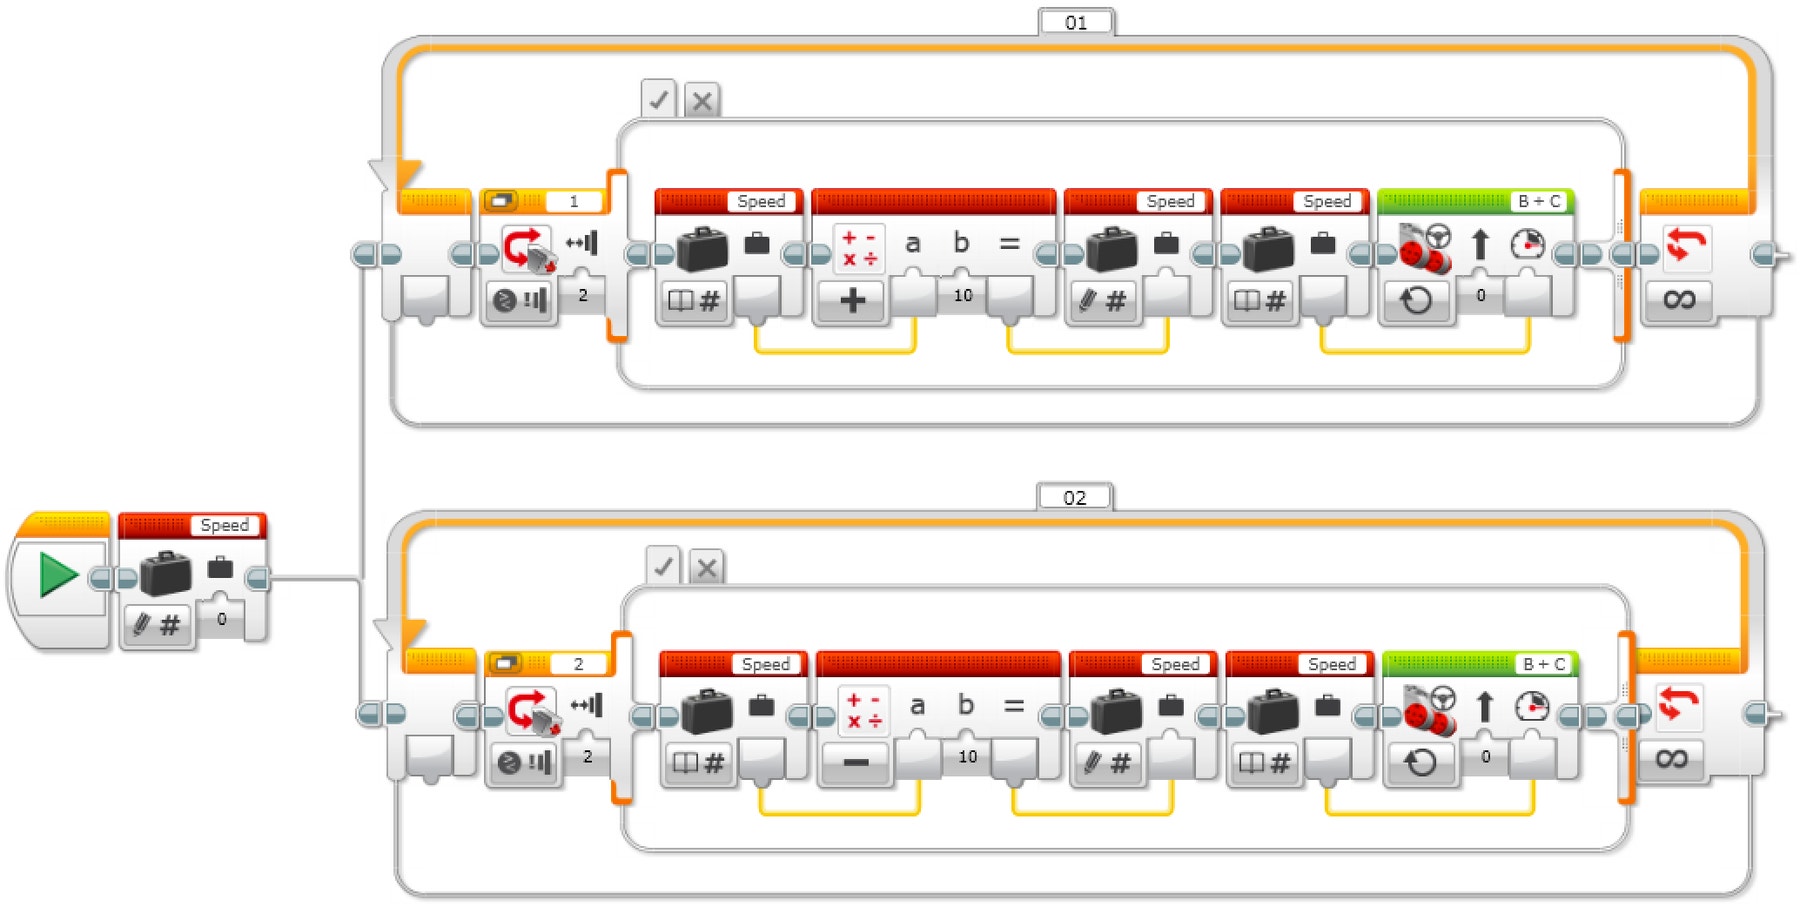
INCREASE AND DECREASE SPEED WITH VARIABLE
- Start the program.
- Create a Variable Block called “Speed”, enter a value of 0, and start two tasks.
TASK 1
3. If Touch Sensor 1 is pressed:
a. Read the variable called “Speed”
b. Add 10 to the read value
c. Write the result in the variable called “Speed”
d. Read the variable called “Speed”
e. Start motors B and C at a speed set to the value stored in the variable called “Speed”
ELSE
(Do nothing)
4. Repeat steps 3a to 3e forever.
TASK 2
5. If Touch Sensor 2 is pressed:
a. Read the variable called “Speed”
b. Subtract 10 from the read value
c. Write the result in the variable called “Speed”
d. Read the variable called “Speed”
e. Start motors B and C at a speed set to the value stored in the variable called “Speed”
ELSE
(Do nothing)
6. Repeat steps 5a to 5e forever.**
With the wheeled robot now accelerating and decelerating at the touch of a button (or two), students can extend their programming to show how fast their robots are moving. Students will use the Display Block to show this value in the Variable Block.
A new skill to be learned in this lesson is the creation of a My Block. Two of these can be seen in the solution below. My Blocks allow users to create subroutines of programs they have already written.
In the case below, we have taken the acceleration and deceleration loops and created My Blocks from these programs. There are two reasons to do this: first to save space, and second to allow these subroutines to be reused in other programs. A tutorial on My Blocks can be found in the Robot Educator section of the EV3 Software.
POSSIBLE SOLUTION
FILENAME: CODING-07.EV3 (Tab: 3)
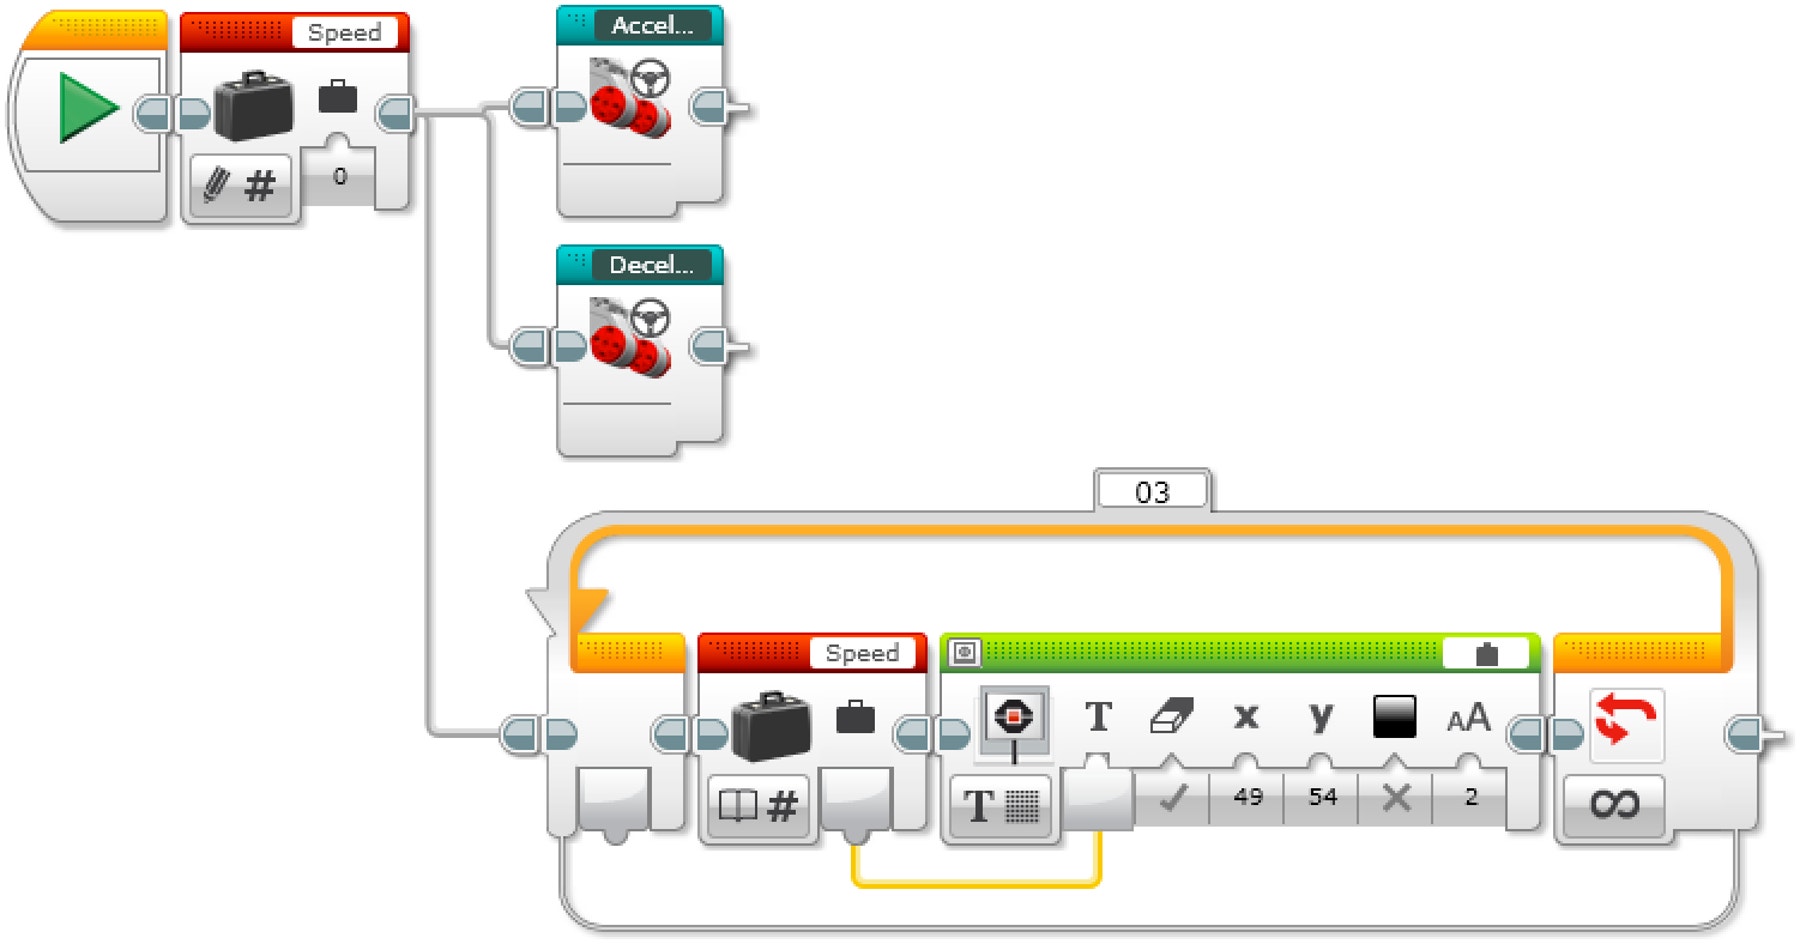
INCREASE AND DECREASE SPEED WITH VARIABLE AND DISPLAY
- Start the program.
- Create a Variable Block called “Speed”, enter a value of 0, and start three tasks.
TASK 1
3. Start My Block “Acceleration”.
TASK 2
4. Start My Block “Deceleration”.
TASK 3
5. Read the variable called “Speed”.
6. Display the value stored in the variable called “Speed”.
7. Repeat steps 5 and 6 forever.
Share
Allow the students to select the tool(s) they find most appropriate for capturing and sharing their creations, unique thinking, and learning process. Encourage them to use text, videos, images, sketchnotes, or another creative medium.
Assessment Opportunity
Specific rubrics for assessing computational thinking skills can be found under 'Assessment'.
Continue
(45 Minutes)
Using Text-Based Programming
Have the students explore text-based programming solutions so they can compare different programming languages.
Swift Playground - POSSIBLE SOLUTION
/*
As of summer 2017, there is no way to use the EV3 Brick’s buttons in Swift playground.
In this example, the EV3 up button has been replaced with touch sensor 1.
*/

Var speed = 0
While true
{
ev3.waitForTouch(on: .one)
ev3.waitFor(seconds: 0.5)
if speed < 100
{
    speed = speed + 10
while ev3.measureTouch(on: .one) == true
    {
        ev3.waitFor(seconds: 0.1)
    }
ev3.move(leftPort: .b, rightPort: .c, leftPower: (Float(speed)), rightPower: (Float(speed)))
}
}
ROBOT C: POSSIBLE SOLUTION
#pragma config(Sensor, S1, touchSensor, sensorEV3 _ Touch)

#pragma config(Sensor, S2, touchSensor2, sensorEV3 _ Touch)

#pragma config(Motor, motorB, rightMotor, tmotorEV3 _ Large,
PIDControl, driveRight, encoder)

#pragma config(Motor, motorC, leftMotor, tmotorEV3 _ Large,
PIDControl, driveLeft, encoder)

/*
Create a program to control the positive speed of the robot by a press
of a Touch Sensor.
*/

task main()
{
    //Create an integer (whole number) variable to store speed value.
    int speed = 0;
    //Repeat our control loop forever.
    while(true)
    {
        //When I press the touch sensor button.
        if(getTouchValue(touchSensor) == 1)
        {
        //Add 10 to our ‘speed’ variable
                if(speed < 100) speed = speed + 10;
                //Create a loop to wait for the touch sensor button to be
released.
                while(getTouchValue(touchSensor) == 1)
                {
                //Wait for button to be released.
                sleep(10);
                }
                //Set motorB and motorC speed to the value of the ‘speed’
variable
        setMotorSpeed(motorB, speed);
        setMotorSpeed(motorC, speed);
        }
    }
}
Warning! This may be dangerous!
The following is a possible solution using the text-based programming language ROBOTC. You may choose to use any other LEGO MINDSTORMS Education EV3 compatible text-based programming languages.
LEGO Education has no ownership of the ROBOTC platform and does not provide any support or guarantee of the quality of the user experience and technology used. All required set up information is provided by ROBOTC at robotc.net. We recommend always to reinstall the official LEGO MINDSTORMS EV3 Brick firmware when you finish using other programming languages.
Other Program Solutions
Swift Playground - POSSIBLE SOLUTION
/*
As of summer 2017, there is no way to use the EV3 Brick’s buttons in Swift playground.
In this example, the EV3 up and down buttons have been replaced with touch sensor 1 and touch sensor 2.
*/

Var speed = 0
While true
{
ev3.move(leftPort: .b, rightPort: .c, leftPower: (Float(speed)), rightPower: (Float(speed)))

if ev3.measureTouch(on : .one)
{
speed = speed + 10
}

if ev3.measureTouch(on : .two)
{
speed = speed - 10
}
}
ROBOT C: POSSIBLE SOLUTION
Swift Playground - POSSIBLE SOLUTION
/*
As of summer 2017, there is no way to use the EV3 Brick’s buttons in Swift playground.
In this example, the EV3 up and down buttons have been replaced with touch sensor 1 and touch sensor 2.
*/

Var speed = 0
func accelerate()
{
if ev3.measureTouch (on : .One)
{
speed = speed + 10
}
}
func decelerate()
{
if ev3.measureTouch (on : .two)
{
speed = speed - 10
}
}
While true
{
accelerate()
decelerate()
ev3.move(leftPort: .b, rightPort: .c, leftPower: (Float(speed)),
rightPower: (Float(speed)))
}
ROBOT C: POSSIBLE SOLUTION
Teacher Support
Students will:
Use the Variable Block to store information
Develop multi-level programs
Create function blocks ( My Blocks )
Pupil Material
Share with:
 Google Classroom


