Reversing Safely
Design features for a car that will improve safety as it reverses.

Connect
(5 minutes)

In this Lesson, students will use the Brick Status Light and Display Block to program their wheeled robot to simulate visual signals for pedestrians, other car drivers, and passengers when reversing. Students will also use the Touch Sensor to simulate forward and reverse gears.
Ignite a classroom discussion around the following questions:
- What are the dangers of reversing a car or other motorized vehicle?
- What are your area’s regional statistics concerning accidents with reversing vehicles?
- How can a vehicle reverse more safely?
- What happens on the outside of vehicles when they are reversing to let pedestrians and other drivers know what they are doing?
Ask your students discuss briefly what happens when cars reverse. Discuss how the reverse lights warn other motorists and pedestrians of what the vehicle is doing. Explain that the indicators on the dashboard communicate to the driver and their passengers which gear the car is in and the direction of travel.
Allow the students to select the tool(s) they find most appropriate for capturing and sharing their ideas. Encourage them to document their thoughts using text, videos, images, sketchnotes, or another creative medium.
Construct
(15 to 30 minutes)
Set up
Before assigning the next task, make sure that there is enough space for them to complete the task. It is a good idea to have students work on a big table or on the floor.
Build
Students will construct the Robot Educator base model, and then they will add the Touch Sensor.
Have the students perform the following building check before they program their robots:
- Are the wires correctly connected from the motors to ports B and C ?
- Are the wheels correctly installed?
- Are the wheels rotating freely?
- Are the wires correctly connected from the Touch Sensor to port 1 ?
Program
- Have the students program their robot to simulate a vehicle reversing, including the use of light indicators.
- Have them use the Touch Sensor as a bumper or as a “brake” in order to reverse the robot.
Allow the students to select the tool(s) they find most appropriate for capturing and sharing their pseudocode. Encourage them to use text, videos, images, sketchnotes, or another creative medium.
POSSIBLE SOLUTION: BUMP AND REVERSE

- Start the Program.
- Drive forward in a straight line at the desired speed.
- Wait for the Touch Sensor (simulating changing to reverse gear) to be “bumped”.
- Stop the motors.
- Wait for 1 second.
- Activate the “reverse lights” (amber lights on EV3 Brick).
- Reverse direction of travel for 2 seconds.
Note
You can use the EV3 Software to demonstrate the Brick Status Light, and the three different modes of the Touch Sensor (i.e., pressed, released, bumped).
Refer students to the Robot Educator Tutorials for further assistance.
In the EV3 Software :
Robot Educator > Hardware > Brick Status Light
Robot Educator > Hardware > Brick Display
Robot Educator > Hardware > Touch Sensor
Contemplate
(35 minutes)
- Introduce the use of the button on the EV3 Brick to act as the “reverse” gear.
- Ask the students how they think the screen could be used as part of an automated car.
- Discuss ways in which the screen could be used to relay important information to the car’s passengers.
Students will build on their previous learning by creating programs that simulate forward and reverse gears in the following ways:
- Use the Touch Sensor as a bumper to stop the robot.
- Use the Brick Buttons to reverse the robot.
- Have the robot indicate its actions..
Allow the students to select the tool(s) they find most appropriate for capturing and sharing their pseudocode. Encourage them to use text, videos, images, sketchnotes, or another creative medium.
POSSIBLE SOLUTION: BUMP, WAIT FOR REVERSE GEAR

- Start the program.
- Drive forward in a straight line at the desired speed.
- Wait for the Touch Sensor (simulating change to reverse gear) to be “bumped”.
- Stop the motors.
- Wait for the Brick Button (simulating change to reverse gear) to be pressed.
- Activate the “reverse lights” (amber lights on the EV3 Brick).
- Reverse the direction of travel for 2 seconds.
Differentiation option
Have the students utilize the EV3 Brick screen as a dashboard indicator.
They will further develop their programs by using the Display Block to incorporate the EV3 Brick screen so that the forward and reverse motion of the wheeled robot will trigger the screen to display arrows indicating the direction of travel.
Have the students integrate other signals, such as:
- Turn signals (a blinking light when turning left or right)
- Horn
POSSIBLE SOLUTION: BUMP, WAIT FOR REVERSE GEAR WITH INDICATORS
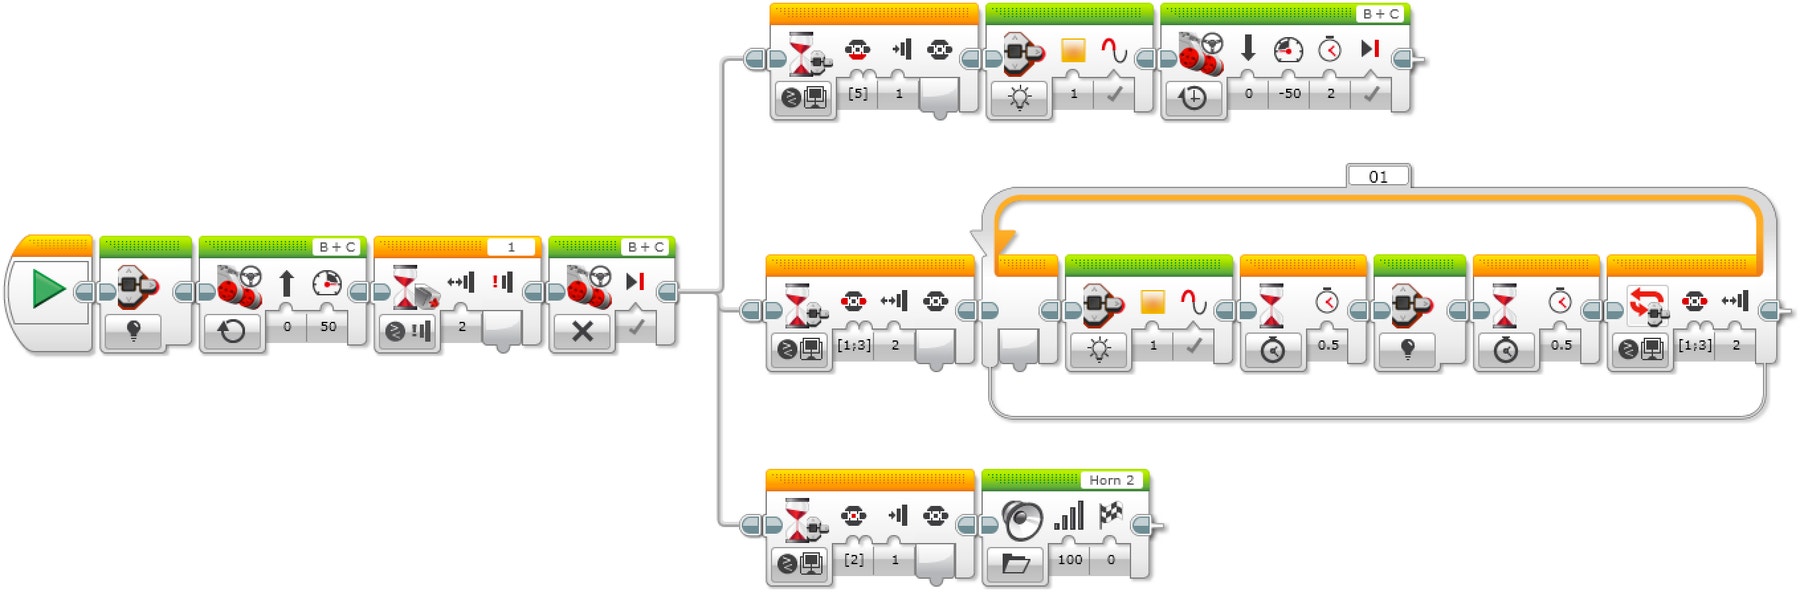
- Start the program.
- Turn off lights on the EV3 Brick.
- Drive forward in a straight line at the desired speed.
- Wait for the Touch Sensor (simulating change to reverse gear) to be “bumped”.
- Stop the motors and start 3 simultaneous tasks.
TASK 1
6. Wait for the Down Brick Button (simulating change to reverse gear) to be pressed.
7. Activate the “reverse lights” (amber lights on the EV3 Brick).
8. Reverse the direction of travel for 2 seconds.
TASK 2
9. Wait for the Left or Right Brick Button to be “bumped”.
10. Activate the amber lights on the EV3 Brick.
11. Wait for 0.5 seconds.
12. Turn off lights on the EV3 Brick.
13. Wait for 0.5 seconds.
14. Repeat steps x to x until the Left or Right Brick Button is “bumped” again.
TASK 3
15. Wait for Enter Brick Button (simulating horn) to be pressed.
16. Play Horn 2 sound.
Share
- Allow the students to select the tool(s) they find most appropriate for capturing and sharing their creations, unique thinking, and learning process.
- Encourage them to use text, videos, images, sketchnotes, or another creative medium
- Ask one or two groups to demonstrate their programs and how their wheeled robot moves.
- Compare the many possible solutions to the given problem.
Assessment Opportunity
Specific rubrics for assessing computational thinking skills can be found under 'Assessment'.
Continue
(45 Minutes)
Using Text-Based Programming
Have the students explore text-based programming solutions so they can compare different programming languages.
Swift Playground - POSSIBLE SOLUTION
ev3.move (left Port: .b, rightPort: .c, leftPower: 50, rightPower: 50)
ev3.WaitForTouch(on: .one)
ev3.stopMove(leftPort : .b, rightPort : .c)
ev3.WaitFor(seconds: 1)
ev3.brickLightOn(With Color: .orange, in Mode: .flashing)
ev3.move(forSeconds : 2, leftPort: .b, rightPort: .c, leftPower: -50, rightPower: -50)
ROBOT C - POSSIBLE SOLUTION
#pragma config(StandardModel, "EV3_REMBOT")
//*!!Code automatically generated by 'ROBOTC' configuration wizard          !!*//

/*
Create a program where the robot drives forward until the Touch Sensor is pressed.
The robot then reverses flashing an orange LED.
*/

task main()
{
    //Set the MotorSpeed to 50%.
    setMotorSpeed(motorB, 50);
    setMotorSpeed(motorC, 50);

    //Wait for touch sensor to be pressed.
    while(getTouchValue(touchSensor) ==0)
    {
        sleep(10);
    }

    //Set the MotorSpeed to 0% or off. Wait 1 second.
    setMotorSpeed(motorB, 0);
    setMotorSpeed(motorC, 0);
    sleep(1000);

    //Flash the EV3 LED Orange.
    setLEDColor(ledOrangeFlash);

    //Set the MotorSpeed to -50%(reverse). Wait 2 seconds.
    setMotorSpeed(motorB, -50);
    setMotorSpeed(motorC, -50);
    sleep(2000);
}
Warning! This may be dangerous!
LEGO Education has no ownership of the ROBOTC platform and does not provide any support or guarantee of the quality of the user experience and technology used. All required set up information is provided by ROBOTC at robotc.net. We recommend always to reinstall the official LEGO MINDSTORMS EV3 Brick firmware when you finish using other programming languages.
Other Program solutions
Swift Playground - POSSIBLE SOLUTION
ev3.move(leftPort: .b, rightPort: .c, leftPower: 50, rightPower: 50)
ev3.WaitForTouch(on: .One)
ev3.stopMove(leftPort: .b, rightPort: .c)

While true
{
if ev3.measureTouch(on: .one)
{
ev3.brickLightOn(WithColor: .orange, inMode: .flashing)
ev3.move(forSeconds : 2, leftPort: .b, rightPort: .c, leftPower: -50, rightPower: -50)
}
else
{
ev3.stopMove(leftPort: .b, rightPort: .c)
ev3.brickLight Off()
}
}
ROBOT C - POSSIBLE SOLUTION
Swift Playground - POSSIBLE SOLUTION
ev3.move(leftPort: .b, rightPort: .c, leftPower: 50, rightPower: 50)
ev3.waitForTouch(on: .one)
ev3.stopMove(leftPort: .b, rightPort: .c)
ev3.brickLightOff()

While true
{
ev3.display(text: ".")
if ev3.measureTouch(on : .one)
{
ev3.brickLightOn(withColor: .orange, inMode: .on)
ev3.display(text: "Reverse" )
ev3.move(forSeconds: 2, leftPort: .b, rightPort: .c, leftPower: -50, rightPower: -50)
ev3.brickLightOff()
}
else if ev3.measureTouchCount(on: .two) == 1
{
repeat
{
ev3.brickLightOn(WithColor: .red, inMode: .on)
ev3.waitFor(seconds: 0.5)
ev3.brickLightOff()
ev3.waitFor(seconds : 0.5)
} While ev3.measureTouchCount(on : .two) < 2
ev3.resetTouchCount(on: .two)
}
else if ev3.measureUltrasonicCentimeters(on: .four) < 10
{
ev3.playSound(file: .errorAalarm, atVolume: 100, withStyle: .wait ForCompletion)
}
}
ROBOT C - POSSIBLE SOLUTION
Teacher Support
Students will:
Extend the use of algorithms to carrying out a series of instructions in order.
Extend understanding of outputs.


