속도 제어 시스템 만들기
버튼을 터치하여 차량의 속도를 바꿀 수 있는 크루즈 컨트롤 시스템을 설계하세요.

수업 계획
준비
- 교사용 자료를 읽으세요.
- 필요에 따라 EV3 랩 소프트웨어 또는 프로그래밍 앱의 시작하기 자료를 이용해 수업을 계획하세요. 학생들이 레고® 마인드스톰® 에듀케이션 EV3와 친숙해지는 데 도움이 될 것입니다.
관심유도(30분)
- 아래의 토의 시작 섹션에 제시된 아이디어를 사용해 학생들에게 이 프로젝트에 대해 논의를 시작하게 하세요.
- 프로젝트를 설명하세요.
- 학생들이 두 명씩 팀을 이루게 하세요.
- 학생들에게 브레인스토밍을 위한 시간을 주세요.
탐구(30분)
- 학생들에게 여러 개의 프로토타입을 만들게 하세요.
- 조립과 프로그래밍을 모두 탐구하게 하세요.
- 각 팀별로 2가지 솔루션을 만들어 테스트하게 하세요.
설명(60분)
- 학생들이 생각한 솔루션들을 테스트하고 가장 최선의 솔루션을 고르게 하세요.
- 학생들에게 자신만의 테스트표를 만들게 하세요.
- 팀별로 프로젝트를 최종 완성하고 작업을 문서화하기 위해 필요한 자료들을 수집할 시간을 주세요.
정교화(60분)
- 학생들에게 최종 보고서를 작성하기 위한 시간을 주세요.
- 각 팀별로 결과를 발표하는 공유 세션을 진행하세요.
평가
- 학생 개개인의 성과에 대한 피드백을 제공하세요.
- 제공된 활동평가표를 사용하면 프로세스를 간소화할 수 있습니다.
토의 시작
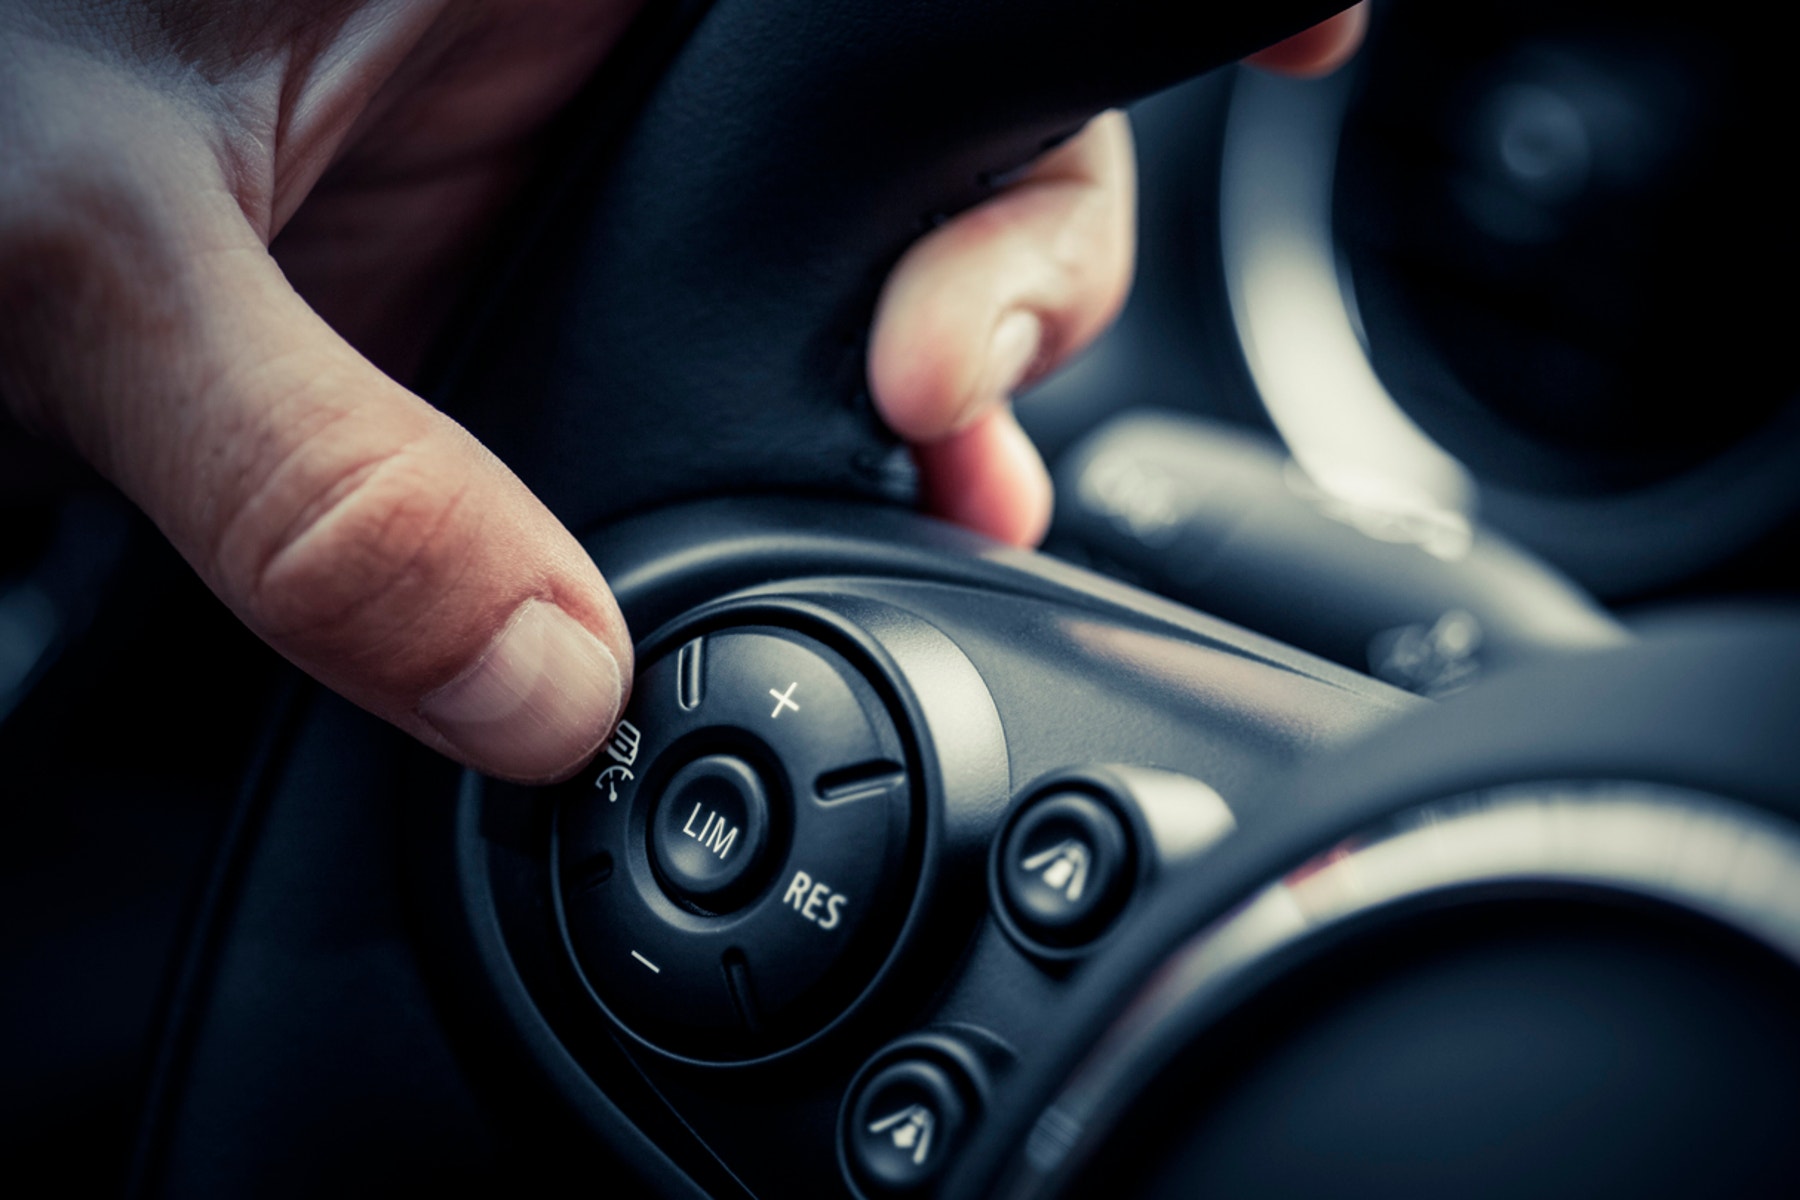
개인용 자동차의 크루즈 컨트롤 기능은 차량의 속도를 자동으로 제어하는 시스템입니다. 이 기술은 현대 기술처럼 보이지만, 사실은 1958년에 처음 소개되었습니다. 이 시스템은 어떻게 작동하는 것일까요?
적극적으로 브레인스토밍을 하게 하세요.
학생들에게 이러한 질문에 대해 생각해보게 하세요.
- 자동차에서 크루즈 컨트롤의 용도는 무엇일까요?
- 크루즈 컨트롤이 장거리 운전자에게 어떤 도움이 될까요?
- 어떻게 해야 크루즈 컨트롤을 더 좋게 만들 수 있을까요?
- 운전자가 버튼 터치식 속도 제어 시스템을 어떻게 사용할까요?
- 버튼을 누르는 동작을 모터의 속도로 변환하려면 프로그램에 어떤 요소를 포함시켜야 할까요?
학생들에게 약간의 시간을 주고 이러한 질문에 답을 하게 하세요.
학생들에게 최초의 아이디어를 문서화하게 하고, 첫 번째 프로토타입에 사용할 솔루션을 선택한 이유를 물어보세요. 그리고 프로젝트가 진행되는 동안 자신의 아이디어를 어떻게 평가할 것인지를 설명해보라고 하세요. 이렇게 함으로써 학생들이 검토와 수정을 거치는 과정에서 솔루션을 평가할 때 활용 가능한 구체적인 정보를 얻을 수 있고 솔루션이 효과적인지 여부를 판단할 수 있습니다.
조립 팁
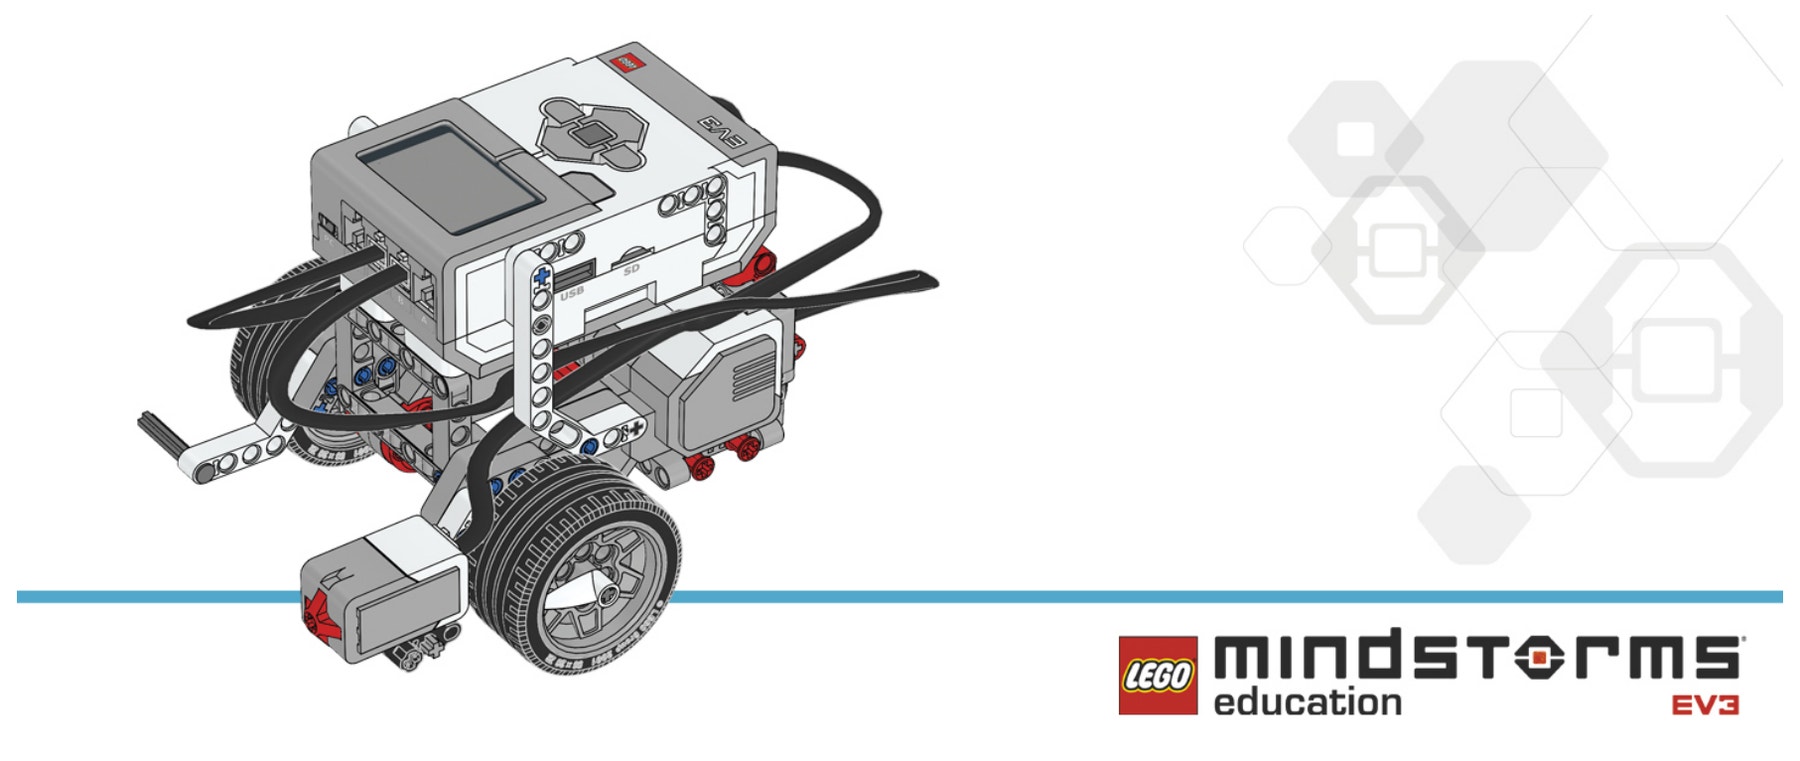
자동차를 조립하는 것부터 시작하세요. 레고® 마인드스톰® EV3 드라이빙 베이스 모델 중 하나를 골라 사용해도 좋고, 직접 모델을 디자인해도 좋습니다. 자동차의 운전대에 붙어 있는 크루즈 컨트롤 버튼을 시뮬레이션하기 위한 버튼이 모델에 포함되어야 합니다.
두 개의 터치 센서 사용
오늘 수업에서 학생들은 두 개의 터치 센서를 사용하여 드라이빙 베이스 모델의 속도를 제어하고 유지하는 방법을 알아볼 것이라고 설명하세요.
코딩 팁
학생들은 이 프로젝트에서 아마도 변수 블록을 사용할 것입니다. 변수 블록은 데이터(즉, 텍스트, 논리, 숫자 또는 배열)를 저장할 수 있는 프로그래밍 블록이며, 프로그램이 실행되는 중에 언제든지 값을 덮어쓸 수 있습니다.
변수는 업데이트 가능한 값을 프로그램에 저장하기 위한 하나의 수단입니다. 변수에 저장된 값은 프로그램이 실행되는 동안 수시로 덮어쓸 수 있습니다.
변수를 사용해 속도 높이기
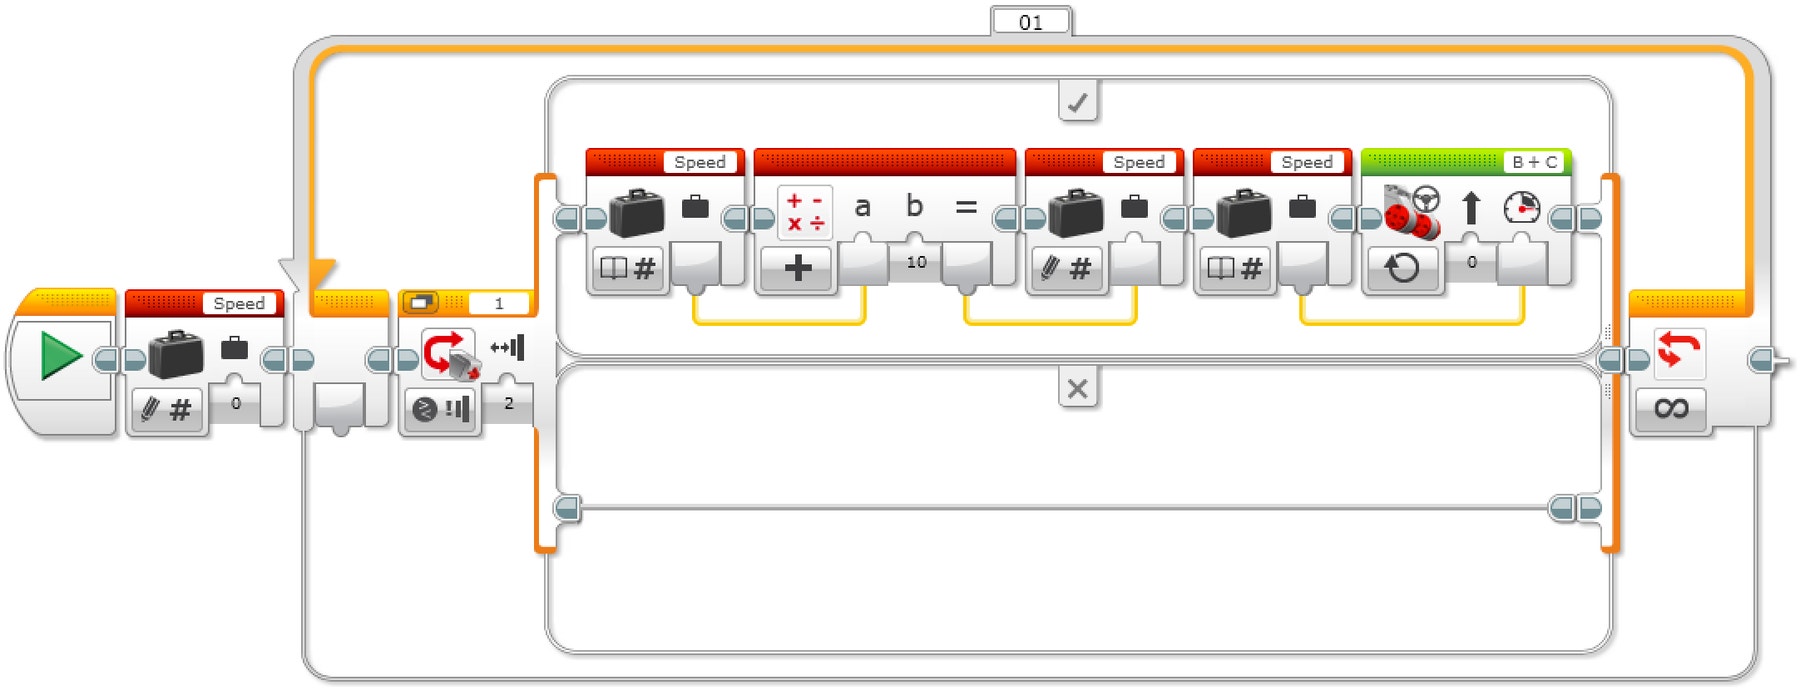
프로그램 설명
프로그램을 시작합니다.
“Speed”라는 변수 블록을 만들고 값을 0으로 입력합니다.
터치 센서가 눌린 경우:
a. “Speed”라는 변수를 읽습니다.
b. 읽은 값에서 “10”을 더합니다.
c. 결과를 “Speed”라는 변수에 씁니다.
d. “Speed”라는 변수를 읽습니다.
e. “Speed”라는 변수에 저장된 값을 속도로 설정하여 모터 B와 C를 작동시킵니다. ELSE (아무 것도 하지 않습니다).3a에서 3e까지의 단계를 무한히 반복합니다.
변수를 사용해 속도 높이고 낮추기
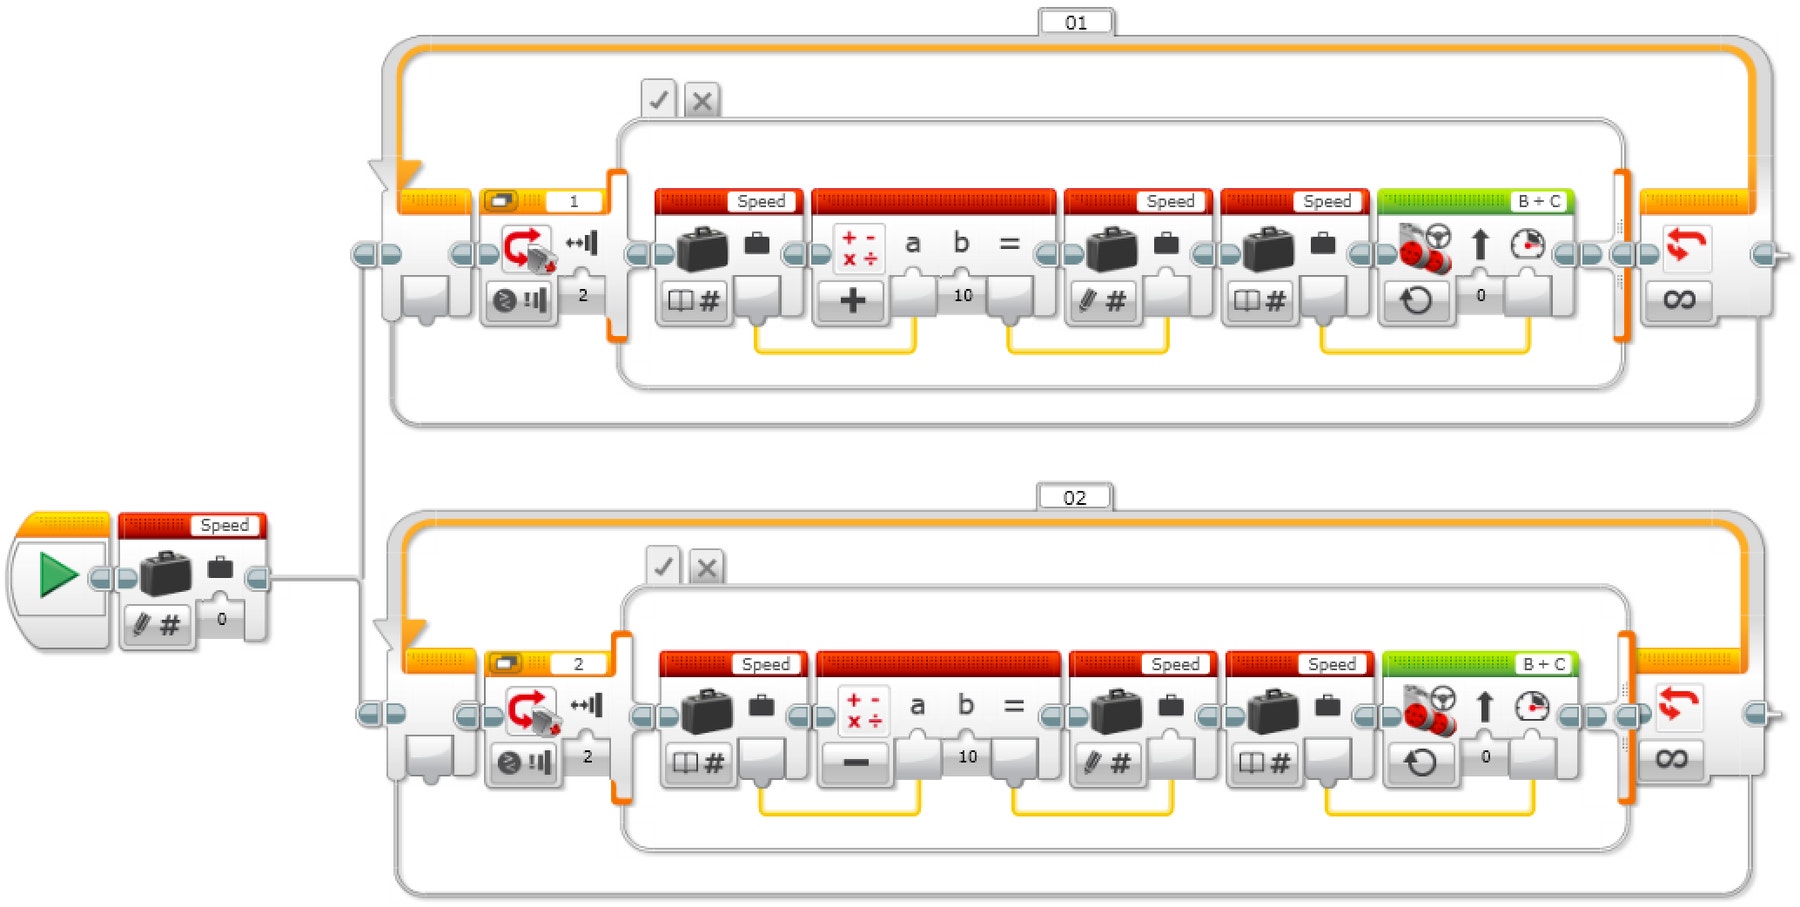
프로그램 설명
- 프로그램을 시작합니다.
- “Speed”라는 이름의 변수 블록을 만들고, 값을 0으로 입력하고, 2개의 Task를 시작합니다.
Task 1
3. 1번 터치 센서가 눌린 경우:
a. “Speed”라는 변수를 읽습니다.
b. 읽은 값에서 “10”을 더합니다.
c. 결과를 “Speed”라는 변수에 씁니다.
d. “Speed”라는 변수를 읽습니다.
e. “Speed”라는 변수에 저장된 값을 속도로 설정하여 모터 B와 C를 작동시킵니다. ELSE (아무 것도 하지 않습니다).
- 3a에서 3e까지의 단계를 무한히 반복합니다.
Task 2
5. 2번 터치 센서가 눌린 경우:
a. “Speed”라는 변수를 읽습니다.
b. 읽은 값에서 “10”을 뺍니다.
c. 결과를 “Speed”라는 변수에 씁니다.
d. “Speed”라는 변수를 읽습니다.
e. “Speed”라는 변수에 저장된 값을 속도로 설정하여 모터 B와 C를 작동시킵니다. ELSE (아무 것도 하지 않습니다).
- 5a부터 5e까지의 단계를 무한히 반복합니다.
변수와 디스플레이를 사용해 속도 높이고 낮추기
학생들에게 디스플레이 블록을 사용하여 드라이빙 베이스의 속도를 디스플레이하게 하세요.
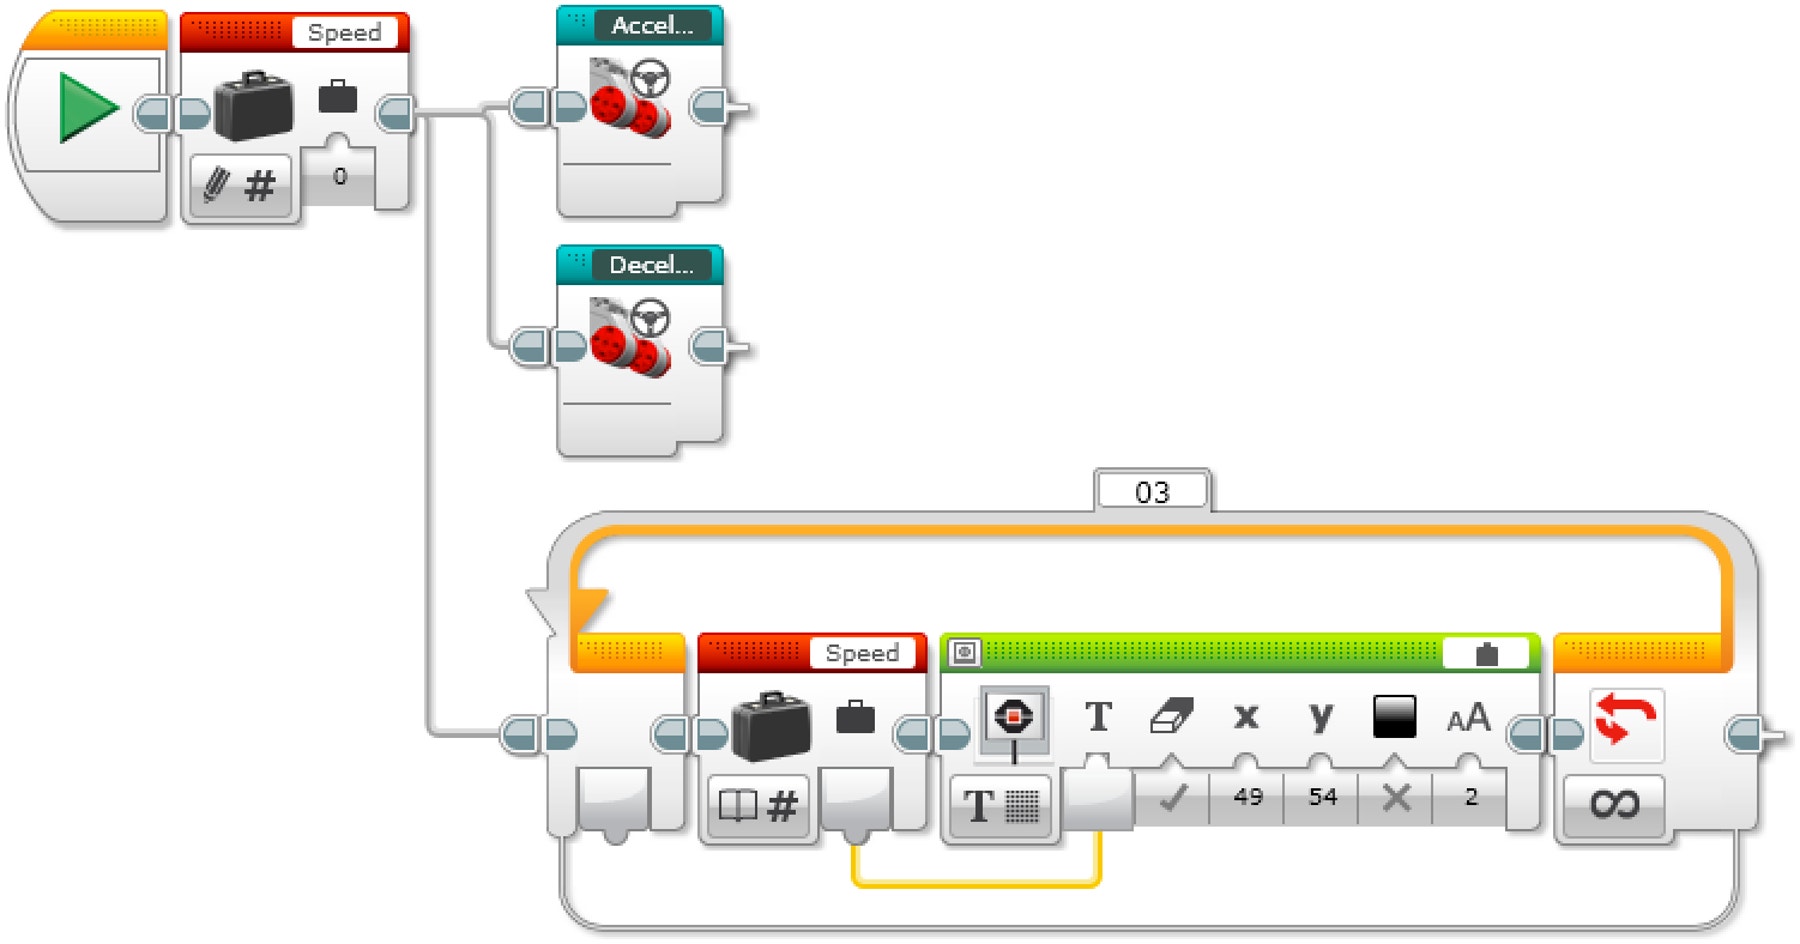
프로그램 설명
- 프로그램을 시작합니다.
- “Speed”라는 이름의 변수 블록을 만들어 값을 0으로 입력하고, 3개의 Task를 시작합니다.
Task 1
3. “Acceleration” 마이 블록을 실행합니다.
Task 2
4. “Deceleration” 마이 블록을 실행합니다.
Task 3
5. “Speed”라는 변수를 읽습니다.
6. “Speed”라는 변수에 저장된 값을 디스플레이합니다.
7. 5와 6단계를 무한히 반복합니다.
EV3 MicroPython 프로그램 솔루션
변수를 이용해 속도 높이기
#!/usr/bin/env pybricks-micropython

from pybricks import ev3brick as brick
from pybricks.ev3devices import Motor, TouchSensor
from pybricks.parameters import Port, Stop, Button
from pybricks.tools import wait
from pybricks.robotics import DriveBase

# Configure 2 motors with default settings on Ports B and C.  These
# will be the left and right motors of the Driving Base.
left_motor = Motor(Port.B)
right_motor = Motor(Port.C)

# The wheel diameter of the Robot Educator Driving Base is 56 mm.
wheel_diameter = 56

# The axle track is the distance between the centers of each of the
# wheels.  This is 118 mm for the Robot Educator Driving Base.
axle_track = 118

# The Driving Base is comprised of 2 motors.  There is a wheel on each
# motor.  The wheel diameter and axle track values are used to make the
# motors move at the correct speed when you give a drive command.
robot = DriveBase(left_motor, right_motor, wheel_diameter, axle_track)

# Set up the Touch Sensor on Port 1.  It is used to increase the speed
# of the robot.
increase_touch_sensor = TouchSensor(Port.S1)

# Initialize the "old_speed" variable to "None."  It is used to check
# whether the speed variable has changed.  Setting it to "None" ensures
# this check will be "True" when the speed variable is initialized with
# a value.
old_speed = None

# Initialize the speed variable to 0.
speed = 0

# This is the main part of the program.  It is a loop that repeats
# endlessly.
while True:

    # Check whether the Touch Sensor is pressed, and increase the speed
    # variable by 10 mm per second if it is.
    if increase_touch_sensor.pressed():
        speed += 10

    # If the speed variable has changed, update the speed of the robot.
    if speed != old_speed:
        old_speed = speed
        robot.drive(speed, 0)

    # Wait 200 milliseconds before starting the loop again.
    wait(200)
변수를 사용해 속도 높이고 낮추기
#!/usr/bin/env pybricks-micropython

from pybricks import ev3brick as brick
from pybricks.ev3devices import Motor, TouchSensor
from pybricks.parameters import Port, Stop, Button
from pybricks.tools import wait
from pybricks.robotics import DriveBase

# Configure 2 motors with default settings on Ports B and C.  These
# will be the left and right motors of the Driving Base.
left_motor = Motor(Port.B)
right_motor = Motor(Port.C)

# The wheel diameter of the Robot Educator Driving Base is 56 mm.
wheel_diameter = 56

# The axle track is the distance between the centers of each of the
# wheels.  This is 118 mm for the Robot Educator Driving Base.
axle_track = 118

# The Driving Base is comprised of 2 motors.  There is a wheel on each
# motor.  The wheel diameter and axle track values are used to make the
# motors move at the correct speed when you give a drive command.
robot = DriveBase(left_motor, right_motor, wheel_diameter, axle_track)

# Set up the Touch Sensor on Port 1.  It is used to increase the speed
# of the robot.
increase_touch_sensor = TouchSensor(Port.S1)

# Set up the Touch Sensor on Port 2.  It is used to decrease the speed
# of the robot.
decrease_touch_sensor = TouchSensor(Port.S2)

# Initialize the "old_speed" variable to "None."  It is used to check
# whether the speed variable has changed.  Setting it to "None" ensures
# this check will be "True" when the speed variable is initialized with
# a value.
old_speed = None

# Initialize the speed variable to 0.
speed = 0

# This is the main part of the program.  It is a loop that repeats
# endlessly.
#
# First, increase the speed variable if Touch Sensor 1 is pressed.
# Second, decrease the speed variable if Touch Sensor 2 is pressed.
# Finally, the robot updates its speed if the speed variable was
# changed.
#
# Then the loop starts over after a brief pause.
while True:

    # Check whether Touch Sensor 1 is pressed, and increase the speed
    # variable by 10 mm per second if it is.
    if increase_touch_sensor.pressed():
        speed += 10

    # Check whether Touch Sensor 2 is pressed, and decrease the speed
    # variable by 10 mm per second if it is.
    if decrease_touch_sensor.pressed():
        speed -= 10

    # If the speed variable has changed, update the speed of the robot.
    if speed != old_speed:
        old_speed = speed
        robot.drive(speed, 0)

    # Wait 200 milliseconds before starting the loop again.
    wait(200)
변수와 디스플레이를 사용해 속도 높이고 낮추기
#!/usr/bin/env pybricks-micropython

from pybricks import ev3brick as brick
from pybricks.ev3devices import Motor, TouchSensor
from pybricks.parameters import Port, Stop, Button
from pybricks.tools import wait
from pybricks.robotics import DriveBase

# Configure 2 motors with default settings on Ports B and C.  These
# will be the left and right motors of the Driving Base.
left_motor = Motor(Port.B)
right_motor = Motor(Port.C)

# The wheel diameter of the Robot Educator Driving Base is 56 mm.
wheel_diameter = 56

# The axle track is the distance between the centers of each of the
# wheels.  This is 118 mm for the Robot Educator Driving Base.
axle_track = 118

# The Driving Base is comprised of 2 motors.  There is a wheel on each
# motor.  The wheel diameter and axle track values are used to make the
# motors move at the correct speed when you give a drive command.
robot = DriveBase(left_motor, right_motor, wheel_diameter, axle_track)

# Set up the Touch Sensor on Port 1.  It is used to increase the speed
# of the robot.
increase_touch_sensor = TouchSensor(Port.S1)

# Set up the Touch Sensor on Port 2.  It is used to decrease the speed
# of the robot.
decrease_touch_sensor = TouchSensor(Port.S2)

# Initialize the "old_speed" variable to "None."  It is used to check
# whether the speed variable has changed.  Setting it to "None" ensures
# this check will be "True" when the speed variable is initialized with
# a value.
old_speed = None

# Initialize the speed variable to 0.
speed = 0

# This is the main part of the program.  It is a loop that repeats
# endlessly.
#
# First, increase the speed variable if Touch Sensor 1 is pressed.
# Second, decrease the speed variable if Touch Sensor 2 is pressed.
# Finally, the robot updates its speed if the speed variable was
# changed, and displays it on the screen.
#
# Then the loop starts over after a brief pause.
while True:

    # Check whether Touch Sensor 1 is pressed, and increase the speed
    # variable by 10 mm per second if it is.
    if increase_touch_sensor.pressed():
        speed += 10

    # Check whether Touch Sensor 2 is pressed, and decrease the speed
    # variable by 10 mm per second if it is.
    if decrease_touch_sensor.pressed():
        speed -= 10

    # If the speed variable has changed, update the speed of the robot
    # and display the new speed in the center of the screen.
    if speed != old_speed:
        old_speed = speed
        robot.drive(speed, 0)
        brick.display.clear()
        brick.display.text(speed, (85, 70))

    # Wait 200 milliseconds before starting the loop again.
    wait(200)
확장 요소
국어교과 확장
옵션 1
국어교과 기술 개발의 통합을 위해 학생들에게 다음 과제를 부여하세요.
- 작성해 두었던 작업, 스케치 또는 사진을 이용해 디자인 프로세스를 요약하고 최종 보고서를 작성하세요.
- 최초의 아이디어부터 완료된 프로젝트까지 디자인 프로세스를 보여 주는 동영상을 만드세요.
- 프로그램에 대한 프레젠테이션을 만드세요.
- 프로젝트와 현실 세계의 시스템을 연관지어 살펴보고 학생들의 작품을 기반으로 만들어낼 수 있는 새로운 발명품을 설명하기 위한 프레젠테이션을 제작하세요.
옵션 2
이번 수업에서는 학생들이 속도 제어 인터페이스를 만들었습니다. 차량 속도 데이터는 개인과 기관이 교통 상황을 보고하고 교통 사고의 가능성을 줄이는 데 중요한 역할을 합니다.
국어교과 기술 개발의 통합을 위해 학생들에게 다음 과제를 부여하세요.
- 교통 안전을 위해 민간이나 기관에서 차량 속도 데이터를 수집하는 것이 실질적으로 자동차 사고의 빈도를 줄이는 데 도움이 된다는 주장의 근거를 글로 작성하세요.
- 학생들에게 이러한 방식이 개인 데이터 보호에 대한 중대한 위반이 된다는 반대 주장의 논리를 세우고, 구체적인 증거를 이용해 서로 상반되는 주장의 장점과 단점을 비교하게 하세요.
수학교과 확장
이번 수업에서는 학생들이 속도 제어 인터페이스를 만들었습니다. 인간 운전자는 도로의 상태를 평가하고 그에 따라 속도를 바꾸는 기술이 상당히 능숙합니다. 반면, 무인 시스템이 이렇게 하려면 훈련이 필요하겠죠.
수학 능력 개발 활동을 통합하고 무인 자동차에 사용되는 인공지능을 탐구하는 차원에서 학생들에게 다음 과제를 부여하세요.
- 도로의 상태와 그것이 차량의 핸들링/성능에 미치는 영향 사이의 관계를 판정하기 위해 살펴봐야 할 여러 가지 변수를 생각해보세요.
- 도로 상태의 수학적 모델이 포함되도록 이러한 변수 중에서 3-4개를 선택하고, 이러한 변수와 차량의 이상적 속도 사이의 관계를 체계화하기 위한 데이터 표를 작성하세요.
- 무인 차량이 도로 상태 변수와 차량 속도 사이의 관계를 식별하고 업데이트하기 위해 기계학습 프로세스를 사용한다는 점을 염두에 두고, 도로의 상태가 건조한지 젖었는지 눈이 쌓였는지를 식별한 후 이러한 변수와 안전 속도 사이의 관계를 예측하세요(예: 건조한 도로 변수가 도로의 요철 상태가 될 수 있음).
평가 기회
교사 관찰 체크리스트
교사의 요구 사항에 맞는 척도를 만드세요(아래의 예 참조).
- 부분적으로 달성됨
- 충분히 달성됨
- 초과 달성됨
다음의 성공 기준을 사용해 학생들의 진척도를 평가하세요.
- 학생들이 문제의 핵심 요소를 식별할 수 있다.
- 학생들이 자율적인 태도로 창의적인 솔루션을 개발한다.
- 학생들이 자신의 아이디어를 명확히 전달할 수 있다.
자기 평가
학생들이 어느 정도의 성과 데이터를 수집한 다음, 각자의 솔루션에 대해 깊이 생각해 볼 시간을 주세요. 다음과 같은 질문이 도움이 될 것입니다.
- 솔루션이 디자인 브리핑의 기준을 충족하나요?
- 로봇의 움직임을 더 정확하게 만들 수 있나요?
- 다른 사람들은 이 문제를 어떤 방식으로 해결했나요?
학생들에게 솔루션을 개선할 두 가지 방법을 브레인스토밍하고 문서화하게 하세요.
동료 피드백
각 그룹이 자신과 타인의 프로젝트를 평가하는 동료 검토 프로세스를 진행하게 하세요. 이러한 검토 프로세스는 학생들이 건설적인 피드백을 제공하는 기술을 개발하고 그들의 분석 기술을 연마하며, 주장을 뒷받침하기 위해 객관적 데이터를 사용하는 능력을 향상하는 데 도움이 됩니다.
진로 연결
이 수업이 즐거웠던 학생이라면 아마 다음과 같은 진로 개발 영역에 대해서도 관심이 있을 것입니다.
- 비즈니스 및 금융(기업가)
- 제조 및 엔지니어링(예비 엔지니어링)
교사 지원
학생 과제:
- 디자인 프로세스를 사용해 현실 세계의 문제를 해결하세요
2015 개정 교육과정
공학의 기초[12공학 01-05]
-공학 문제의 다양한 해결책을 창의적으로 설계한다.
공학의 세계[12 공학 02-07]
-IT 기반 융합 공학의 원리를 이해하고 동향을 파악하며, 이 공학의 융합 사례를 탐색한다.
추상화와 알고리즘[12정보03-03]
-복잡하고 어려운 문제를 해결 가능한 작은 단위의 문제로 분해하고 모델링 한다. 프로그래밍[12정보04-09]
-다양한 학문 분야의 문제 해결을 위한 알고리즘을 협력하여 설계한다.


