Make a Cruise Control System
Design a cruise control system that changes the speed of a vehicle with the touch of a button.

Lesson plan
Prepare
- Read through this teacher material.
- If you feel it is needed, plan a lesson using the getting started material in the EV3 Lab Software or Programming App. This will help familiarize your students with LEGO® MINDSTORMS® Education EV3.
Engage (30 Min.)
- Use the ideas in the Ignite a Discussion section below to engage your students in a discussion related to this project.
- Explain the project.
- Split your class into teams of two students.
- Allow your students some time to brainstorm.
Explore (30 Min.)
- Have your students create multiple prototypes.
- Encourage them to explore both building and programming.
- Have each pair of students build and test two solutions.
Explain (60 Min.)
- Ask your students to test their solutions and to choose the best one.
- Make sure they can create their own testing tables.
- Allow some time for each team to finalize their project and to collect assets for documenting their work.
Elaborate (60 Min.)
- Give your students some time to produce their final reports.
- Facilitate a sharing session in which each team presents their results.
Evaluate
- Give feedback on each student's performance.
- You can use the assessment rubrics provided to simplify the process.
Ignite a Discussion
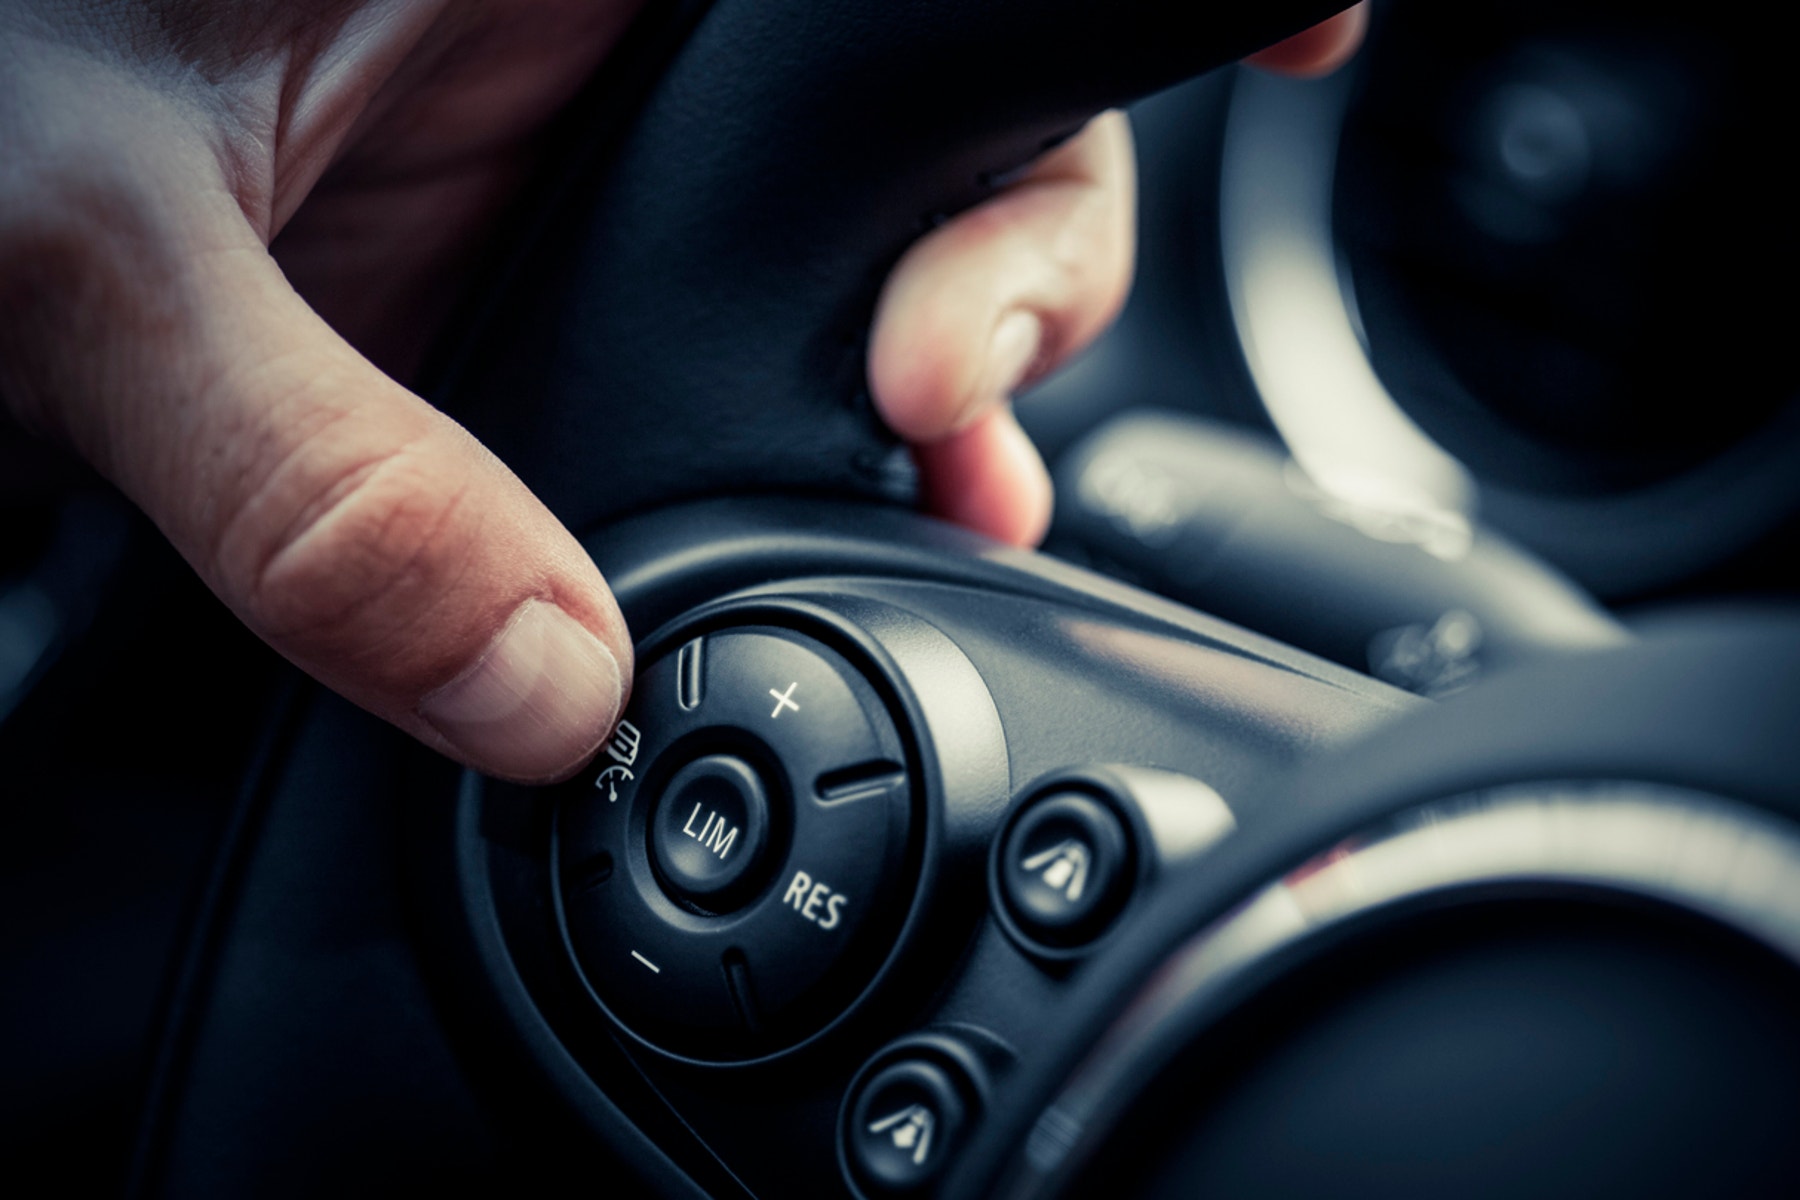
The cruise control function on personal cars is a system that automatically controls the vehicle's speed. Even if it seems like modern technology, it was first introduced in 1958. So how does it work?
Encourage an active brainstorming process.
Ask your students to think about these questions:
- What is the purpose of cruise control in a car?
- How does cruise control help a driver during long drives?
- How could cruise control be even better?
- How would a touch button speed control system be used by a driver?
- What elements will you need to include in your program in order to turn button presses into changes in motor speed?
Give your students some time to answer these questions:
Encourage your students to document their initial ideas and explain why they picked the solution they will use for their first prototype. Ask them to describe how they will evaluate their ideas throughout the project. That way, when they are reviewing and revising, they will have specific information they can use to evaluate their solution and decide whether or not it was effective.
Building Tips
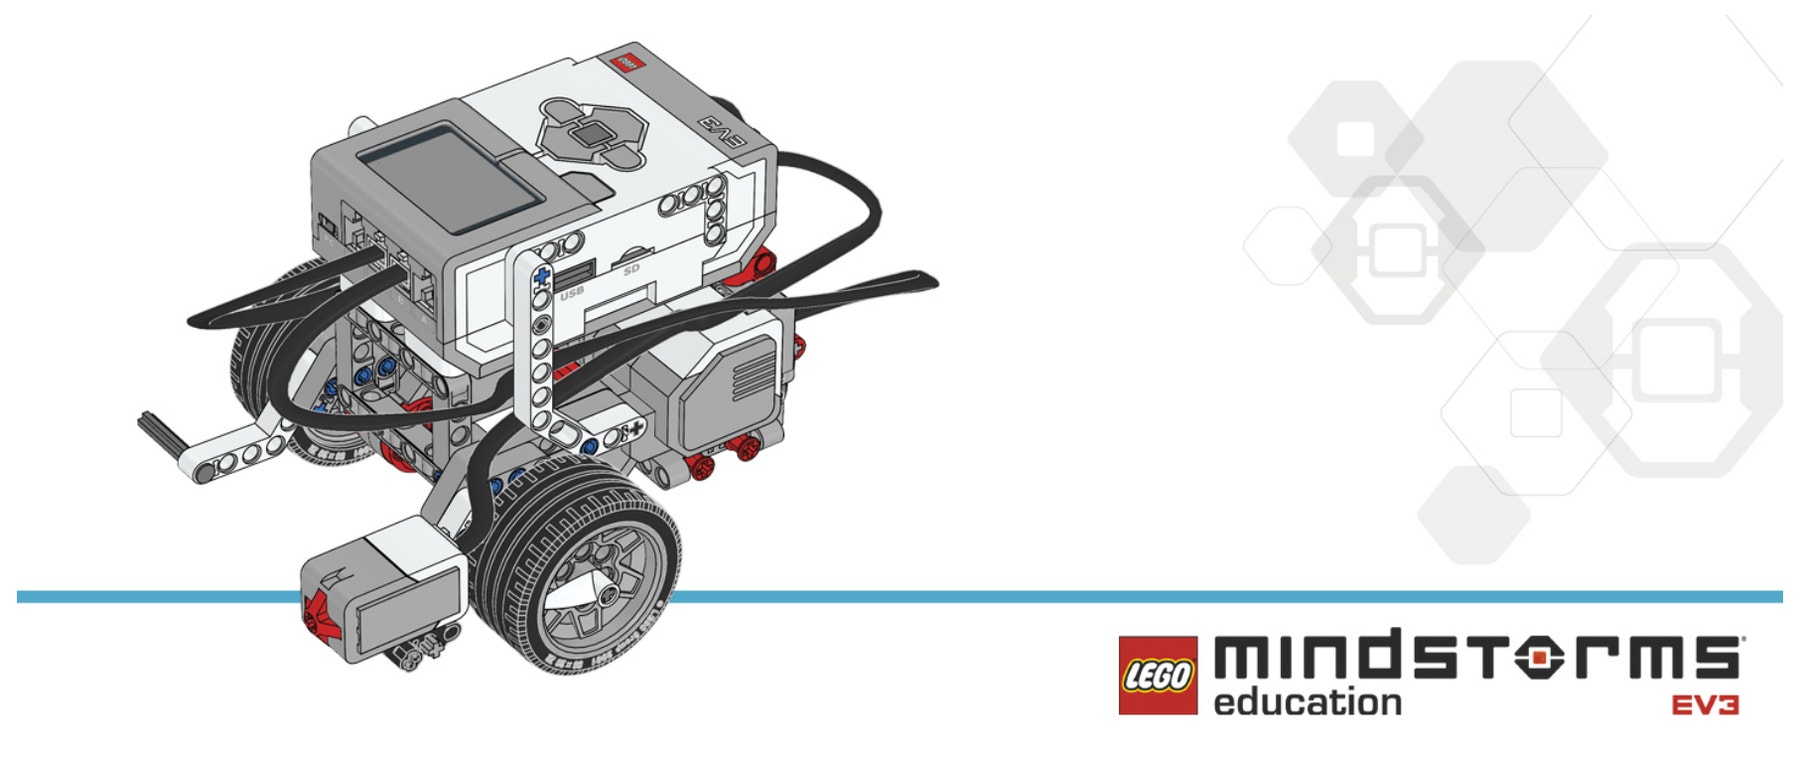
Start by building a vehicle. Your students can use any of the suggested LEGO MINDSTORMS EV3 Driving Base models or design their own. Make sure they include buttons that simulate the buttons found on the steering wheel of a car with cruise control.
Using two Touch Sensors
Explain that in today’s lesson, your students will utilize two Touch Sensors to control and maintain the speed of their Driving Base model.
Coding Tips
Your students will most likely use a Variable Block for this project. A Variable Block is a programming block that can store data (i.e., text, logic, a numeric, or arrays), which can be overwritten at any time while the program is running.
A variable is a way of storing updatable values in a program. The value stored in a variable can be overwritten time and time again as long as the program is running.
Increase Speed with Variable Program
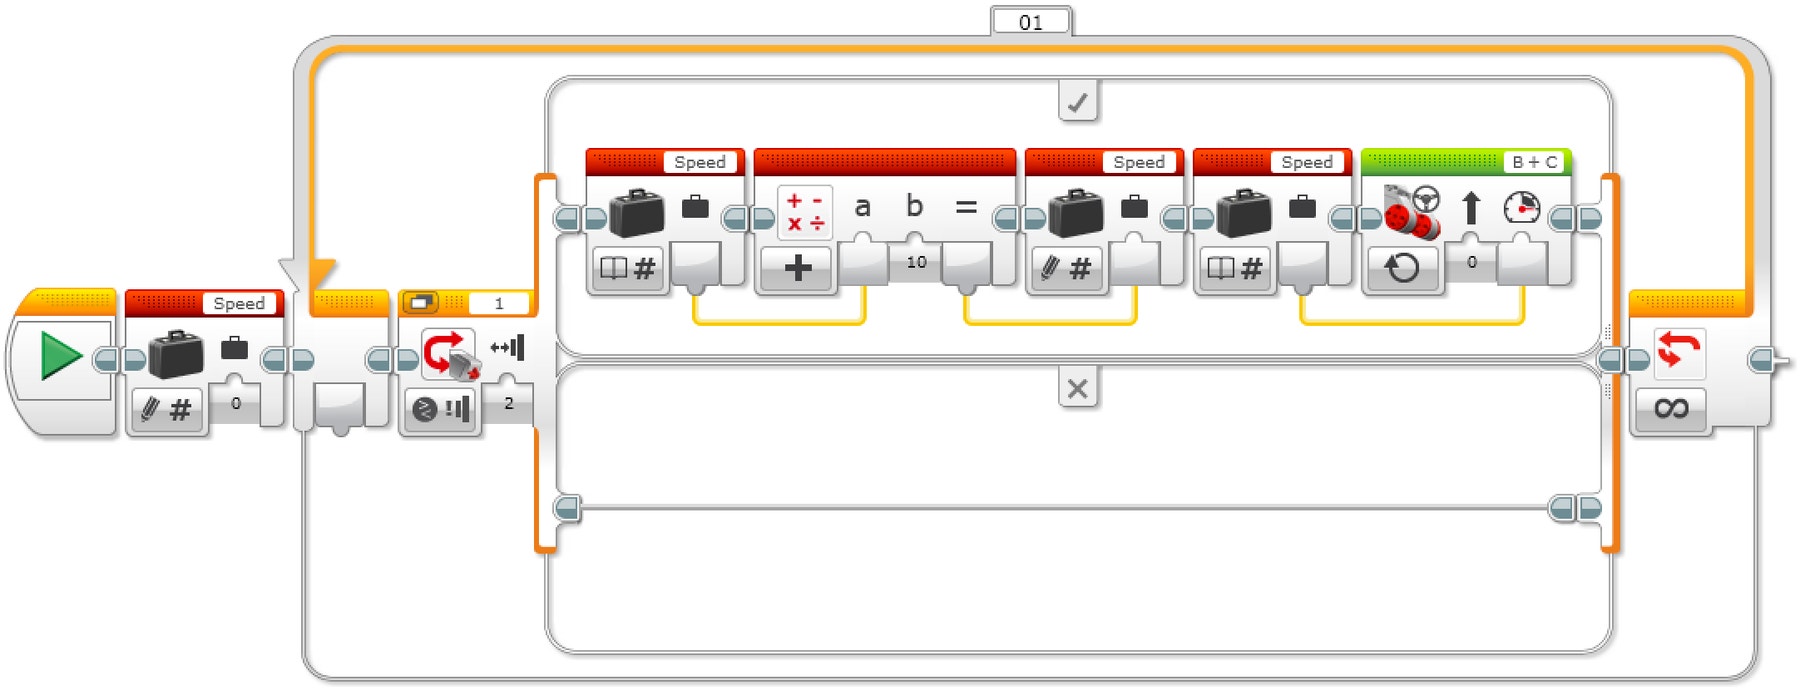
Explanation of the Program
- Start the program.
- Create a Variable Block called “Speed” and enter a value of 0.
- If the Touch Sensor is pressed:
a. Read the variable called “Speed.”
b. Add "10" to the read value.
c. Write the result in the variable called “Speed.”
d. Read the variable called “Speed.”
e. Start motors B and C at a speed set to the value stored in the variable called “Speed” ELSE (do nothing). - Repeat steps 3a to 3e forever.
Increase and Decrease Speed with Variable
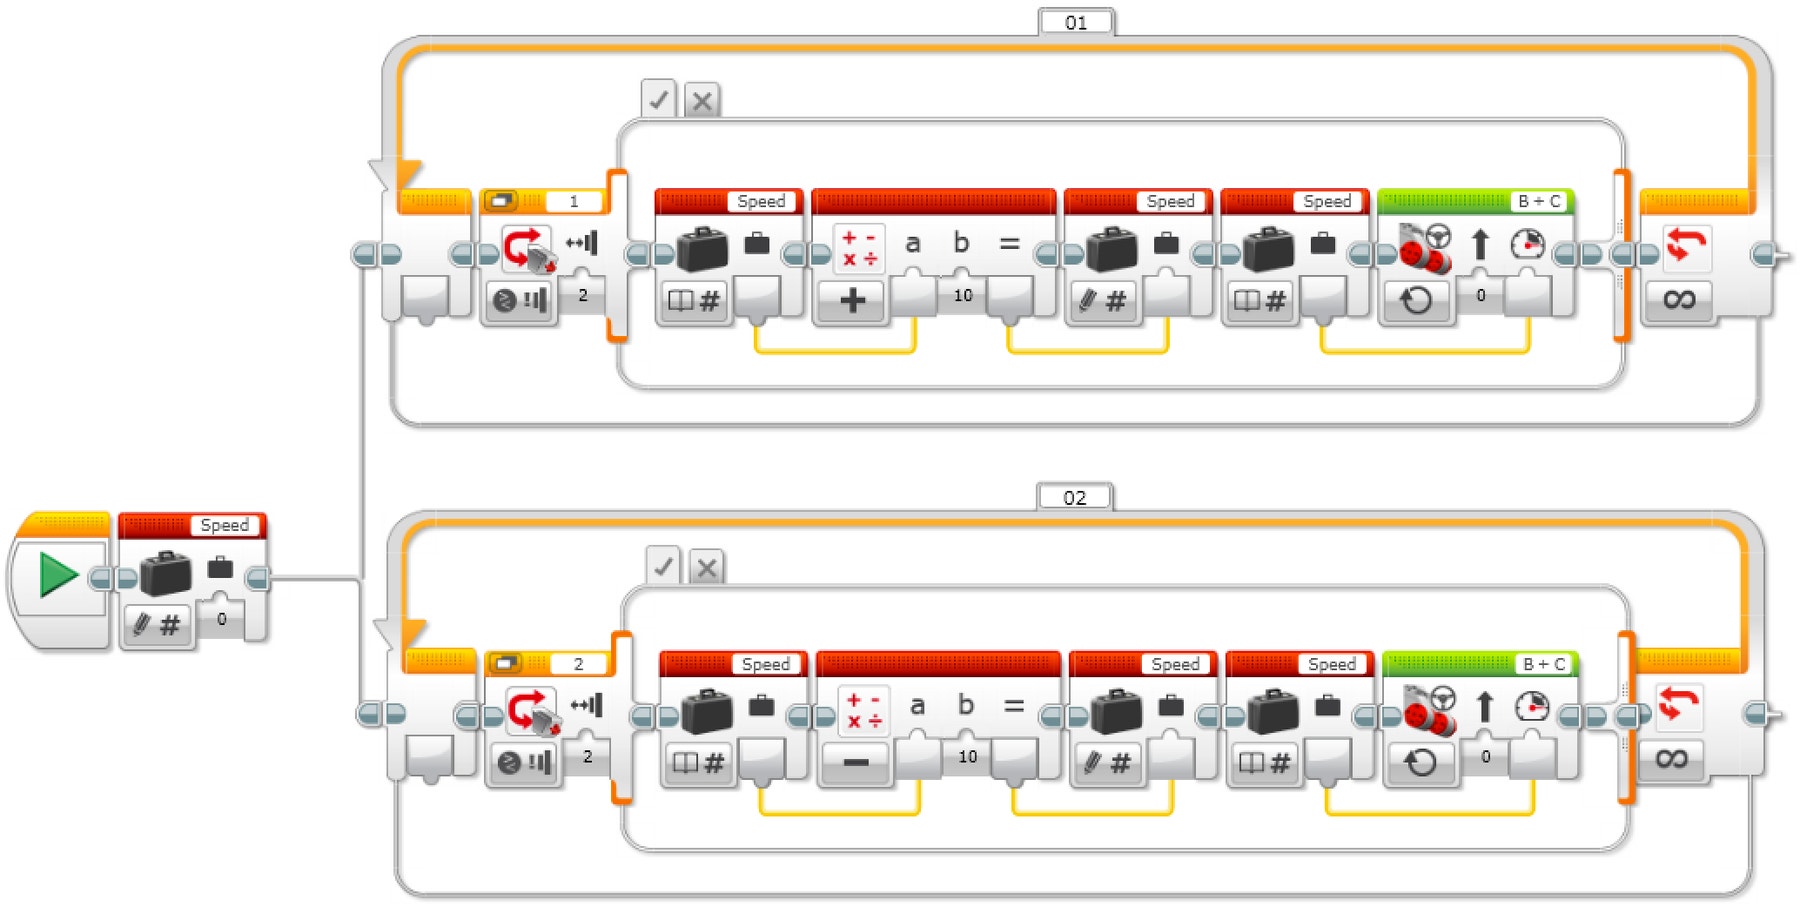
Explanation of the Program
- Start the program.
- Create a Variable Block called “Speed,” enter a value of 0 and start two tasks.
TASK 1
3. If Touch Sensor 1 is pressed:
a. Read the variable called “Speed.”
b. Add "10" to the read value.
c. Write the result in the variable called “Speed.”
d. Read the variable called “Speed.”
e. Start motors B and C at a speed set to the value stored in the variable called “Speed” ELSE (do nothing).
4. Repeat steps 3a to 3e forever.
TASK 2
5. If Touch Sensor 2 is pressed:
a. Read the variable called “Speed.”
b. Subtract "10" from the read value.
c. Write the result in the variable called “Speed.”
d. Read the variable called “Speed.”
e. Start motors B and C at a speed set to the value stored in the variable called “Speed” ELSE (do nothing).
6. Repeat steps 5a to 5e forever.
Increase and Decrease Speed with Variable and Display
Have your students use the Display Block to display the speed of the Driving Base.
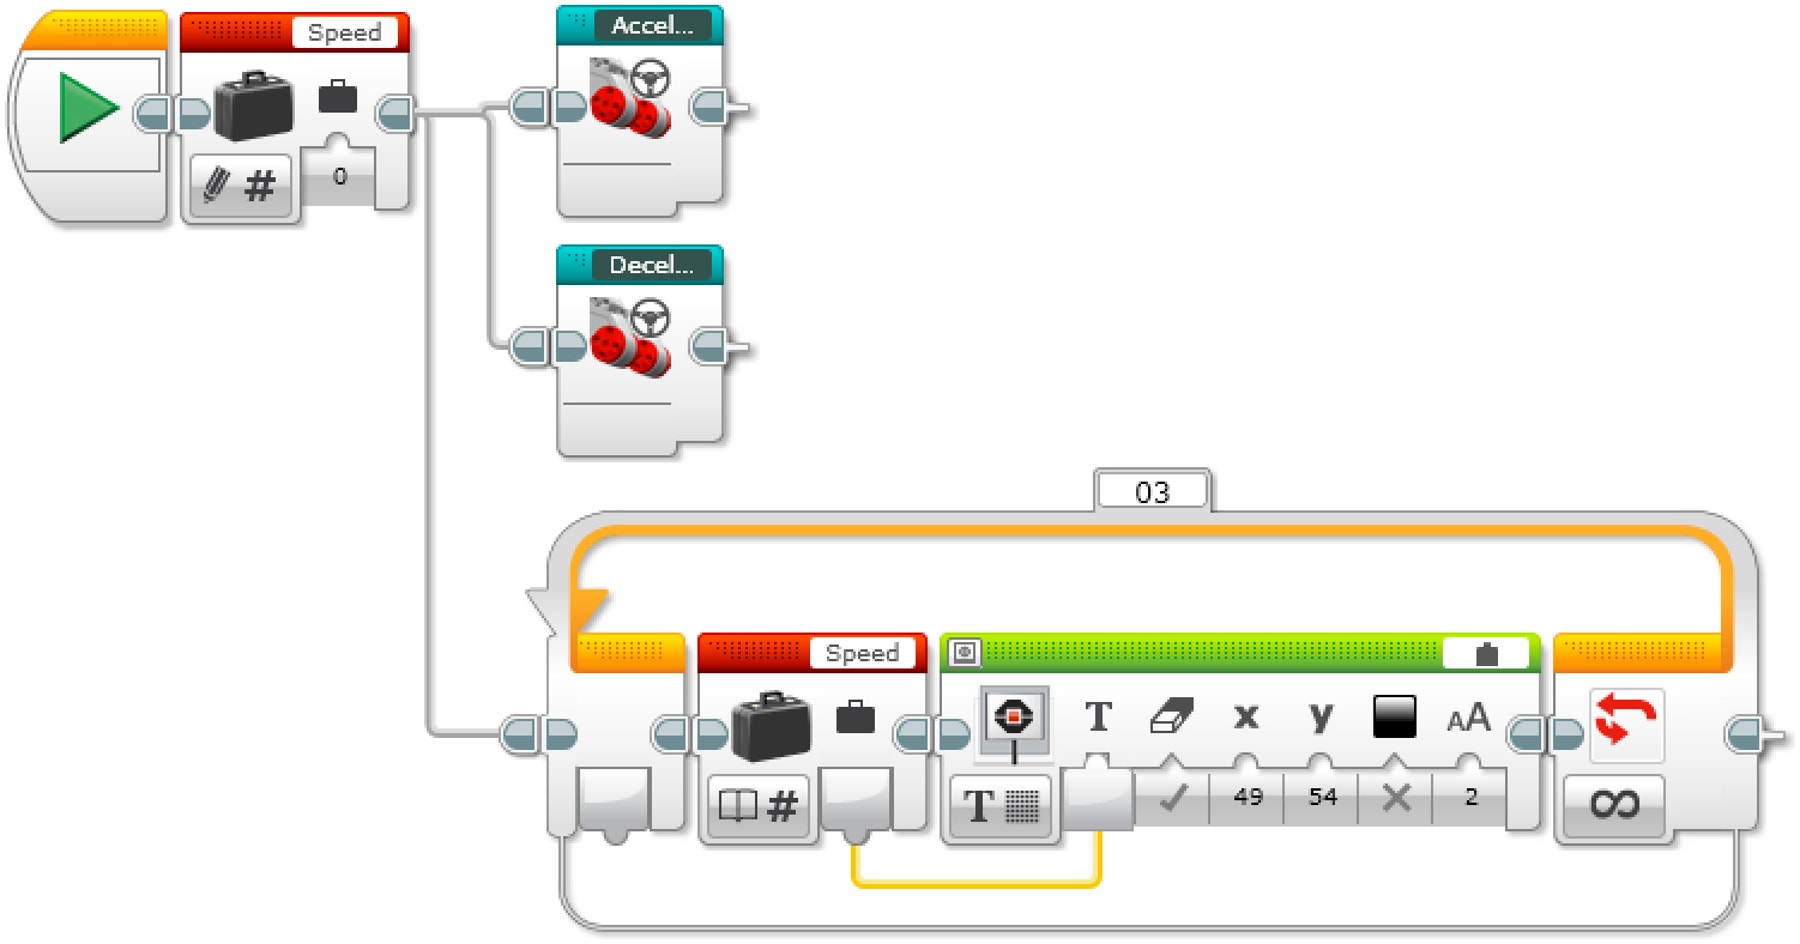
Explanation of the Program
- Start the program.
- Create a Variable Block called “Speed,” enter a value of 0 and start three tasks.
Task 1
3. Start My Block “Acceleration.”
Task2
4. Start My Block “Deceleration.”
Task 3
5. Read the variable called “Speed.”
6. Display the value stored in the variable called “Speed.”
7. Repeat steps 5 and 6 forever.
EV3 MicroPython Program Solutions
Increase Speed with Variable
#!/usr/bin/env pybricks-micropython

from pybricks import ev3brick as brick
from pybricks.ev3devices import Motor, TouchSensor
from pybricks.parameters import Port, Stop, Button
from pybricks.tools import wait
from pybricks.robotics import DriveBase

# Configure 2 motors with default settings on Ports B and C.  These
# will be the left and right motors of the Driving Base.
left_motor = Motor(Port.B)
right_motor = Motor(Port.C)

# The wheel diameter of the Robot Educator Driving Base is 56 mm.
wheel_diameter = 56

# The axle track is the distance between the centers of each of the
# wheels.  This is 118 mm for the Robot Educator Driving Base.
axle_track = 118

# The Driving Base is comprised of 2 motors.  There is a wheel on each
# motor.  The wheel diameter and axle track values are used to make the
# motors move at the correct speed when you give a drive command.
robot = DriveBase(left_motor, right_motor, wheel_diameter, axle_track)

# Set up the Touch Sensor on Port 1.  It is used to increase the speed
# of the robot.
increase_touch_sensor = TouchSensor(Port.S1)

# Initialize the "old_speed" variable to "None."  It is used to check
# whether the speed variable has changed.  Setting it to "None" ensures
# this check will be "True" when the speed variable is initialized with
# a value.
old_speed = None

# Initialize the speed variable to 0.
speed = 0

# This is the main part of the program.  It is a loop that repeats
# endlessly.
while True:

    # Check whether the Touch Sensor is pressed, and increase the speed
    # variable by 10 mm per second if it is.
    if increase_touch_sensor.pressed():
        speed += 10

    # If the speed variable has changed, update the speed of the robot.
    if speed != old_speed:
        old_speed = speed
        robot.drive(speed, 0)

    # Wait 200 milliseconds before starting the loop again.
    wait(200)
Increase and Decrease Speed with Variable
#!/usr/bin/env pybricks-micropython

from pybricks import ev3brick as brick
from pybricks.ev3devices import Motor, TouchSensor
from pybricks.parameters import Port, Stop, Button
from pybricks.tools import wait
from pybricks.robotics import DriveBase

# Configure 2 motors with default settings on Ports B and C.  These
# will be the left and right motors of the Driving Base.
left_motor = Motor(Port.B)
right_motor = Motor(Port.C)

# The wheel diameter of the Robot Educator Driving Base is 56 mm.
wheel_diameter = 56

# The axle track is the distance between the centers of each of the
# wheels.  This is 118 mm for the Robot Educator Driving Base.
axle_track = 118

# The Driving Base is comprised of 2 motors.  There is a wheel on each
# motor.  The wheel diameter and axle track values are used to make the
# motors move at the correct speed when you give a drive command.
robot = DriveBase(left_motor, right_motor, wheel_diameter, axle_track)

# Set up the Touch Sensor on Port 1.  It is used to increase the speed
# of the robot.
increase_touch_sensor = TouchSensor(Port.S1)

# Set up the Touch Sensor on Port 2.  It is used to decrease the speed
# of the robot.
decrease_touch_sensor = TouchSensor(Port.S2)

# Initialize the "old_speed" variable to "None."  It is used to check
# whether the speed variable has changed.  Setting it to "None" ensures
# this check will be "True" when the speed variable is initialized with
# a value.
old_speed = None

# Initialize the speed variable to 0.
speed = 0

# This is the main part of the program.  It is a loop that repeats
# endlessly.
#
# First, increase the speed variable if Touch Sensor 1 is pressed.
# Second, decrease the speed variable if Touch Sensor 2 is pressed.
# Finally, the robot updates its speed if the speed variable was
# changed.
#
# Then the loop starts over after a brief pause.
while True:

    # Check whether Touch Sensor 1 is pressed, and increase the speed
    # variable by 10 mm per second if it is.
    if increase_touch_sensor.pressed():
        speed += 10

    # Check whether Touch Sensor 2 is pressed, and decrease the speed
    # variable by 10 mm per second if it is.
    if decrease_touch_sensor.pressed():
        speed -= 10

    # If the speed variable has changed, update the speed of the robot.
    if speed != old_speed:
        old_speed = speed
        robot.drive(speed, 0)

    # Wait 200 milliseconds before starting the loop again.
    wait(200)
Increase and Decrease Speed with Variable and Display
#!/usr/bin/env pybricks-micropython

from pybricks import ev3brick as brick
from pybricks.ev3devices import Motor, TouchSensor
from pybricks.parameters import Port, Stop, Button
from pybricks.tools import wait
from pybricks.robotics import DriveBase

# Configure 2 motors with default settings on Ports B and C.  These
# will be the left and right motors of the Driving Base.
left_motor = Motor(Port.B)
right_motor = Motor(Port.C)

# The wheel diameter of the Robot Educator Driving Base is 56 mm.
wheel_diameter = 56

# The axle track is the distance between the centers of each of the
# wheels.  This is 118 mm for the Robot Educator Driving Base.
axle_track = 118

# The Driving Base is comprised of 2 motors.  There is a wheel on each
# motor.  The wheel diameter and axle track values are used to make the
# motors move at the correct speed when you give a drive command.
robot = DriveBase(left_motor, right_motor, wheel_diameter, axle_track)

# Set up the Touch Sensor on Port 1.  It is used to increase the speed
# of the robot.
increase_touch_sensor = TouchSensor(Port.S1)

# Set up the Touch Sensor on Port 2.  It is used to decrease the speed
# of the robot.
decrease_touch_sensor = TouchSensor(Port.S2)

# Initialize the "old_speed" variable to "None."  It is used to check
# whether the speed variable has changed.  Setting it to "None" ensures
# this check will be "True" when the speed variable is initialized with
# a value.
old_speed = None

# Initialize the speed variable to 0.
speed = 0

# This is the main part of the program.  It is a loop that repeats
# endlessly.
#
# First, increase the speed variable if Touch Sensor 1 is pressed.
# Second, decrease the speed variable if Touch Sensor 2 is pressed.
# Finally, the robot updates its speed if the speed variable was
# changed, and displays it on the screen.
#
# Then the loop starts over after a brief pause.
while True:

    # Check whether Touch Sensor 1 is pressed, and increase the speed
    # variable by 10 mm per second if it is.
    if increase_touch_sensor.pressed():
        speed += 10

    # Check whether Touch Sensor 2 is pressed, and decrease the speed
    # variable by 10 mm per second if it is.
    if decrease_touch_sensor.pressed():
        speed -= 10

    # If the speed variable has changed, update the speed of the robot
    # and display the new speed in the center of the screen.
    if speed != old_speed:
        old_speed = speed
        robot.drive(speed, 0)
        brick.display.clear()
        brick.display.text(speed, (85, 70))

    # Wait 200 milliseconds before starting the loop again.
    wait(200)
Language Arts Extension
To incorporate language arts skills development, have your students:
- Use their written work, sketches, and/or photos to summarize their design process and create a final report.
- Create a video demonstrating their design process starting with their initial ideas and ending with their completed project.
- Create a presentation about their program.
- Create a presentation that connects their project with real-world applications of similar systems and describes new inventions that could be made based on what they have created.
Assessment Opportunities
Teacher Observation Checklist
Create a scale that matches your needs, for example:
- Partially accomplished
- Fully accomplished
- Overachieved
Use the following success criteria to evaluate your students' progress:
- Students can identify the key elements of a problem.
- Students are autonomous in developing a working and creative solution.
- Students can clearly communicate their ideas.
Self Assessment
Once your students have collected some performance data, give them time to reflect on their solutions. Help them by asking questions, like:
- Is your solution meeting the Design Brief criteria?
- Can your robot’s movement(s) be made more accurate?
- What are some ways that others have solved this problem?
Ask your students to brainstorm and document two ways they could improve their solutions.
Peer Feedback
Encourage a peer review process in which each group is responsible for evaluating their own and others’ projects. This review process can help students develop skills in giving constructive feedback as well as sharpen their analysis skills and ability to use objective data to support an argument.
Career Links
Students who enjoyed this lesson might be interested in exploring these careers pathways:
- Business and Finance(Entrepreneurship)
- Manufacturing and Engineering (Pre-Engineering)
Teacher Support
Students will:
- Use the design process to solve a real-world problem
Pupil Material
Share with:
 Google Classroom


