Musical Vibration
Maria plays piano. She wants to make more music. Can you build her something to play on?
Prepare
(NOTE: This lesson contains a Part A and a Part B. Both are important to access the full learning of the curriculum. If time is limited, review both parts to choose elements that meet your students’ needs.)
In this lesson, the key learning is in planning and conducting an investigation into how vibration causes sound. Designing and building a model is a fun, hands-on way to conduct the investigations. Examples are provided for inspiration. Students should build their ideas for a drum or other testing model.
- Science Background - Musical Vibration:
- When an object vibrates, it creates a wave of energy (called a sound wave) that travels through the air. The wave vibrates your ear drums, which your brain recognises as sound.
- Musical instruments can be classified by how they produce sound waves. In percussion instruments (drum, xylophone), the entire instrument vibrates when played.
- Stringed instruments (violin, guitar) generate sound waves from the vibrating strings.
- Wind instruments (trumpet, recorder, flute) produce sound by vibrating the column of air inside the instrument.
- Evidence of vibrations of musical instruments can be observed by touch, sometimes by sight and by their sounds.
- NOTE: If students cannot feel or observe any vibration with the white LEGO plate, suggest they use the paper cup where vibration will be easier to observe.
- Build Prior Knowledge - Musical Vibration: Using your core science materials, share information, images and definitions.
- Common musical instruments include a drum, triangle, tuning fork, xylophone, guitar, piano, flute, etc.
- When an object vibrates, it moves or shakes back and forth.
- Vibrating materials cause sound waves.
- Sound waves can cause materials to vibrate.
- Key vocabulary: vibrate, vibration, instrument
- Building and Programming Experience: Review the suggestions in the Unit Plan. For this lesson, you may also want to
- Use the Motor Blocks sections of the Help>Icon Blocks menu in the SPIKE App to provide more support.
- Materials: Collect some musical instruments to demonstrate and test: drum, triangle, tuning fork, xylophone, guitar, piano or flute. Provide student pairs with an elastic band, paper cup and shallow bowl to hold 1 cm of water. Determine if you will allow students to test vibrations with a bowl of water and establish any needed protections. Create logs (one per student) for recording sounds if using the Extension.
PART A (45 minutes)
Engage
(Whole Class, 10 minutes)
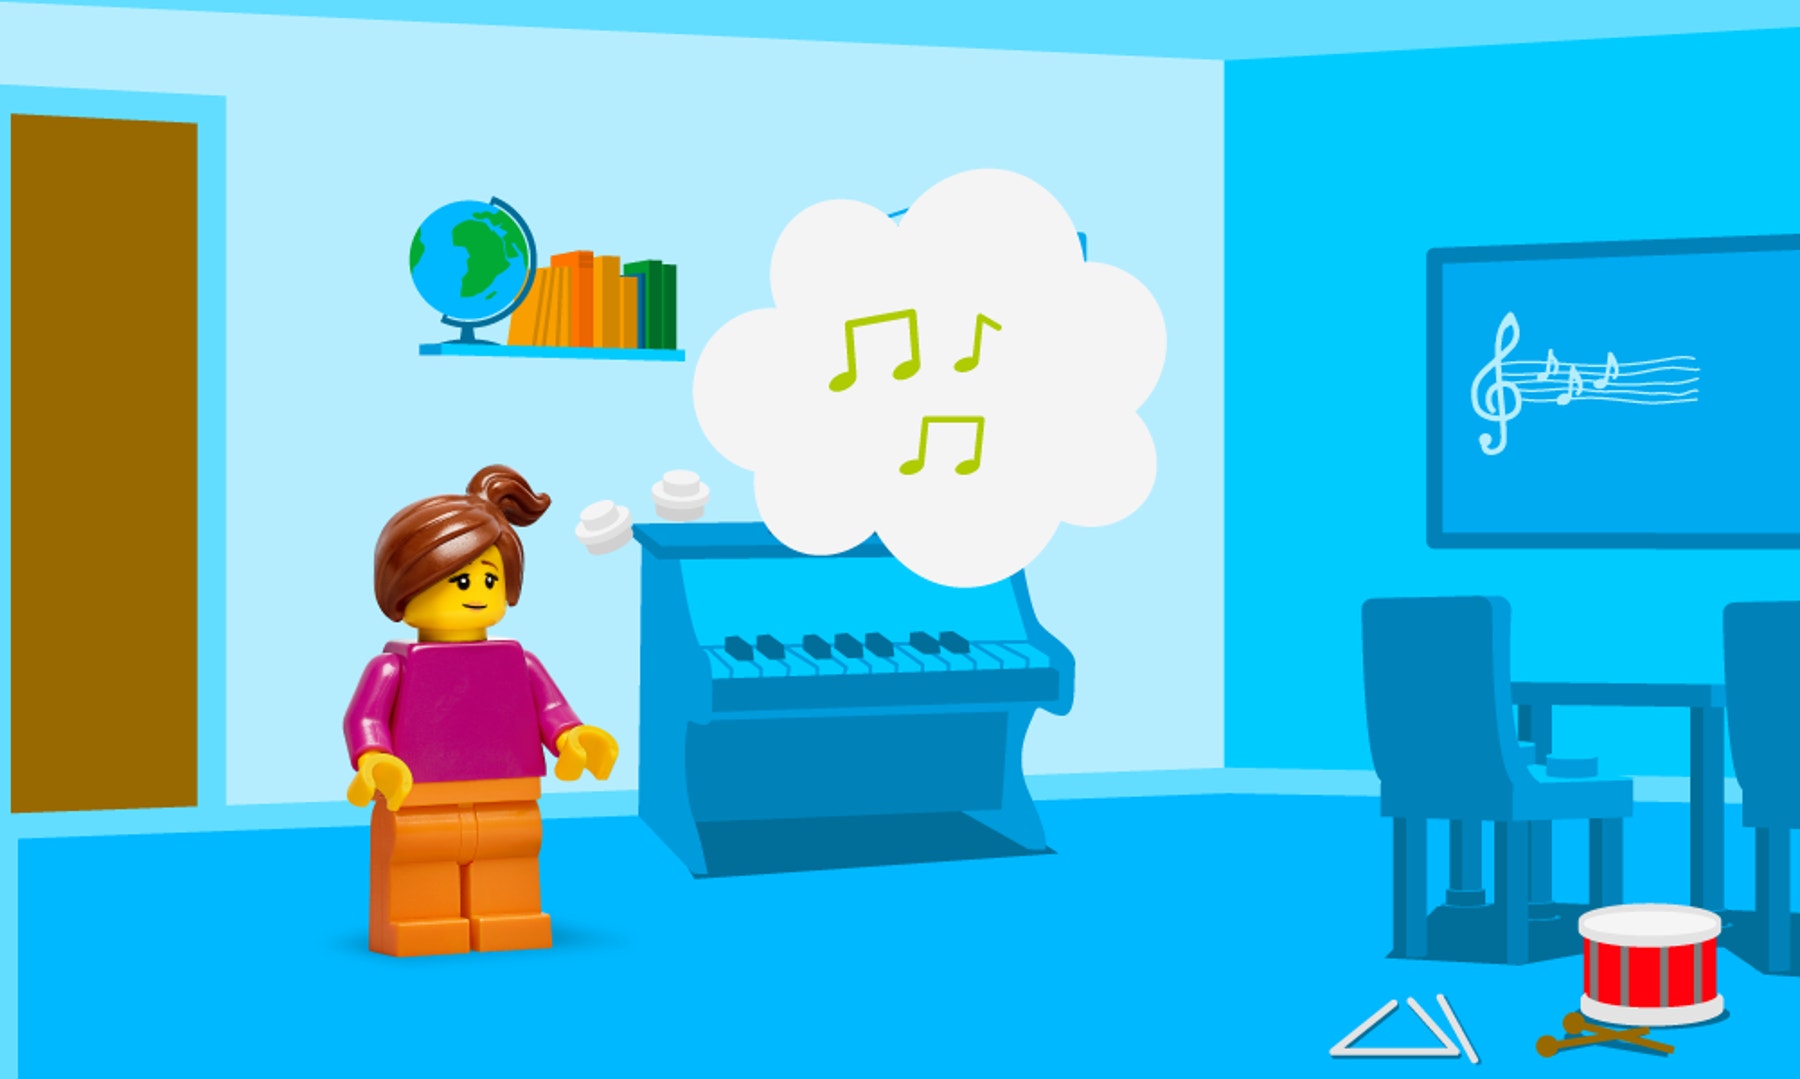
Introduce the story’s main character(s) and the first challenge: Maria plays piano. She wants to make more music. Can you build her something to play on?
THINK – Facilitate a brief discussion about the lesson topic(s), using the story picture if you wish and demonstrating use of the tuning fork or collected musical instruments.
- Let students touch each instrument and feel the vibration when you/they play them. Then ask: What did you feel when you touched the instrument? (vibrating/shaking/moving)
- When did it vibrate? (When the teacher/student plays the instrument or when the sound comes out)
- What do you think makes it vibrate? (Elicit students’ predictions for how each instrument makes sound. Record common ideas for shared reference.)
- How can you make an instrument that vibrates this same way? Turn to your neighbour and share ideas. Then we’ll do some tests to find out. (Elicit testing ideas for shared use.)
Distribute a LEGO® Education SPIKE™ Essential Set and a device to each group.
Explore
(Small Groups, 25 minutes)
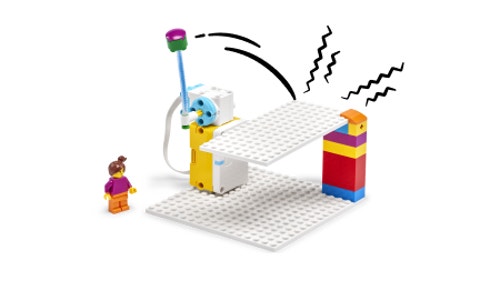
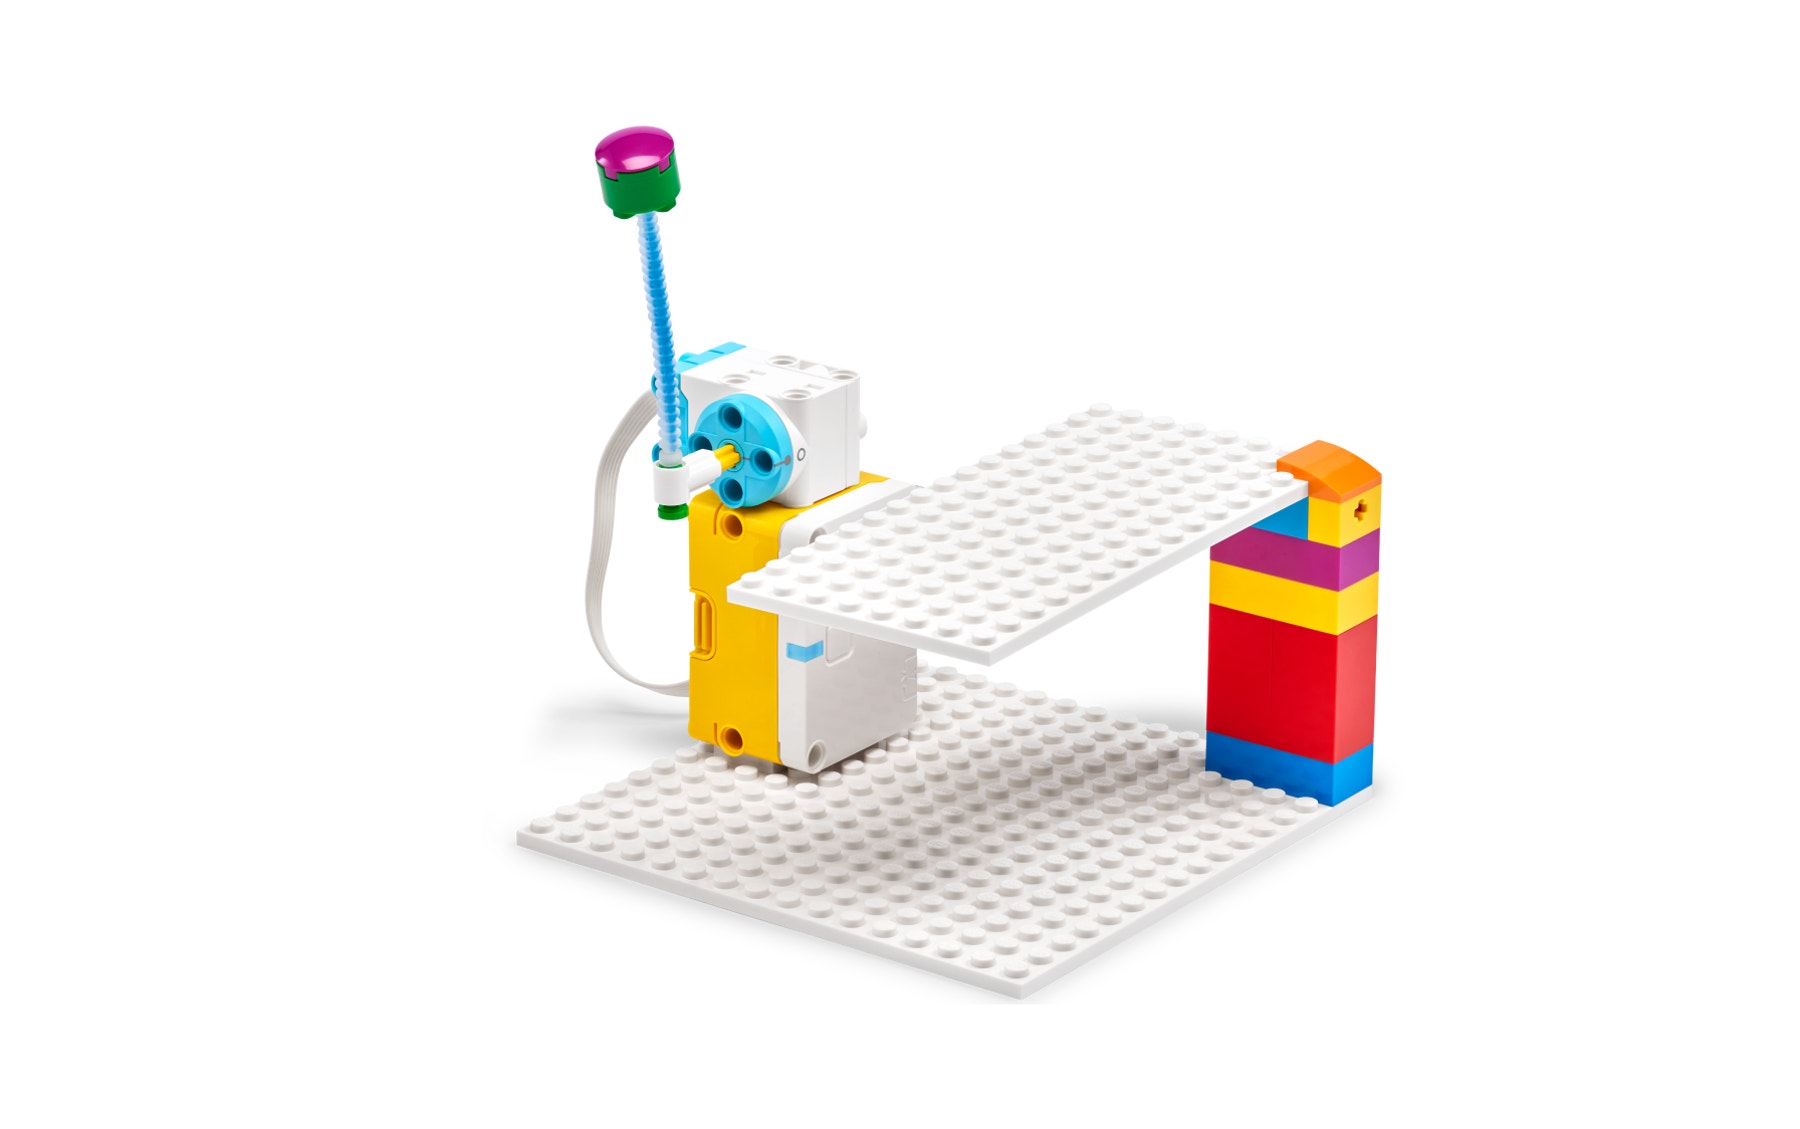
As students work, consider sharing the examples below as support for building or programming. Clarify that the drum model is one idea for testing, but students may build their own idea for a drum or other musical instrument.
Have students work in pairs to:
- Plan a way to test their prediction about how instruments make sound (by creating vibrations), starting with a drum. (This might include feeling vibration or movement on the white plate when sound is made or observing ripples in a bowl or pan of water placed atop the surface of the drum. NOTE that not all instruments will create enough vibration to feel on the plate or to create ripples.)
- Use the base model to BUILD a drum to help Maria play more music.
- PROGRAM the model so the drumstick strikes the white plate repeatedly.
Have partners take turns testing their predictions using the plan they made, including
- Striking the white plate with the drumstick.
- Observing (seeing, hearing, feeling) if the white plate vibrates or moves.
- Identifying when the drum makes sound.
- Finding different sounds the drum can make by playing it in multiple ways to make different vibrations (e.g., using different “drumsticks”, such as either end of a pencil, dragging a drumstick along the plate surface instead of striking it, etc.).
- Describing what they saw, heard and felt.
Facilitate brainstorming about ways to use LEGO® elements or other materials, such as a paper cup, to change the drumming surface to make different sounds.
Halfway through work time, have students exchange ideas using a familiar classroom routine and then update their models with inspiration from sharing.
Example Ideas

Explain
(Whole Class, 10 minutes)
Gather students for sharing.
Have each group use their model to demonstrate and explain:
- What idea (prediction) they tested and how. (What did they think would happen?)
- How does their drum make sound?
- What did they do to make different sounds with their drum?
- What is happening to the white plate each time they hear sound from it? How do they know? Is what happens always the same?
- Share what they learned and give examples.
- If the test plan worked or they had to change it.
Guide students to use evidence from their investigation to support the idea that vibrating materials can make sound. (Students should notice that tapping the white plate creates vibrations or moves and that the amount of vibration changes according to the action of the drumstick. They should provide evidence from what they saw, felt and heard. They may not feel any vibration.)
If you wish to continue to Part B – Explain, have students keep their models intact or allow time for rebuilding.
PART B (45 minutes)
Explain
(Whole Class, 10 minutes)
- Repeat the steps from Part A – Explain to have additional groups demonstrate and explain their learning.
Elaborate
(Whole Class, 30 minutes)
(5 min) Recall the demonstrations from the Engage section and share background to help students Elaborate:
- Besides drums, there are many other kinds of musical instruments, including string instruments. A musician uses a bow or pick or plucks the strings with their fingers to make sounds on a string instrument.
(5 min) Have students complete the next challenge in the app:
- Plan and test how string instruments make sound. (They can use or adapt their testing plan from Explore to investigate if and how an elastic band can make sound.)
(15 min)
- Distribute the elastic bands.
- Have students stretch and pluck the band. What do you hear? See? Feel? (They should see the band move back and forth, feel it vibrate and hear a sound.)
(5 min) Invite students to share knowledge, ideas or skills that
- Helped them complete the challenge.
- They learned while building and testing.
Have students clean up the sets and work areas.
Evaluate
(Whole Class, 5 minutes)
- Ask guiding questions to elicit students’ thinking and their decisions while ideating, building and programming.
Observation Checklist
Review the key objectives (Teacher Support box).
Use the checklist to observe students’ progress:
- Their drum model includes a vibrating part.
- Their investigation plan includes a way to test how instruments (and other materials) make sound, including how actions make materials vibrate.
- They use evidence from their model to explain that vibrating materials cause sound.
Self-Assessment
Have each student choose the brick that they feel best represents their performance。
- Blue brick: I think I can follow instructions to create a program.
- Yellow brick: I can follow instructions to create a program.
- Green brick: I can follow instructions to create a program and I can help a friend do it too.
Peer Feedback
In their small groups, have your students discuss their experiences working together.
Encourage them to use statements like these:
- I liked it when you…
- I’d like to hear more about how you…
Differentiation
Simplify this lesson by:
- Scaffolding the planning stage to connect steps with students’ predictions about sound and vibration. For each step of predicting, testing and observing, prompt and ask questions such as What might happen if you hit the plate with the drumstick? Try it. Do you feel the plate move?
Increase the difficulty by: - Challenging students to build a string instrument (similar to a guitar, violin, cello, etc.) using their SPIKE™ Essential Set. Have them use or adapt their test plan to investigate how the instrument makes sound. Alternatively, have students investigate whether sound can make materials vibrate. They can plan a test with a piece of paper and a speaker.
Extension
- Provide each student with a blank paper log with hour and half-hour marks. Have them use it to keep a written, visual or audio log of sounds they observe at different times of the day (humming of a refrigerator, a television, a bird calling or flapping its wings, a squeaking playground swing, thumping of a bouncing ball). Have students write, draw (e.g., circle or use arrows on a picture) or say the time when they observed the sound and what object or material they think is vibrating to produce each sound.
If facilitated, this will extend beyond the 45-minute lesson.
Teacher Support
Students will:
- Build a model drum that uses vibration to make a sound when struck.
- Plan and conduct investigations to test if vibrating materials produce sound.
- Use evidence from their investigation to support the idea that vibrating materials can make sound.
(one for every two students)
- LEGO® Education SPIKE™ Essential Set
- Device with the LEGO Education SPIKE App installed
- See Prepare - Materials.
ACSSU020 ACTDEP005 ACTDIP004 ACELY1656 ACMNA012 ACELY166 ACMMG020
Science (Physical Sciences)
Foundation to Year 2 Light and Sound:
ACSSU020: "Light and sound are produced by a range of sources and can be sensed."
Technologies (Design and Technologies)
Years F–2 Design and Technologies Processes and Production Skills:
ACTDEP005: "Explore needs or opportunities for designing, and the technologies needed to realise designed solutions."
Technologies (Digital Technologies)
Years F–2 Digital Implementation:
ACTDIP004: "Follow, describe, and represent a sequence of steps and decisions (algorithms) needed to solve simple problems."
English (Literacy)
Year 1 Speaking and Listening:
ACELY1656: "Engage in conversations and discussions, using active listening behaviours, showing interest, and contributing ideas, information and questions."
Mathematics (Number and Operations in Base Ten)
Year 1 Strategies for Addition and Subtraction:
ACMNA012: "Develop confidence with number sequences to and from 100 by ones from any starting point. Skip count by twos, fives, and tens starting from zero."
English (Literacy - Language Arts Extension)
Year 1 Creating Texts:
ACELY1661: "Create short imaginative, informative and persuasive texts that show emerging use of appropriate text structure, sentence-level grammar, word choice, spelling, punctuation and appropriate multimodal elements, for example illustrations and diagrams."
Mathematics (Measurement and Data)
Year 1 Telling Time:
ACMMG020: "Tell time to the half-hour."


