Unlocking a Car
Design a way to use passcodes to protect cars from thieves.

Connect
(5 minutes)
Did you know that it’s now possible to start a car without a key? The “car key” or fob allows the engine to be started remotely. The driver just needs to press a combination of buttons and the brake or clutch in order to start the car. In this lesson, students will learn how they can do the same using a combination of sensors and algebraic logic to start their wheeled robots.
Ignite a classroom discussion around the following questions:
- How do electronic keys work?
- How can we ensure that each key is only able to open one car?
Allow the students to select the tool(s) they find most appropriate for capturing and sharing their ideas. Encourage them to document their thoughts using text, videos, images, sketchnotes, or another creative medium.
Construct
(15 to 30 Minutes)
Build
Students will construct the Robot Educator base model, and then they will add the Ultrasonic Sensor pointing forward.
Have the students perform the following building check before they program their robots:
- Are the wires correctly connected from the motors to ports B and C?
- Are the wheels correctly installed?
- Are the wheels rotating freely?
- Are the wires correctly connected from the Ultrasonic Sensor to 4?
Program
Have the students begin a new project in the EV3 programming environment.
Have them program their robot to first detect the presence of the driver and then that the driver has pressed the ignition button.
In this example:
-The Ultrasonic Sensor is used to simulate the key in the driver’s pocket when the driver is in the car. This is known as “entering the bubble”.
- The Brick Button is used to turn on the car.
- The Brick Display is used as the dashboard to display messages.
Once the students have gotten their wheeled robot to display messages, ask them to place their program inside a loop in order to repeat those messages.
The suggested program uses two inputs in a sequence.
Allow the students to select the tool(s) they find most appropriate for capturing and sharing their pseudocode. Encourage them to use text, videos, images, sketchnotes, or another creative medium.
POSSIBLE SOLUTION
FILENAME: CODING-06.EV3 (TAB: 1)

PRESENCE DETECTION AND CAR IGNITION IN SEQUENCE
- Start the program.
- Wait for the Ultrasonic Sensor to detect an object at a distance of less than 5 cm.
- Show a welcome message on the Brick Display.
- Wait for the Up Button to be pressed.
- Show an ignition message on the Brick Display.
- Wait 3 seconds, then end the program.
Note
Refer students to the Robot Educator Tutorials for further assistance. In the EV3 Software:
Robot Educator > Beyond Basics > Logic
Robot Educator > Basics > Stop at Object
Robot Educator > Beyond Basics > Loop
Robot Educator > Beyond Basics > Switch
Robot Educator > Beyond Basics > Data Wires
Robot Educator > Beyond Basics > Sensor Blocks
Contemplate
(35 minutes)
Students will now have to use the two inputs simultaneously.
Have the students create a program that only grants control of the robot once the right start combination is activated.
Have the students reflect on their first program. Ask them how they can create a code to activate the robot. Guide them through the use of the Logic Operations Block. Explain that the Logic Operations Block is similar to a Venn diagram in the way it behaves. Point out the many conditions this diagram has and how it relates to the Logic Operations Block in the EV3 Software. To do this, you might explain the following image and how the results are created.
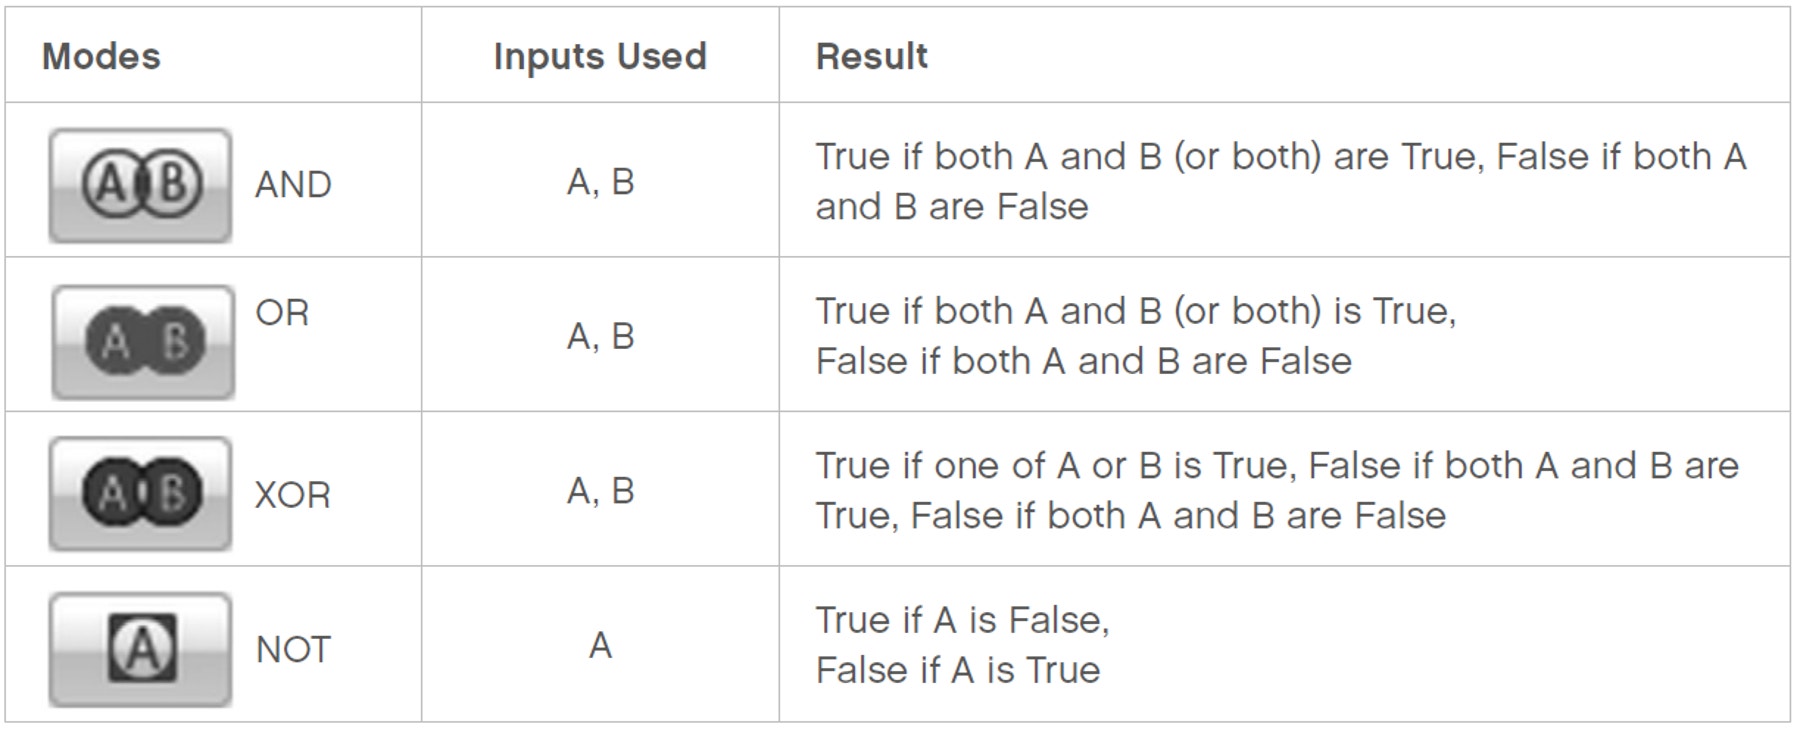
The EV3 Software Logic Operations Block creates a True/False output depending on the criteria set in the block. For example, A and B gives a True output only when A and B are both True.
POSSIBLE SOLUTION
FILENAME: CODING-06.EV3 (Tab: 2)
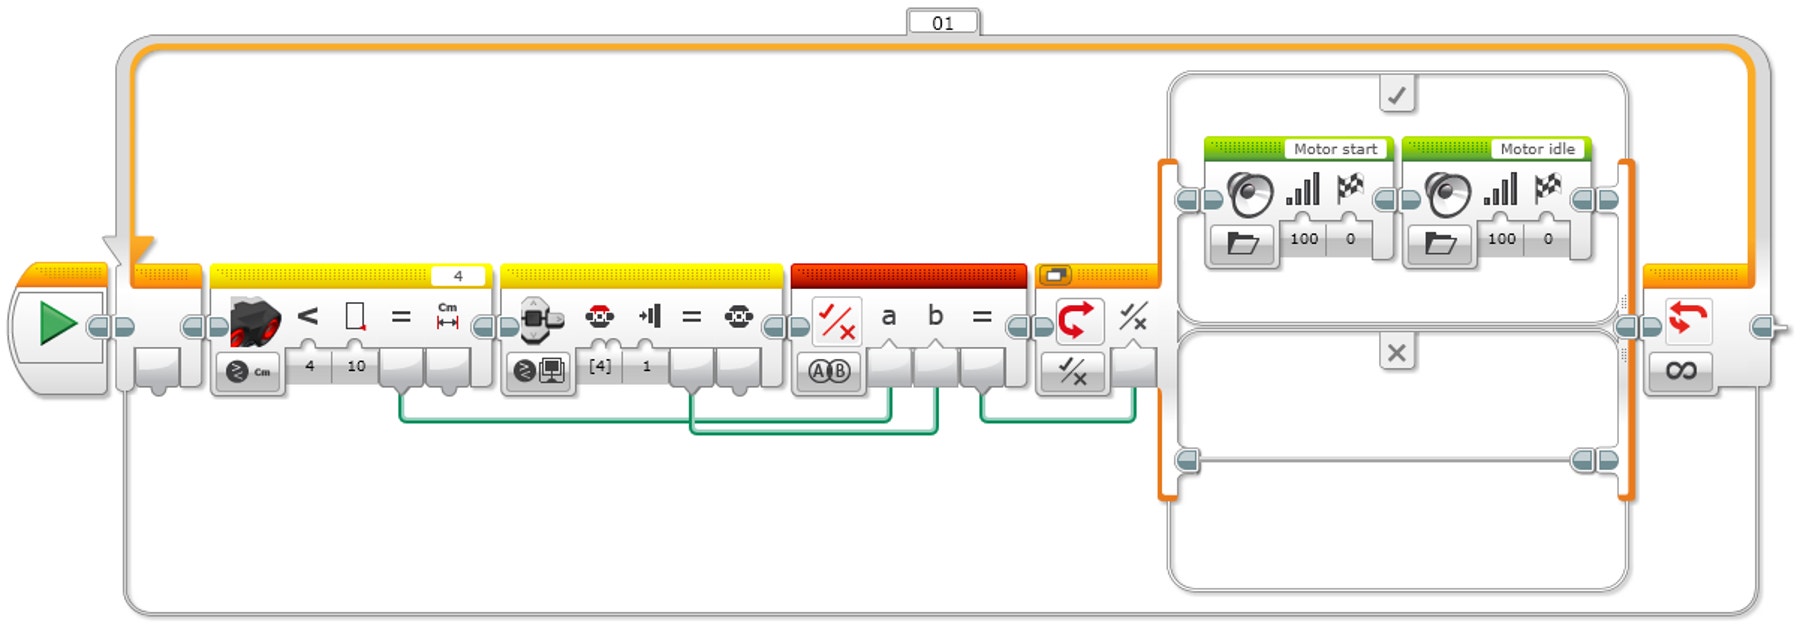
SIMULTANEOUS CONDITIONS TO START A CAR
- Start the program.
- The Ultrasonic Sensor sends a True result when it detects an object at a distance of less than 4 cm.
- The Brick Button sends a True result when the Up Button has been pressed.
- The Logic Operations Block waits for two True messages to be received before sending a True message to the logic switch.
- The logic switch compares the message received from the Logic Operations Block.
If it is True, the EV3 Brick plays two sounds.
If it is False, nothing happens. - Repeat steps 2 to 5 forever.
Differentiation option
Have the students design a program to simulate a passcode with three criteria. Make sure the students understand that all three of the criteria must be true in order for the car to start. For example:
The key or the fob itself needs to be inside the car.
The brake or clutch needs to be pressed.
The button must be pressed in order to turn on the ignition.
Students could connect the Touch Sensor to simulate the clutch or brake.
Have the students design a program that displays an error message if all three of the criteria for starting the car aren’t met.
POSSIBLE SOLUTION
FILENAME: CODING-06.EV3 (Tab: 3)
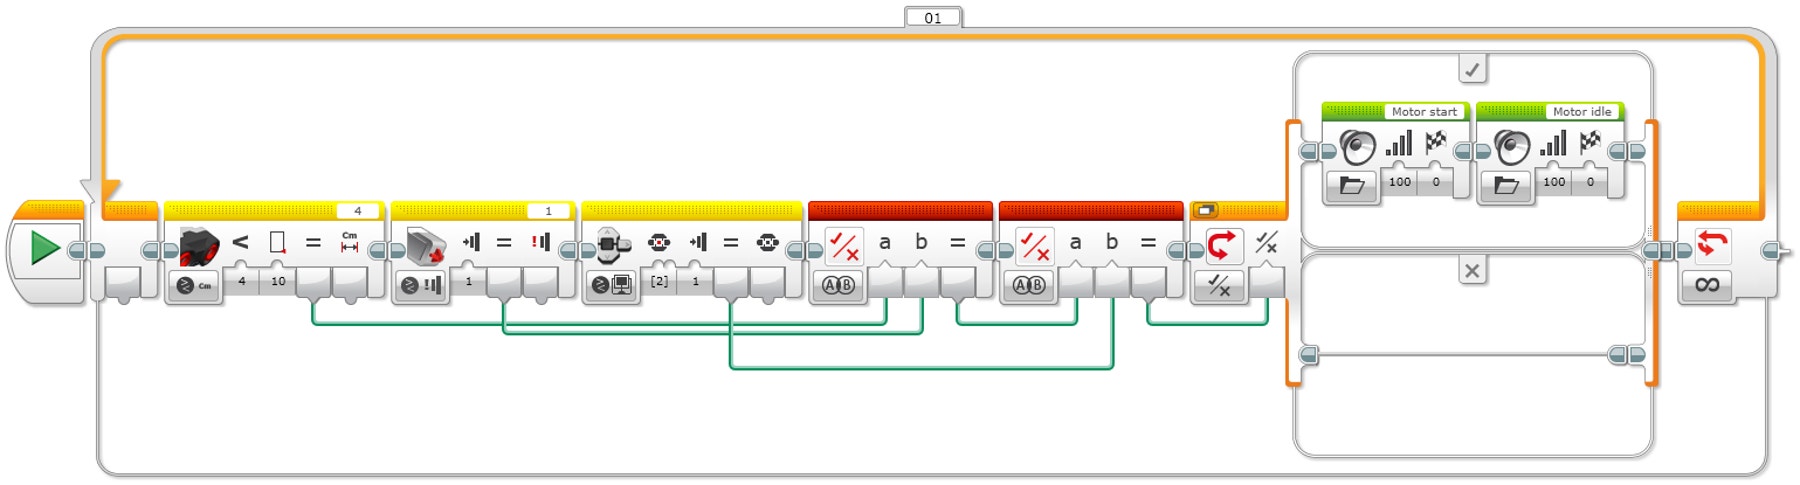
THREE SIMULTANEOUS CONDITIONS TO START A CAR
- Start the program.
- The Ultrasonic Sensor sends a True result when it detects an object at a distance of less than 4 cm.
- The Touch Sensor sends a True result when pressed.
- Brick Button sends a True result when the enter button has been pressed.
- The Logic Operations Block waits for two True messages to be received before sending a True message to the logic switch (messages come from the Ultrasonic Sensor and Touch Sensor).
- The Logic Operations Block waits for two True messages to be received before sending a True message to the logic switch (messages come from the first Logic Operations Block and the Brick Button).
- The logic switch compares the messages received from the Logic Operations Block.
If it is True, the EV3 Brick plays two sounds.
If it is False, nothing happens. - Repeat steps 2 to 7 forever.
Share
Allow the students to select the tool(s) they find most appropriate for capturing and sharing their creations, unique thinking, and learning process. Encourage them to use text, videos, images, sketchnotes, or another creative medium.
How did the students find using the Data Wires? Ask them to share their thoughts. Point out that wires can be moved around and tidied up, which is important to ensure programs don’t become too messy.
Have a discussion about the Wait Block and logical operations. Explain that the Wait Block is generally used with one sensor at a time and that the Logic Operations Block allows users to use multiple sensors simultaneously.
Assessment Opportunity
Specific rubrics for assessing computational thinking skills can be found under 'Assessment'.
Continue
(45 Minutes)
Using Text-Based Programming
Have the students explore text-based programming solutions so they can compare different programming languages.
Swift Playground - POSSIBLE SOLUTION
/*
As of summer 2017, there is no way to use EV3 Brick’s buttons in Swift playground.
In this example, EV3 Up button has been replaced with touch sensor 2.
*/
ev3.WaitForUltrasonicCentimeters (on: .four, lessThanOrEqualTo: 5)
ev3.display (text: "Welcome")
ev3.WaitFor (seconds: 3)
ev3.WaitForTouch (on: .One)
ev3.display (text: "Ignition")
ev3.WaitFor (seconds : 3)
ROBOT C: POSSIBLE SOLUTION
#pragma config(StandardModel, “EV3 _ REMBOT”)
/*
Create a program that shows how a keyless ignition works. The
Ultrasonic Sensor welcomes the driver. The Touch Sensor works the
ignition.
*/
task touchTask()
{
    //Wait for the touch sensor to be pressed.
    while(getTouchValue(touchSensor) == 0)
    {
        //Do Nothing.
        sleep(10);
    }
    //Display Text on the LCD Screen.
    eraseDisplay();
    displayCenteredBigTextLine(4, “Ignition”);
    //Display text for 3 seconds.
    sleep(3000);
}
task main()
{
    //Start the second task to monitor the touch sensor.
    startTask(touchTask);
    //Wait for the sonar sensor to see an object that is less than or equal to 5cm away.
    while(getUSDistance(sonarSensor) >= 5)
    {
        //Do Nothing.
        sleep(10);
    }
    //Display text on the LCD Screen.
    eraseDisplay();
    displayCenteredBigTextLine(4, “Welcome”);
    //Display text for 3 seconds.
    sleep(3000);
}
Warning! This may be dangerous!
The following is a possible solution using the text-based programming language ROBOTC. You may choose to use any other LEGO MINDSTORMS Education EV3 compatible text-based programming languages.
LEGO Education has no ownership of the ROBOTC platform and does not provide any support or guarantee of the quality of the user experience and technology used. All required set up information is provided by ROBOTC at robotc.net. We recommend always to reinstall the official LEGO MINDSTORMS EV3 Brick firmware when you finish using other programming languages.
Other Program Solutions
Swift Playground - POSSIBLE SOLUTION
/*
As of summer 2017, there is no way to use EV3 Brick’s buttons in Swift playground.
In this example, EV3 Up button has been replaced with touch 2.
Sound file used in this example are not the same has RobotC example
*/

While true
{
ev3.brickLightOn(WithColor: .green inMode: .on)
if ev3.measureUltrasonicCentimeters(on: .four) < 4 && ev3.measureTouch(on : .two)
{
ev3.playSound(file: .hello, atVolume : 100,
WithStyle: .WaitForCompletion)
}
}
ROBOT C: POSSIBLE SOLUTION
Swift Playground - POSSIBLE SOLUTION
/*
As of summer 2017, there is no way to use EV3 Brick’s buttons in Swift playground.
In this example, EV3 buttons has been replaced with touch sensor 1 and touch sensor 2.
Sound file used in this example are not the same has RobotC example
*/

While true
{
ev3.brickLightOn(WithColor: .green inMode: .on)
if ev3.measureUltrasonicCentimeters(on: .four) < 4 && ev3.measureTouch(on : .two) && ev3.measureTouch(on : .one)
{
ev3.playSound(file: .hello, atVolume : 100,
WithStyle: .WaitForCompletion)
}
}
ROBOT C: POSSIBLE SOLUTION
Teacher Support
Students will:
Understand simple Boolean logic (such as AND, OR and NOT) and some of its uses in circuits and programming.
Use several inputs in combination.
NGSS
MS-ETS1-1. / MS-ETS1-2. / MS-ETS1-3. /MS-ETS1-4.
CSTA
2-A-2-1 / 2-A-7-2 / 2-A-7-3 / 2-A-7-4 / 2-A-5-5 / 2-A-5-6 / 2-A-5-7 / 2-A-3-9 / 2-A-6-10 / 2-C-7-11 / 2-C-4-12 / 2-D-5-16 / 2-I-1-20
Student Material
Share with:
 Google Classroom


