クルーズコントロールシステムを作る
乗り物の速度をボタン1つで変更することのできるクルーズコントロールシステムを設計しましょう。
レッスンプラン
(5分)
準備
- こちらの先生向け資料をお読みください。
- 必要に応じて、EV3 ラボソフトウェアまたは EV3 プログラミングアプリに入っている導入用資料を使いながらレッスンを計画します。これにより、生徒が教育版レゴ® マインドストーム® EV3に慣れることができます。
興味付け (30分)
- 「ディスカッションを活性化させる」セクションのアイデアを参考に、生徒の学習への関心を喚起します。
- プロジェクトの説明。
- 生徒にペアを組ませます。
- 生徒にブレインストーミングの時間を与えます。
探求 (30分)
- プロトタイプを複数製作するよう指示します。
- 本体とプログラミングの両方の面で複数のアイデアを試すよう促します。
- 各ペアに2つのアイデアを制作させ、動作をテストさせます。
説明 (60分)
- 生徒に2つのモデルの動作をテストし、優れた方を選ぶよう指示します。
- 構造とプログラミングの両方の面で複数のアイデアを試すよう促します。
- 各ペアがプロジェクトの仕上げをし、作業プロセスを記録するのに必要な資料をまとめる時間を設けます。
仕上げ (60分) - 生徒が最終レポートを作成する時間を設けます。
- 各ペアがクラスの前で成果を発表する発表タイムを設けます。
評価
- それぞれの生徒に取り組みを評価して伝えます。
- 評価の際は、以下に提示するルーブリックを参考にすると良いでしょう。
ディスカッションを活性化させる
(15~30分)
自動車のクルーズコントロール機能は、乗り物の速度を自動的に制御するシステムです。新しいテクノロジーのように思えますが、1958年に初めて導入されました。どのような仕組みなのでしょうか?
活発なブレインストーミングになるよう促します。
生徒に以下の質問について考えてもらいましょう:
- 自動車におけるクルーズコントロールの目的とは何でしょうか?* クルーズコントロールは、長時間運転している人にどのように役立ちますか?
- クルーズコントロールはどこが改善できるでしょうか?
- 運転手はクルーズコントロールシステムのタッチボタンをどのように活用できますか?
- ボタンを押すたびにモーターの速度が変わるようにするには、プログラムにどの要素を取り入れる必要があるでしょうか?
生徒が質問の答えを考える時間を設けてください:
ブレインストーミングで思いついた全てのアイデアと、最初のプロトタイプに選んだアイデア、選んだ理由を記録するよう促します。
このプロジェクトでアイデアの有効性をどのように評価するのかを考え、記録してもらいます。
こうすることで、見直しや修正を行う際にアイデアを評価し、効果的に問題を解決できるかどうかを判断する評価基準として使うことができます。
組み立てのヒント
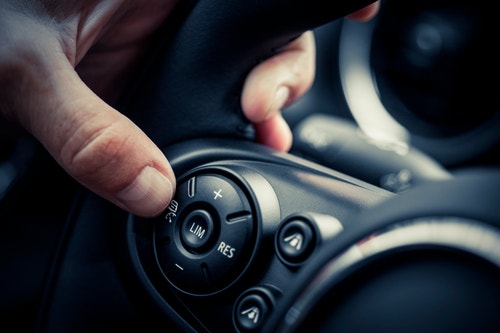
まずは車両ロボットを組み立てます。推奨されている教育版レゴ® マインドストーム® EV3 駆動ベースモデルの中から好きなものを選ぶか、自分で考えたモデルでも構いません。クルーズコントロールのある車のハンドルについているボタンを再現するボタンを2つ設けるようにしてください。
タッチセンサーを2個使う
生徒に、今日のレッスンは2つのタッチセンサーを使って駆動ベースモデルの速度をコントロールしたり維持したりすることだと説明します。
プログラミングのヒント
このプロジェクトでは、変数ブロックを使うことになります。
変数ブロックはデータ(テキスト、ロジック、数値、または配列)を保存することができ、このデータはプログラムが実行されている間はいつでも上書きすることができます。
変数とは、更新できる数値をプログラムに使用する方法です。変数に保存された値は、プログラムが実行している限り、何度も上書きすることができます。変数を使って速度を上げる
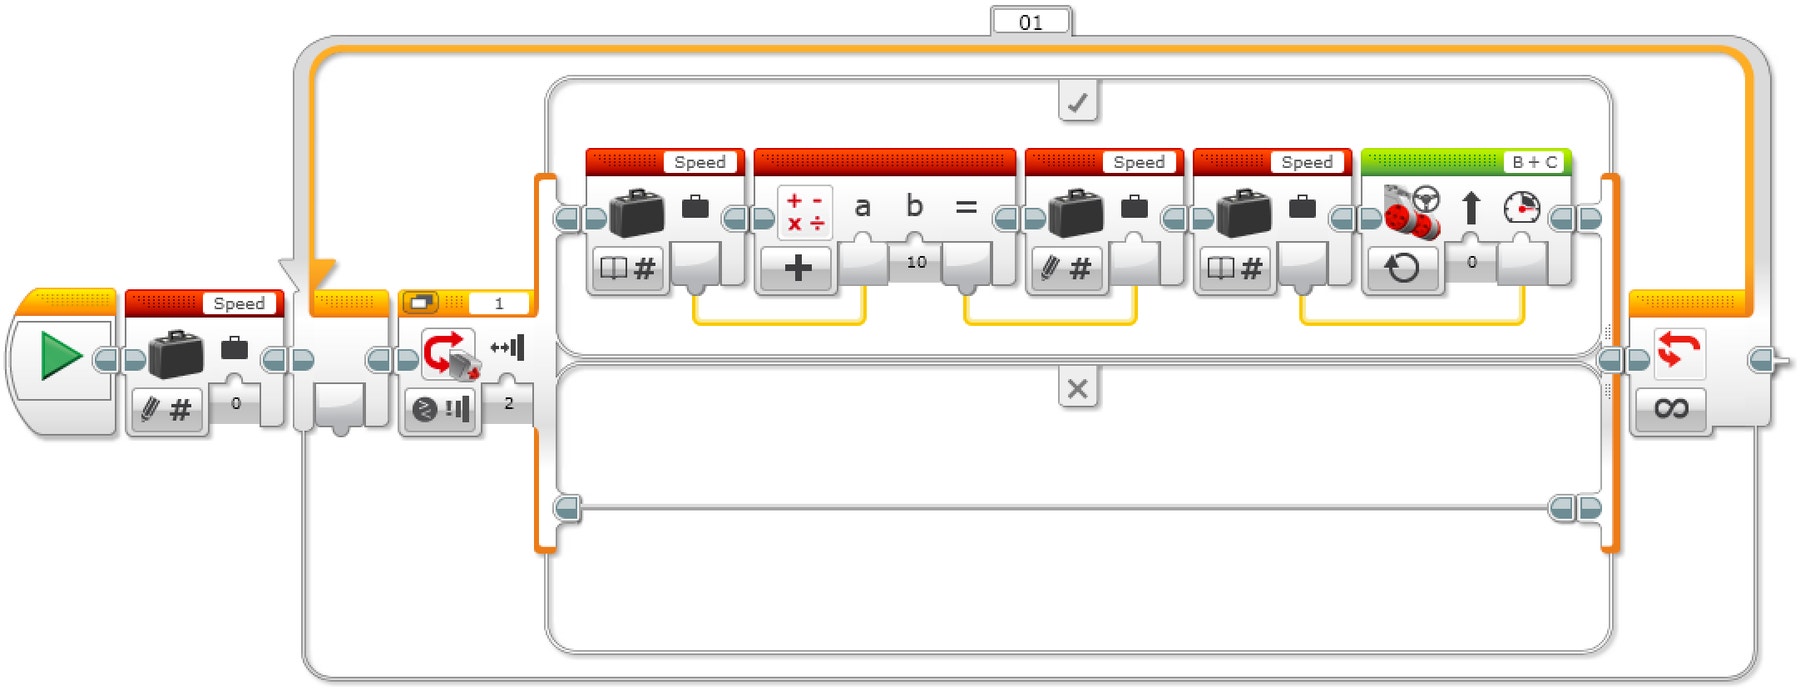
ブログラムの説明
プログラムを開始します。
2.「Speed」という変数ブロックを作成し、0の値を入力します。もしタッチセンサーが押されたら:
a. 変数ブロック「Speed 」の値を読み込みます。
b. 読み取った値に10を足します。
c. 結果の値を変数ブロック「Speed 」に書き込みます。
d. 変数ブロック「Speed 」の値を読み込みます。
e. 変数ブロック「Speed 」に保存されている値が示す速度でモーターBとCを起動します 。ステップ3aから3eを繰り返します。
変数による速度の増加と減少
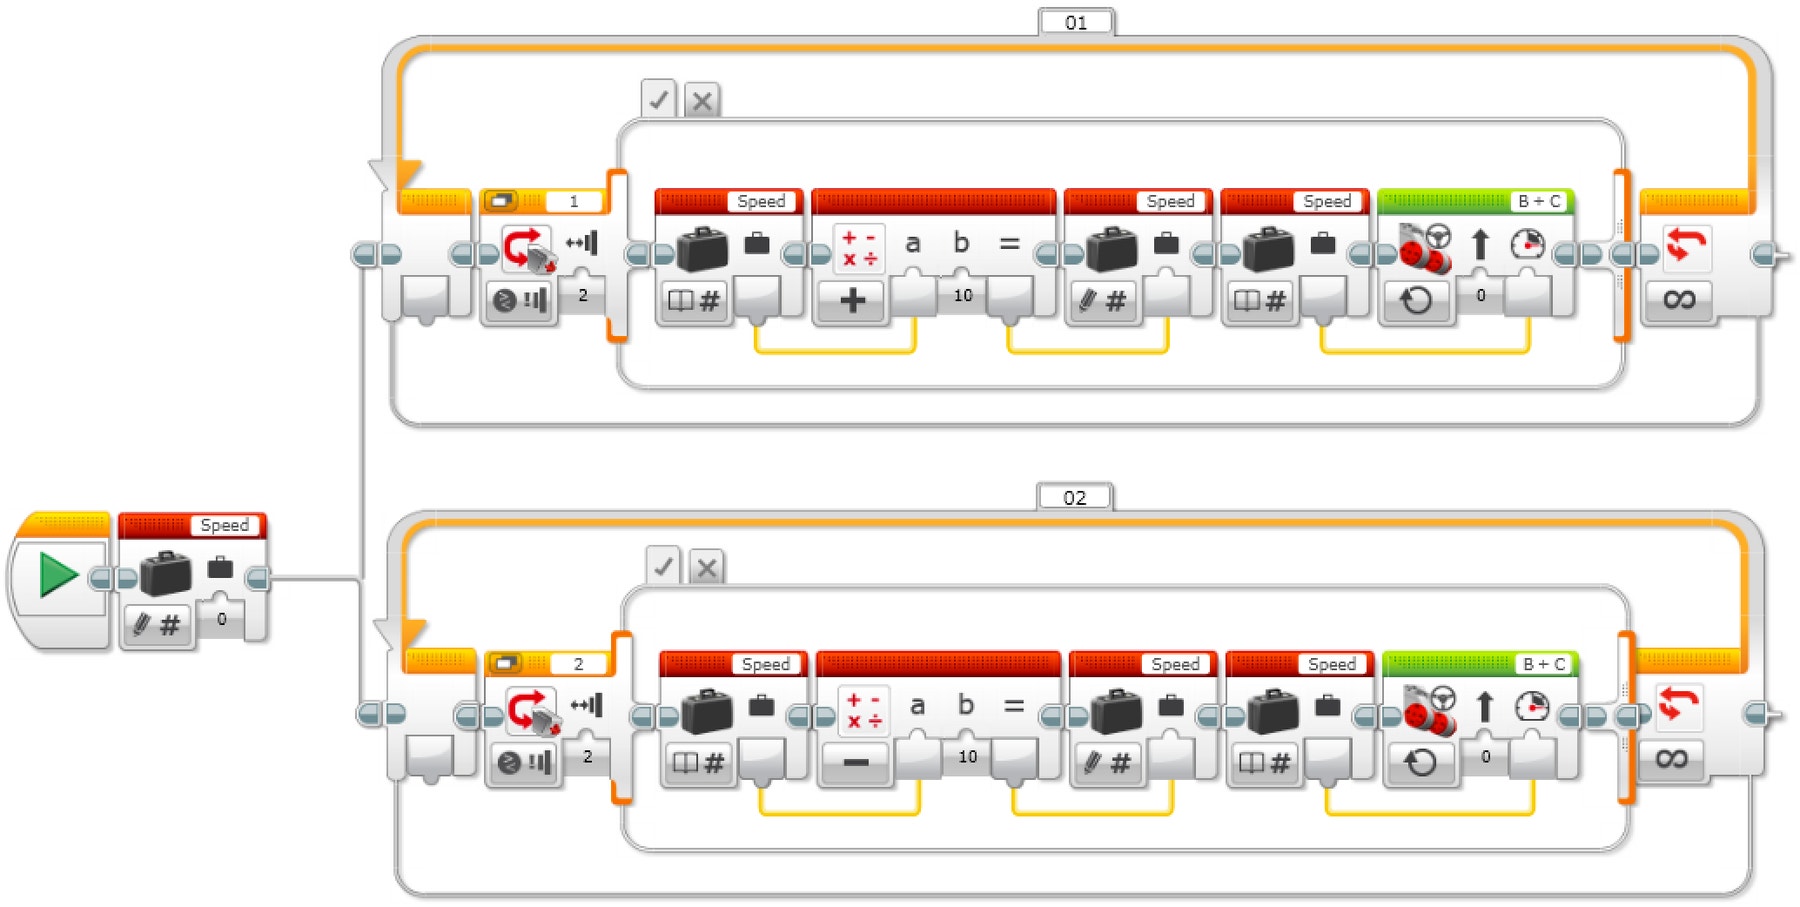
ブログラムの説明
1.プログラムを開始します。
2.変数ブロック「Speed 」を作成し、0の値を入力し、2つのタスクを開始します。
タスク1
3.もしタッチセンサー1が押されたら:a. 変数ブロック「Speed 」の値を読み込みます。
b. 読み取った値に10を足します。
c. 結果の値を変数ブロック「Speed 」に書き込みます。
d. 変数ブロック「Speed 」の値を読み込みます。
e. 変数ブロック「Speed 」に保存されている値が示す速度でモーターBとCを起動します 。
4.ステップ3aから3eを繰り返します。
タスク2
5.もしタッチセンサー2が押されたら:a. 変数ブロック「Speed 」の値を読み込みます。
b. 読み取った値から10を引きます。
c. 結果の値を変数ブロック「Speed 」に書き込みます。
d. 変数ブロック「Speed 」の値を読み込みます。
e. 変数ブロック「Speed 」に保存されている値が示す速度でモーターBとCを起動します 。
- ステップ5aから5eを繰り返します。
変数による速度の増加と減少、速度表示
生徒は表示ブロックを使って駆動ベースの速度を表示させる仕組みを学びます。
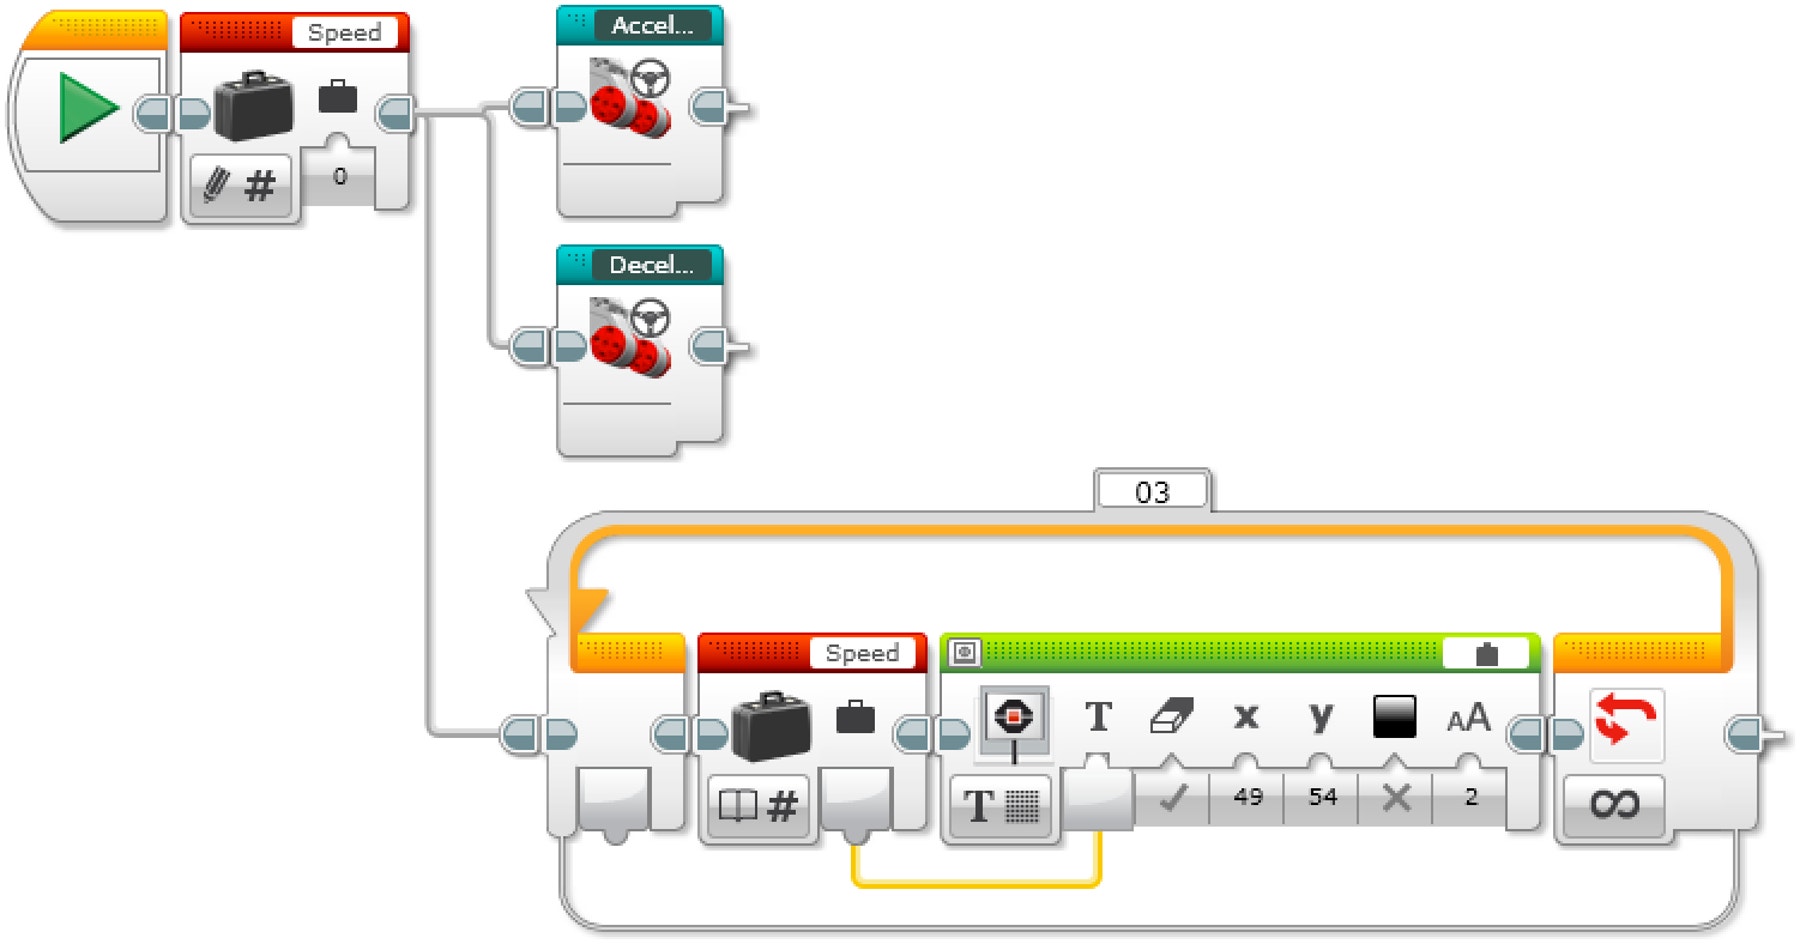
ブログラムの説明
- プログラムを開始します。
- 変数ブロック「Speed 」を作成し、0の値を入力し、3. つのタスクを開始します。
タスク1
3.マイ ブロック「Acceleration 」(加速)を開始します。
タスク2
4.マイ ブロック「Deceleration 」(減速)を開始します。タスク
タスク3
5.変数ブロック「Speed 」の値を読み込みます。
6. 変数ブロック「Speed 」に保存されている値を表示します。
7.ステップ5と6を繰り返します。
EV3 MicroPython プログラム例
変数を使って速度を上げる
#!/usr/bin/env pybricks-micropython

from pybricks import ev3brick as brick
from pybricks.ev3devices import Motor, TouchSensor
from pybricks.parameters import Port, Stop, Button
from pybricks.tools import wait
from pybricks.robotics import DriveBase

# Configure 2 motors with default settings on Ports B and C.  These
# will be the left and right motors of the Driving Base.
left_motor = Motor(Port.B)
right_motor = Motor(Port.C)

# The wheel diameter of the Robot Educator Driving Base is 56 mm.
wheel_diameter = 56

# The axle track is the distance between the centers of each of the
# wheels.  This is 118 mm for the Robot Educator Driving Base.
axle_track = 118

# The Driving Base is comprised of 2 motors.  There is a wheel on each
# motor.  The wheel diameter and axle track values are used to make the
# motors move at the correct speed when you give a drive command.
robot = DriveBase(left_motor, right_motor, wheel_diameter, axle_track)

# Set up the Touch Sensor on Port 1.  It is used to increase the speed
# of the robot.
increase_touch_sensor = TouchSensor(Port.S1)

# Initialize the "old_speed" variable to "None."  It is used to check
# whether the speed variable has changed.  Setting it to "None" ensures
# this check will be "True" when the speed variable is initialized with
# a value.
old_speed = None

# Initialize the speed variable to 0.
speed = 0

# This is the main part of the program.  It is a loop that repeats
# endlessly.
while True:

    # Check whether the Touch Sensor is pressed, and increase the speed
    # variable by 10 mm per second if it is.
    if increase_touch_sensor.pressed():
        speed += 10

    # If the speed variable has changed, update the speed of the robot.
    if speed != old_speed:
        old_speed = speed
        robot.drive(speed, 0)

    # Wait 200 milliseconds before starting the loop again.
    wait(200)
変数による速度の増加と減少
#!/usr/bin/env pybricks-micropython

from pybricks import ev3brick as brick
from pybricks.ev3devices import Motor, TouchSensor
from pybricks.parameters import Port, Stop, Button
from pybricks.tools import wait
from pybricks.robotics import DriveBase

# Configure 2 motors with default settings on Ports B and C.  These
# will be the left and right motors of the Driving Base.
left_motor = Motor(Port.B)
right_motor = Motor(Port.C)

# The wheel diameter of the Robot Educator Driving Base is 56 mm.
wheel_diameter = 56

# The axle track is the distance between the centers of each of the
# wheels.  This is 118 mm for the Robot Educator Driving Base.
axle_track = 118

# The Driving Base is comprised of 2 motors.  There is a wheel on each
# motor.  The wheel diameter and axle track values are used to make the
# motors move at the correct speed when you give a drive command.
robot = DriveBase(left_motor, right_motor, wheel_diameter, axle_track)

# Set up the Touch Sensor on Port 1.  It is used to increase the speed
# of the robot.
increase_touch_sensor = TouchSensor(Port.S1)

# Set up the Touch Sensor on Port 2.  It is used to decrease the speed
# of the robot.
decrease_touch_sensor = TouchSensor(Port.S2)

# Initialize the "old_speed" variable to "None."  It is used to check
# whether the speed variable has changed.  Setting it to "None" ensures
# this check will be "True" when the speed variable is initialized with
# a value.
old_speed = None

# Initialize the speed variable to 0.
speed = 0

# This is the main part of the program.  It is a loop that repeats
# endlessly.
#
# First, increase the speed variable if Touch Sensor 1 is pressed.
# Second, decrease the speed variable if Touch Sensor 2 is pressed.
# Finally, the robot updates its speed if the speed variable was
# changed.
#
# Then the loop starts over after a brief pause.
while True:

    # Check whether Touch Sensor 1 is pressed, and increase the speed
    # variable by 10 mm per second if it is.
    if increase_touch_sensor.pressed():
        speed += 10

    # Check whether Touch Sensor 2 is pressed, and decrease the speed
    # variable by 10 mm per second if it is.
    if decrease_touch_sensor.pressed():
        speed -= 10

    # If the speed variable has changed, update the speed of the robot.
    if speed != old_speed:
        old_speed = speed
        robot.drive(speed, 0)

    # Wait 200 milliseconds before starting the loop again.
    wait(200)
変数による速度の増加と減少、速度表示
#!/usr/bin/env pybricks-micropython

from pybricks import ev3brick as brick
from pybricks.ev3devices import Motor, TouchSensor
from pybricks.parameters import Port, Stop, Button
from pybricks.tools import wait
from pybricks.robotics import DriveBase

# Configure 2 motors with default settings on Ports B and C.  These
# will be the left and right motors of the Driving Base.
left_motor = Motor(Port.B)
right_motor = Motor(Port.C)

# The wheel diameter of the Robot Educator Driving Base is 56 mm.
wheel_diameter = 56

# The axle track is the distance between the centers of each of the
# wheels.  This is 118 mm for the Robot Educator Driving Base.
axle_track = 118

# The Driving Base is comprised of 2 motors.  There is a wheel on each
# motor.  The wheel diameter and axle track values are used to make the
# motors move at the correct speed when you give a drive command.
robot = DriveBase(left_motor, right_motor, wheel_diameter, axle_track)

# Set up the Touch Sensor on Port 1.  It is used to increase the speed
# of the robot.
increase_touch_sensor = TouchSensor(Port.S1)

# Set up the Touch Sensor on Port 2.  It is used to decrease the speed
# of the robot.
decrease_touch_sensor = TouchSensor(Port.S2)

# Initialize the "old_speed" variable to "None."  It is used to check
# whether the speed variable has changed.  Setting it to "None" ensures
# this check will be "True" when the speed variable is initialized with
# a value.
old_speed = None

# Initialize the speed variable to 0.
speed = 0

# This is the main part of the program.  It is a loop that repeats
# endlessly.
#
# First, increase the speed variable if Touch Sensor 1 is pressed.
# Second, decrease the speed variable if Touch Sensor 2 is pressed.
# Finally, the robot updates its speed if the speed variable was
# changed, and displays it on the screen.
#
# Then the loop starts over after a brief pause.
while True:

    # Check whether Touch Sensor 1 is pressed, and increase the speed
    # variable by 10 mm per second if it is.
    if increase_touch_sensor.pressed():
        speed += 10

    # Check whether Touch Sensor 2 is pressed, and decrease the speed
    # variable by 10 mm per second if it is.
    if decrease_touch_sensor.pressed():
        speed -= 10

    # If the speed variable has changed, update the speed of the robot
    # and display the new speed in the center of the screen.
    if speed != old_speed:
        old_speed = speed
        robot.drive(speed, 0)
        brick.display.clear()
        brick.display.text(speed, (85, 70))

    # Wait 200 milliseconds before starting the loop again.
    wait(200)
発展課題
(35分)
国語の発展課題
オプション 1
言語能力を発達させるために、生徒に以下のタスクに取り組んでもらいます:
- 文章やスケッチ、写真などを使って設計プロセスの概要をまとめ、最終レポートを作成する。
- 最初のアイデアから完成モデルまで、設計プロセスを解説するビデオを作成する。
- 自分たちのプログラムについてのプレゼンテーションを作成する。
- 自分たちのプロジェクトを、同じようなシステムを使った実社会での実用例と比較しながら、制作したモデルをもとに開発できる新しい発明品を発表するプレゼンテーションを作成する。
オプション 2
このレッスンではクルーズコントロールシステムを制作しました。車両の速度データを収集して交通状態を報告し、交通事故のリスク削減に役立てている人や調査会社もあります。
言語能力を発達させるために、生徒に以下のタスクに取り組んでもらいます:
- 個人や調査会社によって車両の速度データを収集し、交通安全を監視する方法は、交通事故の可能性を効果的に削減することができるという主張を支持する論拠を述べる。
- この方法は個人情報の重大なプライバシー侵害であるという反対意見に反論し、具体的な証拠を用いて賛成論と反対論の強みと弱みを比較する。
数学の発展課題
このレッスンではクルーズコントロールシステムを制作しました。人間の運転手は道路の状態を判断し、それに応じて速度を変更する能力にたけています。ですが、自動運転車両の場合はトレーニングが必要です。
数学スキルの向上を取り入れ、自動運転車両に使用されている人工知能を詳しく取り上げたい場合は、以下の課題に取り組ませてください:
- 道路の状態と、それが車両の操作や性能に与える影響との関係性を特定するために分析するべき様々な変数について考える。
- 前のステップで挙げた変数の中から道路の状態を表す数学的モデルに含めるものを3~4つ選び、データ表を作成して、これらの変数と車両の最適な速度との関係性を整理する。
- 自動運転車両では、道路の状態を表す変数と車両速度との関係性を機械学習プロセスを用いて特定・更新している点をふまえ、乾燥している状態、濡れている状態、雪が積もっている状態の道路を表す変数を特定し、これらの変数と安全な速度との関係を予測する(乾燥している道路を示す変数は道路の粗度、など)。
学習評価
(45分)
この学習におけるルーブリックの例
次のルーブリックを参考に、評価規準や判定基準を作成します。
1.課題を部分的にこなした。
2.課題を十分にこなした。
3.期待を上回る達成度であった。
以下の成功基準を使用して、生徒の達成度を評価します。
- 問題の重要な要素を見出すことができる。
- 自主的に、実用的で独創的な解決方法を開発している。
- 自分のアイディアを明確に伝えることができる。
自己評価
生徒たちが製作した装置の動きのデータをある程度収集できたら、自分たちの解決方法について考察するよう促します。以下のような質問をするとよいでしょう:
- あなたの解決方法は課題設定の条件を満たしていますか?
- ロボットの動作をさらに正確にすることはできますか?
- クラスメートはどのような方法で問題を解決しましたか?解決方法を改善する方法を2つ考えて記録するよう促してください。
生徒同士のフィードバック
フィードバックの時間を設け、各グループに、自分たちのプロジェクトとほかのグループのプロジェクトを評価させます。相互評価は建設的なフィードバックをするスキルだけでなく、物事を分析するスキルや、自分の意見の根拠として客観的なデータを使う力を育てるのに役立ちます。
職業適性
この授業を楽しむことができた生徒は、以下の進路について興味がある可能性があります。
- 起業家
- システム建築エンジニア
教師用サポート
学習内容:設計プロセスを応用して実生活に基づいた問題を解決する
情報(共通教科):
情報Ⅰ 2-(3)コンピュータとプログラミング
情報Ⅱ 2-(3)情報とデータサイエンス
2-(4)情報システムとプログラミング
2-(5)情報と情報技術を活用した問題発見・解決の探求
数学:数学A 2-(3)数学と人間の活動
数学B 2-(3)数学と社会生活
数学C 2-(3)数学的な表現の工夫
理科:科学と人間生活 2-(1)科学技術の発展
物理基礎 2-(1)物体の運動とエネルギー
2-(2)-(オ)物理学が拓く世界
物理 2-(1)様々な運動
2-(3)電気と磁気
理数:理数探求基礎 2-ア〜イ、
理数探求 2-ア〜イ
工業:第1 工業技術基礎〜第28コンピュータシステム技術
情報(専門教科):情報産業と社会、課題研究、情報の表現と管理、情報テクノロジー、情報システムのプログラミング、情報デザイン、コンテンツの制作と発信、情報実習
国語:現代の国語 [知識及び技能] 2-(2)話や文章に含まれている情報の扱い方
[思考力、判断力、表現力等] A話すこと・聞くこと、B書くこと
論理国語
国語表現 [知識及び技能] 2-(1)-エ、
[思考力、判断力、表現力等] A話すこと・聞くこと-(2)-オ、
B書くこと-(2)-イ、ウ
美術:美術Ⅰ〜Ⅲ 2-A-(2)デザイン、(3)映像メディア表現
総合的な探求の時間
文部科学省高等学校学習指導要領(平成30年告知)
http://www.mext.go.jp/a_menu/shotou/new-cs/1407074.htm
生徒用資料
以下でシェア:
 Google Classroom


