
- トラブルシューティング - 接続方法
SPIKE™ プライムハブに接続する
SPIKE™プライムの初心者ですか?
まず始めに、デバイスにSPIKE プライムハブを接続しましょう。
AndroidとChromeOS
Bluetoothで接続
- デバイスの設定で、必ずBluetoothをオンにしてください。
2.SPIKE™ アプリでプロジェクトを作成、または開く
- プログラミング キャンバスのハブアイコンをクリックするか、タップする。
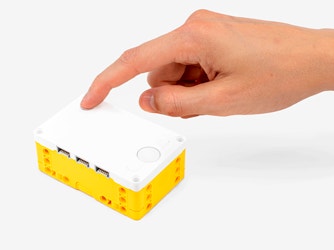
- ハブのセンターボタンを長押しして、ハブをオンにします。
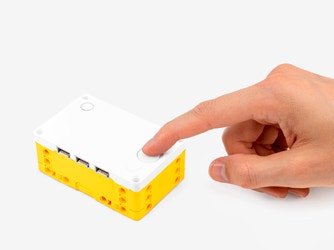
- ハブのBluetoothボタンを押してBluetoothを有効にします。
- ハブが、使用可能なハブのリストに表示されるのを待ちます。新しいハブの場合は、任意の名前を与えるまで、初期設定の名前「LEGO Hub」が表示されます。
- ハブの下の「接続」ボタンをクリックするかタップし、ハブを接続します。デバイスやOSによっては、ペアリングの認証が必要な場合があります。以上です!これで、ハブにBluetoothアイコン
が表示され、音が鳴り、接続の成功を知らせてくれます。
iOS と iPadOS
Bluetoothで接続
デバイスの設定で、必ずBluetoothをオンにしてください。
SPIKE™ アプリでプロジェクトを作成、または開く
プログラミング キャンバスのハブアイコンをクリックするか、タップする。
- ハブのセンターボタンを長押しして、ハブをオンにします。
- ハブのBluetoothボタンを押してBluetoothを有効にします。
- ハブが、アクセサリーリストに表示されるのを待ちます。ハブは最初「Toy」と表示される場合がありますが、最終的には「LEGO®Hub」と表示されます。新しいハブの場合は、任意の名前を与えるまで、初期設定の名前「LEGO Hub」と表示されます。
- ハブの名前をクリックするかタップし、接続開始します。以上です!これで、ハブにBluetoothアイコンが表示され、音が鳴り、接続の成功を知らせてくれます。
MacOS
Bluetoothで接続
デバイスの設定で、必ずBluetoothをオンにしてください。
SPIKE™ アプリでプロジェクトを作成、または開く
プログラミング キャンバスのハブアイコンをクリックするか、タップする。
- ハブのセンターボタンを長押ししてハブをオンにします。
- ハブのBluetoothボタンを押してBluetoothを有効にします。
- ハブが、Bluetooth リストに表示されるのを待ちます。新しいハブの場合は、任意の名前を与えるまで、初期設定の名前「LEGO Hub」が表示されます。
ハブの名前の横にある「接続」ボタンをクリックするかタップし、ハブを接続開始します。
「選択」ボタンをクリックするか、タップし、確定します。以上です!これで、ハブにBluetoothアイコンが表示され、音が鳴り、接続の成功を知らせてくれます。
Windows
Bluetoothで接続
デバイスの設定で、必ずBluetoothをオンにしてください。
SPIKE™ アプリでプロジェクトを作成、または開く
プログラミング キャンバスのハブアイコンをクリックするか、タップする。
- ハブのセンターボタンを長押ししてハブをオンにします。
- ハブのBluetoothボタンを押してBluetoothを有効にします。
- ハブが、使用可能なハブのリストに表示されるのを待ちます。新しいハブの場合は、任意の名前を与えるまで、初期設定の名前「LEGO Hub」が表示されます。
ハブの下の「接続」ボタンをクリックするかタップし、接続します。
初回接続時には、そのハブをデバイスとして追加するかを確認するWindowsの通知が表示されます。通知をクリックし、ペアリングして下さい。
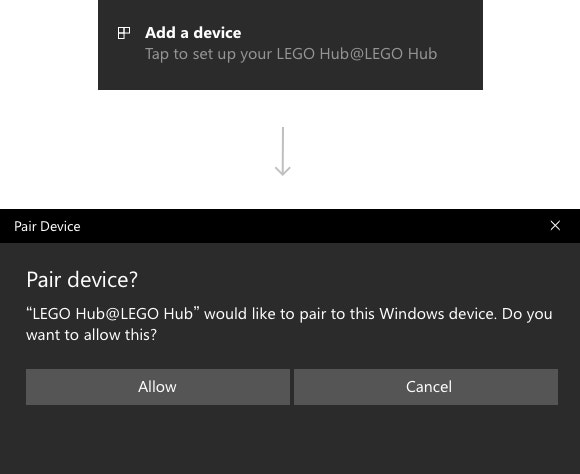
以上です!これで、ハブにBluetoothアイコンが表示され、音が鳴り、接続の成功を知らせてくれます。


