Make a System That Manufactures
Design, build and program a robotic system that draws a pattern, performs the task accurately and is able to repeat the task.
Connect
(30 minutes)
Use this video to:
- Connect students to real-life robotic systems
- Consider how robotic systems are made up of smaller subsystems
- Inspire students to create their own robotic systems
Make a System Discussion
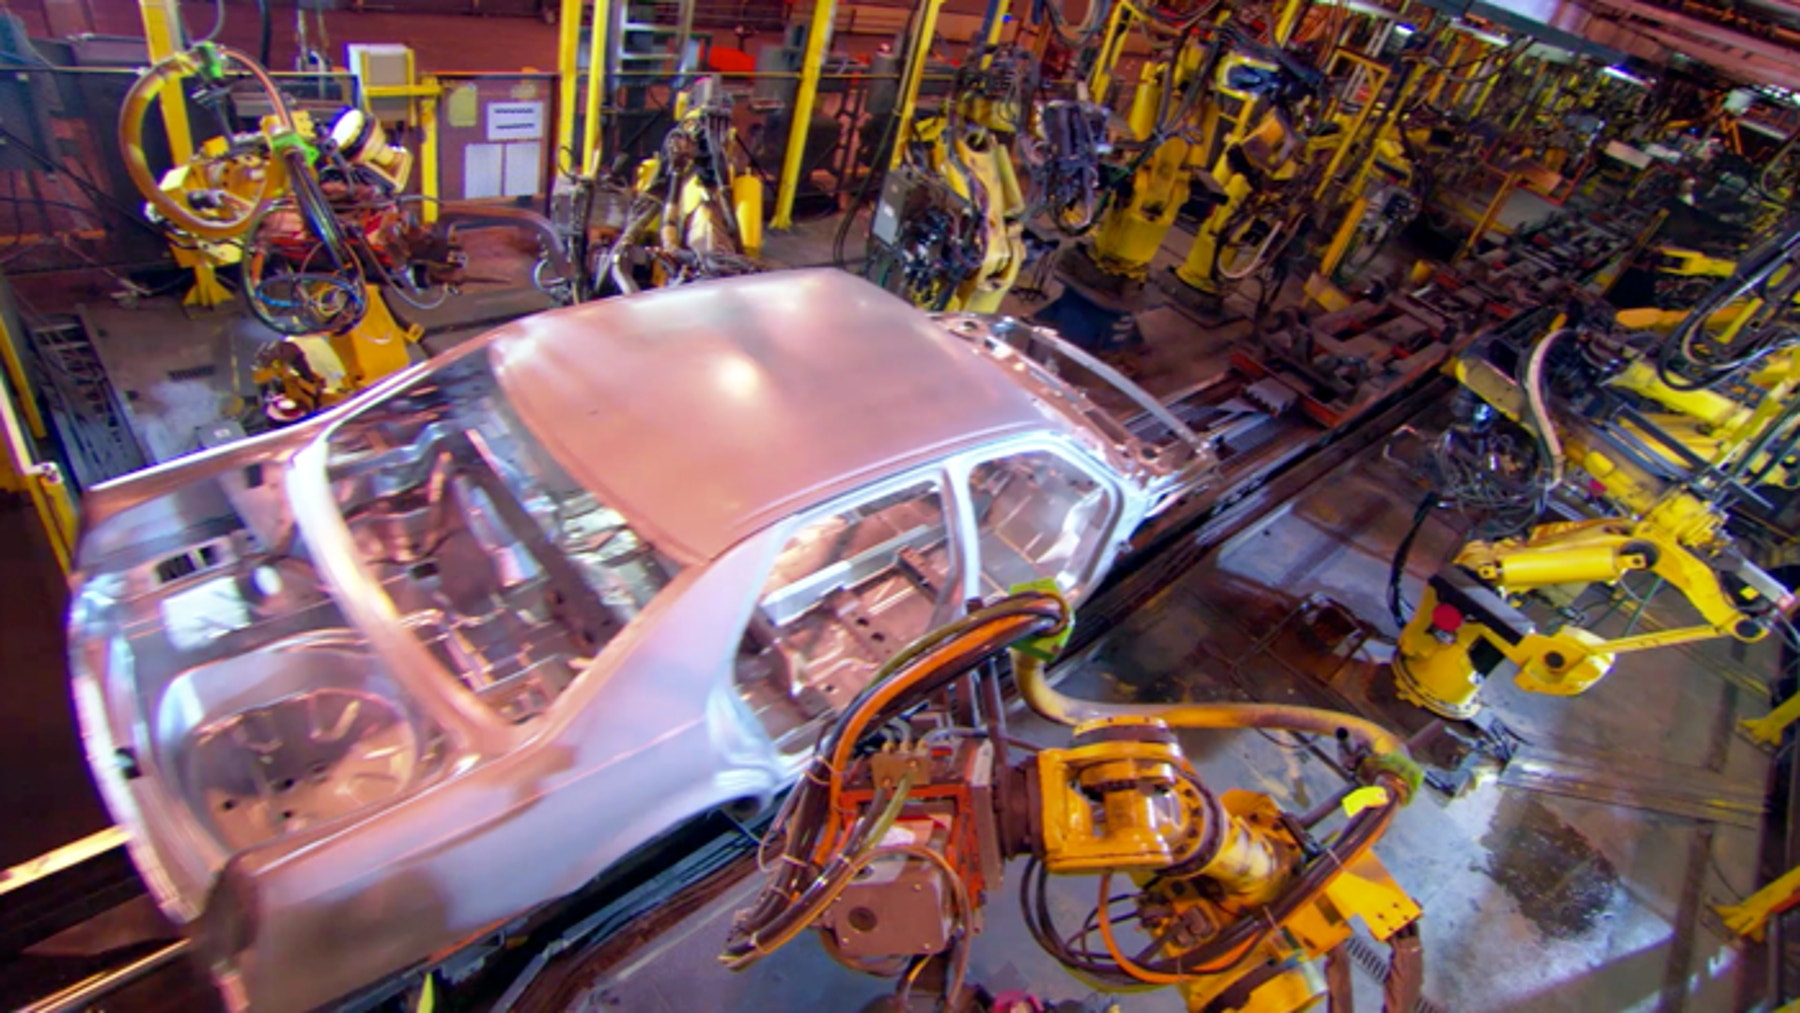
Robotic systems are built from smaller, related subsystems. Look at the automobile system shown in the video. What subsystems can you see?
Answers can vary but may include describing the automobile manufacturing system with one subsystem for moving the car into position and multiple robotic subsystems welding components on different parts of the car.What other systems and subsystems do you see in the video?
Answers may vary but may include describing the box-sorting conveyor system that separates boxes of different sizes. This system has two conveyor lines: one for larger boxes and one for smaller boxes. There is also a more complex sorting system that manages a larger volume of boxes and many more possible locations using multiple sorting arms and conveyors.
Design Brief
Design, build, and program a robotic system that draws a pattern, performs the task accurately and is able to repeat the task.
Brainstorm
Encourage an active brainstorming process so that students develop their conceptual understanding. For example, encourage them to:
- Review the Robots In Action videos showing robots for inspiration
- Investigate Key Concepts Systems and Subsystems
- Build some of the examples from Building Ideas and explore how they work
- Personalize their robot or describe a context in which a robot moves other objects (e.g., robot arm and other robots in the Logistics video).
Building Ideas:
Select the Best Solution
Describe the solution that you have agreed to build and program.
Think about examples from your brainstorming discussion. Then explain why you chose this solution for the design brief. Encourage students to describe why they have chosen this solution. That way, when students are reviewing and revising, they will have specific information to use to evaluate their solution and decide whether or not it was effective.
Construct
(30 minutes)
Build and Program
Start building and programming your solution!
As you work on your solution, make sure students keep track of:
- Describe one part of your design that worked especially well.
- Describe one design change that you had to make.
- What will you try next?
Students can use images, video, text, sound, or weblinks to document their work.
Test Set Up and Procedure
Materials needed: Large sheet of graph paper or paper with gridlines, colored pencils (3 or more different colors).
- If your paper needs gridlines, add them to the paper so that you can identify 1cm x 1cm squares.
- Position your robot on the paper and mark the edges so you can keep it in the same position.
- Run your program.
- The robot marks the paper, moving the pen to draw the pattern.
- Run the program at least two more times.
- Compare the three sets of marks. How close together are they?
Depending on the students’ skill level, they can use Cartesian coordinates to indicate the expected and actual coordinates (e.g., Expected (x, y) Actual (x1-5, y1-2)). You could even identify a Cartesian system on the graph paper and get very specific describing the range of motion, depending on the type of robot that they students created. For other solutions, polar coordinates may be more appropriate.
Contemplate
(30 minutes)
Test and Analyze
How well does your solution satisfy the design brief?
Use a table to record data. Name the columns and rows, such as Trial Number, Expected position, Actual position, Difference in cm and What will you change?
Review and Revise
Take a moment to reflect on your robot solution.
- Can the robot movement be made more accurate?
- What are some ways that others have solved the problem?
Encourage students to look back at the design brief and at their own brainstorming notes and test data. Encourage a peer-review process so that each group is responsible for evaluating their own and others’ projects. This review process can help students develop skills in giving constructive feedback as well as sharpening analysis skills and the use of objective data to support an argument.
You may wish to provide students with the specific precision level to aim for (e.g., within 0.5 cm).
Communicate
Here are some ideas to suggest to students:
- Create a video of your project, especially your final presentation and your robot’s performance.
- Explain some important features of your software program.
- Produce a building guide for your model by taking a series of photographs as you deconstruct it.
- Include an image of your program with comments.
- Add a team photograph
Evaluate Design and NGSS Goals
You can use the included rubrics to evaluate skills progression of Design Engineering Projects.
- Students can review their design goals as well as their use of some NGSS practices using the provided rubric. Students can rate their level of work by adding a mark below the Bronze, Silver, Gold, or Platinum column.
- You may also choose to use the rubric to rate each team or student yourself.
Evaluate Creativity and Collaboration
Students can review their creative and collaboration processes using the provided rubric.
You may also choose to use the rubric to rate each team or student yourself.
Continue
(30 minutes)
Communicate
Here are some ideas to suggest to students:
- Create a video of your project, especially your final presentation and your robot’s performance.
- Explain some important features of your software program.
- Produce a building guide for your model by taking a series of photographs as you deconstruct it.
- Include an image of your program with comments.
- Add a team photograph
Evaluate Design and NGSS Goals
You can use the included rubrics to evaluate skills progression of Design Engineering Projects.
- Students can review their design goals as well as their use of some NGSS practices using the provided rubric. Students can rate their level of work by adding a mark below the Bronze, Silver, Gold, or Platinum column.
- You may also choose to use the rubric to rate each team or student yourself.
Evaluate Creativity and Collaboration
Students can review their creative and collaboration processes using the provided rubric.
You may also choose to use the rubric to rate each team or student yourself.
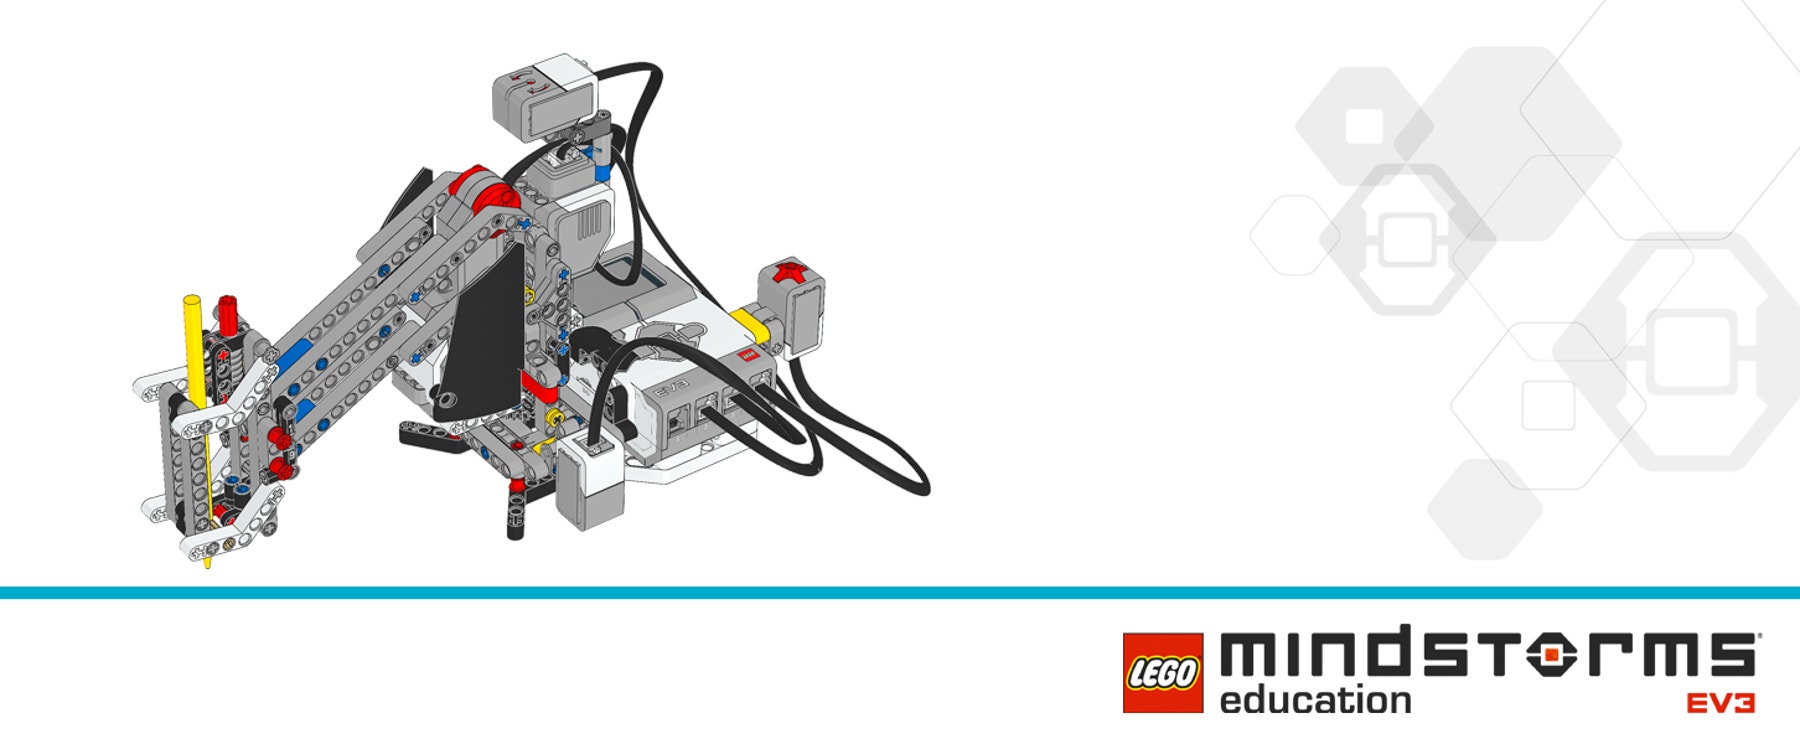
Sample Solution Overview
The Pen Arm Solution is one example of many possible solutions for the Make a System That Manufactures project.

Sample Solution Building Ideas
This Pen Arm Solution combines these Building Ideas: Seesaw, Color Sensor 1, Pen Holder, Gyro Sensor, Touch Sensor, and Turntable.
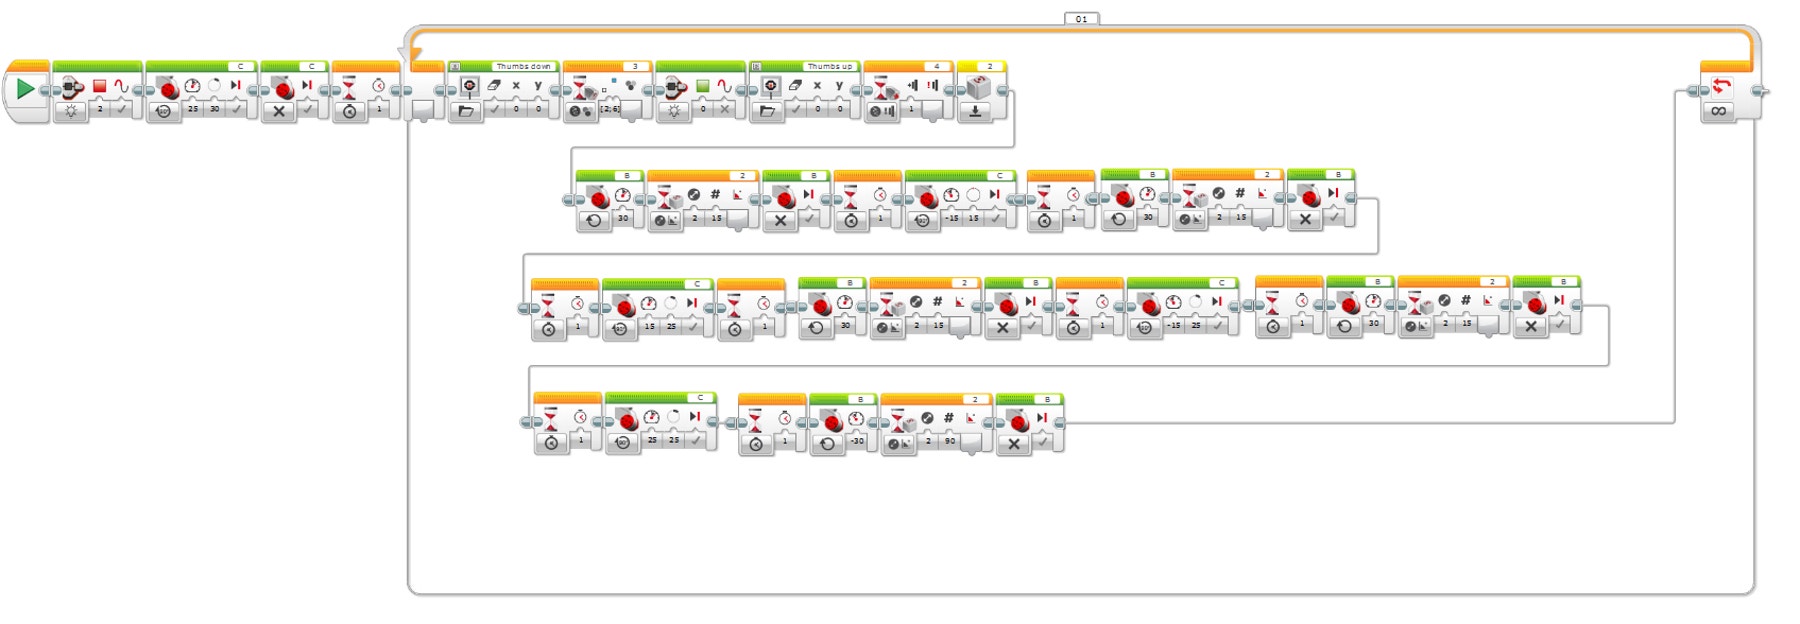
Sample Solution Program
This program:
- Turns on the red light
- Turns on the Turntable Motor C so the arm lifts up
- Turns off Motor C
- Waits 1 second
- Displays Thumbs Down
- Waits for the Color Sensor to see either white or blue paper
- Turns on the green light
- Displays Thumbs Down
- Waits for the Touch Sensor to be pressed
- Resets the Gyro Sensor to zero
- Turns on Motor B
- Waits for the Gyro Sensor to see its first location
- Turns off Motor B
- Waits for 1 second
- Turns on Motor C to lower the pen
- Waits for 1 second
- Turns on Motor B to draw the line
- Waits until the Gyro Sensor sees the end of the line position
- Turns off Motor B
- Waits for 1 second
- Turns on Motor C to lift the pen
- Waits for 1 second
- Turns on Motor B to move without drawing
- Waits until the Gyro Sensor sees the end of the line position
- Turns off Motor B
- Waits for 1 second
- Turns on Motor C to lower the pen
- Waits for 1 second
- Turns on Motor B to draw a line
- Waits until the Gyro Sensor sees the end of the line position
- Turns off Motor B
- Waits for 1 second
- Turns on Motor C to lift the pen
- Waits for 1 second
- Turns on Motor B to move without drawing
- Waits until the Gyro Sensor sees the end of the line position
- Turns off Motor B
Teacher Support
Students will:
• Understand that larger systems can be made from smaller systems or subsystems
• Understand that sensor feedback can be used to control systems
• Understand that robots that perform tasks accurately and create a product are examples of manufacturing technology
• Write a program to control the drawing of a pattern at least twice using feedback to maximize accuracy and reliability
LEGO® MINDSTORMS Education EV3 Core Set
LEGO® MINDSTORMS Education EV3 Lab or EV3 Programming
Prerequisites
Students should know how to create and download a program, and how to program a motor. Students should also know how to use sensors for feedback.
Common Core Science
Practices
1.1, 1.2, 1.3, 1.6, 1.8
Cross-cutting Concepts
2.1, 2.4
Core Ideas: Engineering, Technology and Application of Science
3.ETS.1
Common Core Mathematics
Practices
1.1, 1.2, 1.4, 1.5, 1.6
ITEEA Standards for Technological Literacy
Design
8, 9, 10
Abilities for a Technological World
11, 13
The Designed World
16
ISTE National Education Technology Standards
1a, 1b, 1c, 2b, 2d, 3a, 3d, 4a, 4b, 4c, 6a, 6c, 6d


